
Owner's Manual

10
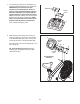
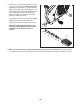
12. Make sure that all parts are properly tightened before you use the exercise bike. Note: After assembly
is completed, some extra parts may be left over. Place a mat beneath the exercise bike to protect the floor.
11
2
3
26
68
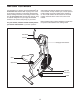
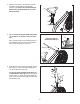
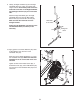
11. Remove the 1/2" Pedal Nut (68) from the shaft
of one of the Pedals (23). See the lower draw-
ing. Make sure that there is a Custom Washer
(
86), a Pedal Spring (42), a Blue Washer (71), a
Pedal Bushing (43), a Black Pedal Washer (79),
a
nd a Pedal Spacer (44) on the shaft of the
Pedal. In addition, make sure that the Pedal
Bushing is oriented as shown.
Firmly tighten the shaft of the Pedal (23) clock-
wise into the right Crank Arm (26). Then,
tighten the 1/2" Pedal Nut (68) onto the shaft.
Attach the other Pedal (not shown) in the
same way. Firmly tighten the Pedal counter-
clockwise into the left Crank Arm (not
shown).
23
68
42
71
43
79
44
86