Model No. 831.21641.1 Serial No. BIKE EXERCISER User’s Manual Serial Number Decal • Assembly • Operation • Maintenance • Part List and Drawing CAUTION Read all precautions and instructions in this manual before using this equipment. Keep this manual for future reference. Sears, Roebuck and Co.
TABLE OF CONTENTS IMPORTANT PRECAUTIONS . . . . . . . . . . . . . . . . . . . . . . . . . . . . . . . . . . . . . . . . . . . . . . . . . . . . . . . . . . . . . . . .2 BEFORE YOU BEGIN . . . . . . . . . . . . . . . . . . . . . . . . . . . . . . . . . . . . . . . . . . . . . . . . . . . . . . . . . . . . . . . . . . . . . .3 ASSEMBLY . . . . . . . . . . . . . . . . . . . . . . . . . . . . . . . . . . . . . . . . . . . . . . . . . . . . . . . . . . . . . . . . . . . . . . . . . . . . . . .
BEFORE YOU BEGIN Congratulations for selecting the new PROFORM® XP 100 U exercise cycle. Cycling is one of the most effective exercises for increasing cardiovascular fitness, building endurance, and toning the entire body. The XP 100 U exercise cycle offers a selection of features designed to let you enjoy this healthful exercise in the convenience and privacy of your home. after reading this manual, please call 1-800-4-MYHOME® (1-800-469-4663).
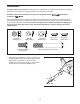
ASSEMBLY Assembly requires two persons. Place all parts of the exercise cycle in a cleared area and remove the packing materials. Do not dispose of the packing materials until assembly is completed. Assembly requires the included tools and your own adjustable wrench screwdriver . and Phillips Use the part drawings below to identify the small parts used in assembly. The number in parentheses below each drawing refers to the key number of the part, from the PART LIST on page 18.
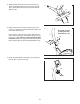
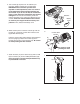
2. While another person lifts the rear of the Frame (1), attach the Rear Stabilizer (14) to the Frame with two M10 x 73mm Button Screws (33) and two M10 Split Washers (34). 2 14 1 34 34 3. While another person holds the Upright (3) near the Frame (1), connect the Upper Wire Harness (32) to the Lower Wire Harness (31). 3 Gently pull the upper end of the Upper Wire Harness (32) to remove the slack, and slide the Upright (3) onto the Frame (1). Be careful to avoid pinching the Wire Harnesses.
5. The Console (6) requires four “D” batteries (not included); alkaline batteries are recommended. IMPORTANT: If the exercise cycle has been exposed to cold temperatures, allow it to warm to room temperature before inserting batteries into the Console. If you do not do this, the console displays or other electronic components may become damaged. Press the tab on the battery cover and remove the battery cover.
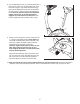
8. Turn the Adjustment Knob (11) counterclockwise two or three turns to loosen it (if the Adjustment Knob is not loosened enough, it may scratch the Seat Post [5]). Next, pull the Adjustment Knob, insert the Seat Post into the Frame (1), and then release the Adjustment Knob. Move the Seat Post upward and downward slightly until the pin on the Adjustment Knob engages one of the holes in the Seat Post. Then, turn the Adjustment Knob clockwise until it is tight. 8 5 1 9.
HOW TO OPERATE THE EXERCISE CYCLE HOW TO ADJUST THE SEAT HOW TO ADJUST THE PEDAL STRAPS For effective exercise, the seat Seat should be at the proper height. As Adjustment you pedal, there Knob should be a slight Seat bend in your knees Post when the pedals are in the lowest position. To adjust the height of the seat, first turn the adjustment knob counterclockwise two or three turns to loosen it (if the knob is not loosened enough, it may scratch the seat post).
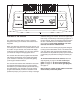
FEATURES OF THE CONSOLE exercises during your workout. Choose an upper body, lower body, or whole body cross training program for a focused workout. Note: The strength exercises require the use of dumbbells and an inflatable exercise ball (not included). To purchase dumbbells or an exercise ball, call toll-free 1-888-533-1333. The advanced console offers an array of features designed to make your workouts more effective and enjoyable.
The center of the display—When you select the manual mode, the center of the display will show a track that represents 1/4 mile. As you exercise, indicators will appear in succession around the track until the entire track appears. The track will then disappear and the indicators will again begin to appear in succession. HOW TO USE THE MANUAL MODE 1 Press any button or begin pedaling to turn on the console. 2 Select the manual mode. 3 4 A moment after you turn on the console, the display will light.
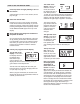
5 6 Measure your heart rate if desired. If there are sheets of clear plastic on Metal Contacts the metal contacts on the handgrip pulse sensor, remove the plastic. To measure your heart rate, hold the handgrip pulse sensor with your palms resting against the metal contacts. Avoid moving your hands or gripping the contacts too tightly. Turn on the fan if desired. To turn on the fan at high speed, press the Fan button. To turn on the fan at low speed, press the button a second time.
As you exercise, you will be prompted to keep your pedaling pace near the target pace setting for the current segment. When the words PEDAL FASTER appear in the display, increase your pace. When the words PEDAL SLOWER appear, decrease your pace. When the words PEDALING IN RANGE appear, maintain your current pace. HOW TO USE A TRAINER PROGRAM 1 Press any button or begin pedaling to turn on the console. 2 Select a trainer program. A moment after you turn on the console, the display will light.
Important: The target pace settings are intended only to provide motivation. Your actual pace may be slower than the target pace settings. Make sure to pedal at a pace that is comfortable for you. HOW TO USE A CROSS TRAINING PROGRAM 1 Press any button or begin pedaling to turn on the console. 2 Select a cross training program. A moment after you turn on the console, the display will light.
5 6 Continue the cross training program. When you have performed the recommended number of repetitions, the words START PEDALING will appear in the display. To continue the cross training program, step onto the exercise cycle and start pedaling. The pedals will automatically adjust to the resistance level for the next segment. 7 8 9 The program will continue in this way until the last segment ends. Then, the words PROGRAM DONE will appear in the display. 14 Follow your progress with the display.
Important: The target pace settings are intended only to provide motivation. Your actual pace may be slower than the target pace settings. Make sure to pedal at a pace that is comfortable for you. Note: If you manually override the resistance levels of a calorie goal program, you might not reach your calorie goal. HOW TO USE A CALORIE GOAL PROGRAM 1 Press any button or begin pedaling to turn on the console. 2 Select one of the calorie goal programs.
MAINTENANCE AND TROUBLESHOOTING Inspect and properly tighten all parts of the exercise cycle regularly. Replace any worn parts immediately. Next, remove the screws from the left and right side shields. Note: There are two different sizes of screws in the side shields. Make sure to note the location of each screw. Then, carefully remove the side shields. To clean the exercise cycle, use a damp cloth and a small amount of mild soap—never use alcohol, abrasives, or chemicals to clean the exercise cycle.
CONDITIONING GUIDELINES The following guidelines will help you to plan your exercise program. Remember that proper nutrition and adequate rest are essential for successful results. WARNING: Before beginning this or any exercise program, consult your physician. This is especially important for persons over the age of 35 or persons with pre-existing health problems. During the first few minutes of exercise, your body uses easily accessible carbohydrate calories for energy.
PART LIST—Model No. 831.21641.1 Key No. Qty. 1 2 3 4 5 6 7 8 9 10 11 12 13 14 15 16 17 18 19 20 21 22 23 24 25 1 1 1 4 1 1 1 1 5 1 1 1 1 1 2 1 1 1 1 1 1 1 1 1 2 Description Frame Front Stabilizer Upright Endcap Seat Post Console Eddy Mechanism Resistance Motor M5 x 12mm Screw Resistance Cable Adjustment Knob Seat Pulley/Crank Rear Stabilizer M4 x 15mm Screw Magnet Left Side Shield Right Side Shield Spring Seat Post Bushing Reed Switch/Wire Clamp Belt Left Pedal Pedal Strap R0307A Key No. Qty.
EXPLODED DRAWING—Model No. 831.21641.
Get it fixed, at your home or ours! Your Home For repair—in your home—of all major brand appliances, lawn and garden equipment, or heating and cooling systems, no matter who made it, no matter who sold it! For the replacement parts, accessories, and user’s manuals that you need to do-it-yourself. For Sears professional installation of home appliances and items like garage door openers and water heaters. 1-800-4-MY-HOME® (1-800-469-4663) Call anytime, day or night (U.S.A. and Canada) www.sears.com www.