Patent Pending Model No. 831.21522.1 Serial No. Write the serial number in the space above for reference. BIKE EXERCISER User’s Manual Serial Number Decal (beneath stabilizer) • Assembly • Operation • Maintenance • Part List and Drawing CAUTION Read all precautions and instructions in this manual before using this equipment. Keep this manual for future reference. Sears, Roebuck and Co.
TABLE OF CONTENTS IMPORTANT PRECAUTIONS . . . . . . . . . . . . . . . . . . . . . . . . . . . . . . . . . . . . . . . . . . . . . . . . . . . . . . . . . . . . . . . .2 BEFORE YOU BEGIN . . . . . . . . . . . . . . . . . . . . . . . . . . . . . . . . . . . . . . . . . . . . . . . . . . . . . . . . . . . . . . . . . . . . . .3 ASSEMBLY . . . . . . . . . . . . . . . . . . . . . . . . . . . . . . . . . . . . . . . . . . . . . . . . . . . . . . . . . . . . . . . . . . . . . . . . . . . . . . .
BEFORE YOU BEGIN Congratulations on selecting the new PROFORM® XP after reading this manual, please call 1-800-4-MY90 exercise cycle. Cycling is an effective exercise for HOME® (1-800-469-4663). To help us assist you, increasing cardiovascular fitness, building endurance, please note the product model number and serial and toning the entire body. The PROFORM XP 90 number before calling. The model number is exercise cycle offers an impressive array of features 831.21522.1.
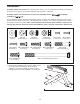
ASSEMBLY Assembly requires two persons. Place all parts of the exercise cycle in a cleared area and remove the packing materials. Do not dispose of the packing materials until assembly is completed. Assembly requires the included tools and your own adjustable wrench screwdriver . and Phillips Use the drawings below to identify the small parts used for assembly. The number in parentheses below each drawing is the key number of the part, from the PART LIST on page 21.
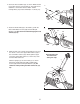
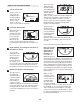
2. Orient the Front Stabilizer (15) as shown. While another person lifts the front of the Frame (1), attach the Front Stabilizer to the Frame with two M10 x 112mm Carriage Bolts (76) and two M10 Nylon Locknuts (72). 2 76 15 3. Attach the Frame Rail (52) to the Frame (1) with two M8 x 19mm Button Screws (40) and two M8 Split Washers (55). Be careful to avoid damaging the Side Shields (26, 27). 3 Slide the Upright (2) onto the Frame (1) as shown.
5. Orient the Seat Carriage Assembly (10) as shown. Attach the Seat Carriage Assembly to the Seat Bracket (11) with four M8 x 16mm Button Screws (61) and four M8 Split Washers (55). 5 Attach a Handlebar (3) to the Seat Bracket (11) with two M8 x 38mm Button Bolts (58) and two M8 Nylon Locknuts (49). Make sure that the Nylon Locknuts are resting in the hexagonal holes in the front of the Handlebar. 61 Attach the other Handlebar (3) to the Seat Bracket (11) in the same way. 6.
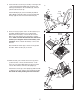
8. Push down the seat lever (not shown) on the right side of the Seat Carriage Assembly (10), slide the Seat Carriage Assembly into the Seat Rail (78), and then pull the seat lever back up. 8 56 Seat Lever 51 Attach a Bumper (51) to the Seat Rail (78) with an M4 x 20mm Screw (56). Next, press the Frame Rail Endcap (50) into the end of the Frame Rail (52). 78 52 10 9. The Console (4) requires four 1.5V “D” batteries (not included); alkaline batteries are recommended.
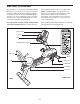
11. Identify the Left Pedal (22), which is marked with an “L.” Using an adjustable wrench, firmly tighten the Left Pedal counterclockwise into the left arm on the Crank (29). Tighten the Right Pedal (not shown) clockwise into the right arm on the Crank. Important: Tighten both Pedals as firmly as possible. After using the exercise cycle for one week, retighten the Pedals. For best performance, the Pedals must be kept tightened.
CONSOLE DIAGRAM FEATURES OF THE CONSOLE (available at electronics stores), you can connect the exercise cycle to your home stereo, portable stereo, computer, or VCR and play special iFIT.com CD and video programs (iFIT.com CDs and videocassettes are available separately). iFIT.com CD and video programs automatically control the resistance of the pedals and prompt you to vary your pace as a personal trainer coaches you through every step of your workout. Highenergy music provides added motivation.
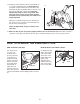
To turn on the console, press the On/Reset button On/Reset or begin pedaling. Button Note: If there are sheets of clear plastic on the face of the console, remove the plastic. The center of the display will show the elapsed time, your pedaling pace in minutes per mile, and the approximate number of grams of carbs you have burned. The display will change from one number to the next every few seconds.
5 6 Measure your heart rate if desired. If there are thin sheets of plastic on the metal contacts on the handgrip pulse sensor, Contacts peel off the plastic. Place your hands on the handgrip pulse sensor, with your palms on the contacts closest to you and your fingers touching the contacts on the opposite side of the handgrip pulse sensor. Avoid moving your hands. When your pulse is detected, the heart-shaped indicator in the upper part of the display will begin to flash each time your heart beats.
HOW TO USE A PRESET PROGRAM 1 2 3 Turn on the console. See step 1 on page 10. Select one of the preset programs. 5 To select a preset program, press the Program button repeatedly until one of the four preset program indicators lights. 6 7 Press the Start button or begin pedaling to start the program. 8 Each preset program consists of several oneminute periods. One resistance setting and one target pace are programmed for each period.
3 4 5 Enter your age or a target heart rate. period. (The same target heart rate may be programmed for two or more consecutive periods.) Program 2 is sixty minutes long (you may choose to use only part of the program). The same target heart rate is programmed for the entire program. If pulse program 1 is selected, the word “AGE” will flash in the lower part of the display. You must enter your age to use this program. If you have already entered your age, press the Enter button and go to step 4.
HOW TO CONNECT YOUR PORTABLE STEREO HOW TO CONNECT YOUR CD PLAYER, VCR, OR COMPUTER Note: If your stereo has an RCA-type AUDIO OUT jack, see instruction A below. If your stereo has a 1/8” LINE OUT jack, see instruction B. If your stereo has only a PHONES jack, see instruction C. To use iFIT.com CDs, the exercise cycle must be connected to your portable CD player, portable stereo, home stereo, or computer with CD player. See pages 14 and 15 for connecting instructions. To use iFIT.
HOW TO CONNECT YOUR HOME STEREO HOW TO CONNECT YOUR COMPUTER A. Plug one end of a 1/8” to RCA stereo audio cable (available at electronics stores) into the jack beneath the console. Plug the other end of the cable into the LINE OUT jack on your stereo. A. Plug one end of a 1/8” to 1/8” stereo audio cable (available at electronics stores) into the jack beneath the console. Plug the other end of the cable into the LINE OUT jack on your computer.
HOW TO CONNECT YOUR VCR B. Plug one end of a 1/8” to RCA stereo audio cable (available at electronics stores) into the jack beneath the console. Plug the other end of the cable into an RCA Y-adapter (available at electronics stores). Next, remove the wire that is currently plugged into the AUDIO OUT jack on your VCR and plug the wire into the unused side of the Yadapter. Plug the Y-adapter into the AUDIO OUT jack on your VCR. Note: If your VCR has an unused AUDIO OUT jack, see instruction A below.
your workout. Simply follow your personal trainer’s instructions. HOW TO USE AN IFIT.COM CD OR VIDEO PROGRAM The program will function in almost the same way as a preset program (see steps 3 and 4 on page 12). However, an electronic “chirping” sound will alert you when the resistance of the pedals and/or the pace guide is about to change. To use iFIT.com CDs or videocassettes, the exercise cycle must be connected to your portable CD player, portable stereo, home stereo, computer with CD player, or VCR.
HOW TO USE PROGRAMS DIRECTLY FROM OUR WEB SITE Our Web site at www.iFIT.com allows you to play iFIT.com programs directly from the internet. To use programs from our Web site, the exercise cycle must be connected to your home computer. See HOW TO CONNECT YOUR COMPUTER on page 15. In addition, you must have an internet connection and an internet service provider. A list of specific system requirements is found on our Web site. Follow the steps below to use a program from our Web site.
MAINTENANCE AND TROUBLESHOOTING HOW TO LEVEL THE EXERCISE CYCLE Inspect and tighten all parts of the exercise cycle regularly. Replace any worn parts immediately. After the exercise cycle has been moved to the location where it will be used, make sure that both ends of front stabilizer are Leveling touching the floor. Foot If the exercise cycle rocks slightly during use, turn one or both of the leveling feet under the front stabilizer until the rocking motion is eliminated.
CONDITIONING GUIDELINES The following guidelines will help you to plan your exercise program. Remember that proper nutrition and adequate rest are essential for successful results. WARNING: Before beginning this or any exercise program, consult your physician. This is especially important for persons over the age of 35 or persons with pre-existing health problems. During the first few minutes of exercise, your body uses easily accessible carbohydrate calories for energy.
PART LIST—Model No. 831.21522.1 Key No. Qty.
EXPLODED DRAWING A—Model No. 831.21522.
EXPLODED DRAWING B—Model No. 831.21522.
Get it fixed, at your home or ours! Your Home For repair—in your home—of all major brand appliances, lawn and garden equipment, or heating and cooling systems, no matter who made it, no matter who sold it! For the replacement parts, accessories, and user’s manuals that you need to do-it-yourself. For Sears professional installation of home appliances and items like garage door openers and water heaters. 1-800-4-MY-HOME® (1-800-469-4663) Call anytime, day or night (U.S.A. and Canada) www.sears.com www.