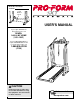
® Model No. PCTL74200 Serial No. Serial Number Decal USER'S MANUAL If you require SERVICE for this product, please call SEARS: 1-800-4 MY HOME (469-4663) If you are MISSING PARTS or require INFORMATION on how to operate this product, call 1-888-936-ICON (4266) CAUTION Read all precautions and instructions in this manual before using this equipment. Save this manual for future reference. Visit our website at www.proform.
TABLE OF CONTENTS IMPORTANT PRECAUTIONS . . . . . . . . . . . . . . . . . . . . . . . . . . . . . . . . . . . . . . . . . . . . . . . . . . . . . . . . . . . . . . . . .2 BEFORE YOU BEGIN . . . . . . . . . . . . . . . . . . . . . . . . . . . . . . . . . . . . . . . . . . . . . . . . . . . . . . . . . . . . . . . . . . . . . . .4 ASSEMBLY . . . . . . . . . . . . . . . . . . . . . . . . . . . . . . . . . . . . . . . . . . . . . . . . . . . . . . . . . . . . . . . . . . . . . . . . . . . . . . .
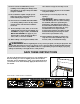
14. Never start the treadmill while you are standing on the walking belt. Always hold the handrails or the upper body arms while using the treadmill. 15. The treadmill is capable of high speeds. Adjust the speed in small increments to avoid sudden jumps in speed. sure that the storage latch is fully closed. 19. Inspect and tighten all parts of the treadmill every three months. 20. Never drop or insert any object into any opening. 21. 16. Never leave the treadmill unattended while it is running.
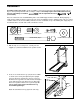
BEFORE YOU BEGIN Thank you for selecting the new PROFORM® CROSSWALK XT treadmill. The CROSSWALK XT treadmill combines advanced technology with innovative design to let you enjoy an excellent form of cardiovascular exercise in the convenience and privacy of your home. And when you’re not exercising, the unique CROSSWALK XT can be folded up, requiring less than half the floor space of other treadmills.
ASSEMBLY Assembly requires two people. Set the treadmill in a cleared area and remove all packing materials. Do not dispose of the packing materials until assembly is completed. Assembly requires the included allen wrench and your own phillips screwdriver and two adjustable wrenches (not included). Note: The underside of the treadmill walking belt is coated with high-performance lubricant. During shipping, a small amount of lubricant may be transferred to the top of the walking belt or the shipping carton.
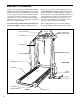
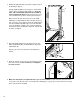
3. Identify the Right Handrail (7) (it may be helpful to look at the drawing on page 4). 3 11 Hold the Right Handrail (7) at an angle as shown and insert the upper end into the right Upright (11). Keep the lower end of the Handrail away from the treadmill to avoid scratching the finish. Next, rotate the lower end of the Handrail to the position shown by the dotted line. 7 Make sure that the hole in the lower end of the Right Handrail (7) is aligned with the hole in the Extension Leg (34).
OPERATION AND ADJUSTMENT THE PERFORMANT LUBETM WALKING BELT Your treadmill features a walking belt coated with PERFORMANT LUBETM, a high-performance lubricant. IMPORTANT: Never apply silicone spray or other substances to the walking belt or the walking platform. Such substances will deteriorate the walking belt and cause excessive wear. HOW TO PLUG IN THE POWER CORD DANGER: Improper connection of the equipment-grounding conductor can result in an increased risk of electric shock.
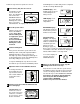
CONSOLE DIAGRAM On/Reset Button Note: If there is a thin sheet of clear plastic on the face of the console, remove it before operating the console. CAUTION: Before operating the console, read the following precautions. • Do not stand on the walking belt when turning on the power. • Always wear the clip (see the drawing at the lower right) while using the treadmill. When the key is removed from the console, the walking belt will stop. • Adjust the speed in small increments.
Follow the steps below to operate the console. 1 track will light one at a time until you have completed 1/4 mile. A new lap will then begin. Insert the key fully into the console. SPEED display—This display shows the speed of the walking belt, in miles per hour. Inserting the key will not turn on the displays. The displays will turn on when the ON/RESET button is pressed or when the walking belt is started. Note: If you just installed batteries, the displays will already be on.
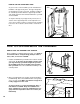
HOW TO USE THE UPPER BODY ARMS As you exercise on the treadmill, you can hold either the handrails or the upper body arms. The upper body arms are designed to exercise your arms, shoulders, and back for a total body workout. Hold one upper body arm with each hand, and move them forward and back as you walk on the treadmill. To vary the intensity of your upper body exercise, the resistance of the upper body arms can be adjusted.
HOW TO MOVE THE TREADMILL Before moving the treadmill, convert the treadmill to the storage position as described above. Make sure that the storage latch is closed fully over the catch. 1. Hold the upper ends of the handrails. Place one foot on the base as shown. 2. Tilt the treadmill back until it rolls freely on the front wheels. Carefully move the treadmill to the desired location. Never move the treadmill without tipping it back.
TROUBLE-SHOOTING Most treadmill problems can be solved by following the simple steps below. Find the symptom that applies, and follow the steps listed. If further assistance is needed, please call our Customer Service Department toll-free at 1-888-936-4266 Monday through Friday 8h00 until 18h30 eastern time (excluding holidays). 1. SYMPTOM: THE POWER DOES NOT TURN ON a. Make sure that the power cord is plugged into a surge protector, and that the surge protector is plugged into a properly grounded outlet.
4. SYMPTOM: THE WALKING BELT SLOWS WHEN WALKED ON a. Use only a UL-listed surge protector, rated at 15 amps, with a 14-gauge cord of 1,5 m (5 ft) or less in length. b. If the walking belt is overtightened, treadmill performance may decrease and the walking belt may be permanently damaged. Remove the key and UNPLUG THE POWER CORD. Using the allen wrench, turn both rear roller adjustment bolts counterclockwise, 1/4 of a turn.
CONDITIONING GUIDELINES WARNING: Before beginning this or any exercise program, consult your physician. This is especially important for individuals over the age of 35 or individuals with pre-existing health problems. the first few minutes of exercise, your body uses easily accessible carbohydrate calories for energy. Only after the first few minutes does your body begin to use stored fat calories for energy.
Training Zone Exercise After warming up, increase the intensity of your exercise until your pulse is in your training zone for 20 to 60 minutes. (During the first few weeks of your exercise program, do not keep your pulse in your training zone for longer than 20 minutes.) Breathe regularly and deeply as you exercise—never hold your breath. to cool down. This will increase the flexibility of your muscles and will help to prevent post-exercise problems.
ORDERING REPLACEMENT PARTS To order replacement parts, call our Customer Service Department toll-free at 1-888-936-4266 Monday through Friday 8h00 until 18h30 Eastern Time (excluding holidays).
PART LIST—Model No. PCTL74200 Key No. Qty.
REMOVE THIS EXPLODED DRAWING AND PART LIST FROM THE MANUAL 34 Save this EXPLODED DRAWING and PART LIST for future reference. Note: Specifications are subject to change without notice. For information about ordering replacement parts, see the back cover of the User’s Manual.
83 39 84 92 90 83 31 93 88 32 72 94 31 102 1 59 39 77 87 38 31 86 6 99 62 52 100 70 25 38 57 13 35 46 79 5 98 97 96 4 95 80 73 38 42 73 57 79 82 49 48 101 13 13 74 85 71 66 72 62 49 76 36 13 10* 77 70 48 5 66 81 73 13 68 37 48 47 38 45 44 69 75 52 73 13 8 9 2 67 50 38 63 49 3 65 43 41 89 39 89 39 73 38 49 47 89 60 73 30 29 27 39 53 31 40 37 38 25 64 35 39 78 51 13 39 48 61 73 39 40 91 25 73