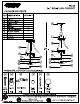
FROG REDS P3748 2-LT SEMI-FLUSH CONVERT SIGHTING" PACKAGE CONTENTS PART| DESCRIPTION QUANTITY A | Fixture 1 B | Socket Cluster 1 C | Glass Shade 1 D | Stem 1 E | Hex Nut 2 F | Flat Metal Washer 1 G | Rubber Washer 1 H | Finial 1 J | Screws 2 K | Canopy HARDWARE CONTENTS (not actual size) Screw | Wire Nut Mounting Strap Ball Nut Chain Chain Loop (1/81P) Qty:2 Qty:3 Qty:1 Qty:2 Qty:1 Qty:1 EN .
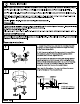
AN Safety Information Please read and understand this entire manual before attempting to assemble, operate or install the product. CAUTION: Read instructions carefully and tum electricity off at main circuit breaker panel before beginning installation. CAUTION: Risk of fire. Min. 90°C supply conductors. Consult a qualified electrician to ensure correct branch circuit conductor. WARNING: If any Special Control Devices are used with this fixture, follow instructions carefully to assure full compliance with N.
Assembly Instructions 3 3. Equally adjust the arms by carefully turning them out from \ the center. 4. Pass the wires from the socket cluster (B) through the fixture (A). Tighten socket cluster {B) securely to the fixture (A). Tighten stem (D) securely to the socket cluster (B). Thread the hex nut (E) onto the stem (D). Pass the flat washer (F), rubber washer (G) and glass shade {C) onto stem (D). to secure the above parts to the stem (D} Thread the finial {H} onto stem (B) and secure it tightly. 5.
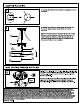
Flush Mounting Assembly Instructions 3 6. Pass the screws through the two holes in the canopy. Secure the fixture (A) to the screws (AA) using the two ball nuts {DD). Tighten securely. 7. Thread the lamp (not included) into the fixture socket. Use 100-watt MAX incandescent medium base lamp, HSBC or SLED. Hanging Mounting Assembly Instructions 5 93063543 Page:4 5. Pass the wires through the chain loop (FF). Then thread the chain loop (FF) onto the nipple at the top of the fixture (A).
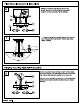
Hanging Mounting Assembly Instructions 6 ! NOTE: During this step, determine the hanging length of your fixture by adding or removing stems and chain links. The electrical and ground wire may also optionally be cut to length. Do NOT cut electrical or ground wires until this length is determined. Leave AT LEAST 6 inches MINIMUM of wire past the canopy chain loop {FF) to allow for easy connections in step 7. (Chain links can be spread open with 2 pairs of pliers.