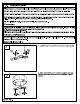
OGRESS R P350167 P3712 SIGHTING P350168 P350129 PACKAGE CONTENTS 3-LT SEMI-FLUSH 2-LT SEMI-FLUSH QUANTITY PART| DESCRIPTION P3712 |P350129/P350167 P350168 A | Fixture Fabric shade Knurled nut Lock washer Hex nut Stem Steel flat washer Rubber washer Glass diffuse Glass holder |Finial P3712 P35012¢ P350167 P350168 HARDWARE CONTENTS (not actual size) Mounting Strap Qty:1 Ball Nut Qty:2 THANK YOU for selecting Progress Lighting We can assist you with questions regarding product information, assembly or missing
UN Safety Information Please read and understand this entire manual before attempting to assemble, operate or install the product. CAUTION: Read instructions carefully and tum electricity off at main circuit breaker pane! before beginning installation. CAUTION: Risk of fire. Min. 80°C supply conductors. Consult a qualified electrician to ensure correct branch circuit conductor. WARNING: If any Special Control Devices are used with this fixture, follow instructions carefully to assure full compliance with N.
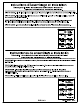
Assembly Instructions hi Thread screws up & down for adjustment 3. You now need to adjust the stud length (AA) according to the fixture canopy depth. Lift up the fixture (A) and pass the studs (AA) through the two mounting holes in the fixture canopy. While holding the fixture with one hand, thread the studs {AA) in or out of the mounting strap (CC) until 3/16" of threads are showing. That should be enough to mount the fixture as instructed in step 6. Remove the fixture from the ceiling.
Assembly Instructions 5. Strip 3/8” of insulation from the electrical wire ends. Using wire nuts (BB), connect the WHITE fixture wire to the WHITE supply wire from the outlet box; connect the BLACK fixture wire to the BLACK supply wire from the outlet box. 5 Connect the fixture ground wire and supply ground wire using a wire nut or by fastening to the ground screw on the round mounting plate. Push all of the wire connections carefully into the outlet box. 6.