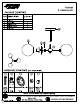
OGRESS IGHTING™ P350235 3-LT SEMI-FLUSH PACKAGE CONTENTS PART| DESCRIPTION QUANTITY A | Fixture 1 B | Coupling 3 C | Glass cover 3 D | Glass Shade 3 E | Canopy 1 —® HARDWARE CONTENTS (not actual size) Screw | Wire Nut | Round Mounting Plate | Hex Nut | Cylinder Nut ay2 | ay3 atty Qy:2 Qy2 THANK YOU for selecting Progress Lighting (7?) We can assist you with questions regarding product information, assembly or missing parts dD 800-447-0573 @ ch 33154184 Page am-8pm (Eastern), Monday-Friday
/1\ Safety Information Please read and understand this entire manual before attempting to assemble, operate or install the product. CAUTION: Read instructions carefully and tum electricity off at main circuit breaker pane! before beginning installation. CAUTION: Risk of fire. Min. 80°C supply conductors. Consult a qualified electrician to ensure correct branch circuit conductor.
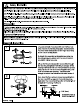
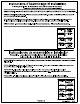
Assembly Instructions 3 — Stem 93164194 Page NOTE: Do NOT cut electrical or ground wires until this length is determined. Leave AT LEAST 6 inches MINIMUM of wire past the canopy to allow for easy connections in step 4. 3. Pass wires through the stem and out of the canopy tightening the Stem to the nipple of fixture (A). 4. Strip 3/8” of insulation from the electrical wire ends.
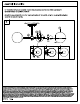
Assembly Instructions 6. Thread the lamp {not included) into the fixture socket. Use 60-watt MAX Incandescent candelabra base lamp, HSBC or SLED. Attach the glass shade (D) onto the retaining bracket of fixture (A) using the coupling {B} and glass cover (C) to secure it tightly. 6 WARRANTY AND EXCLUSIVE REMEDY: Progress products, when properly Installed and under normal conditions of use, are warranted to our customers only to be fre from defects In material and ‘workmanship at time of shipment.