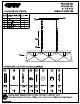
REDS P400048-020 L SIGHTING” P400048-143 5-LT ISLAND PACKAGE CONTENTS LINEAR CHANDELIER PART|DESCRIPTION |QUANTITY A fixture |12"Pipe 8 C | 6"Pips 2 D | Chain loop 4 E | Canopy HARDWARE CONTENTS (not actual size) Nipple | Lira connector | Mounting plate| Hex nut | Screw | Flat washer Finial Chain (1/81P) (1/81P) (1/81P) | (#8) (1/81P) (8" Qty:1 Qty:3 Qty:1 Qty:1 | Qty:1 Qty:1 Qty:1 Qty:2 Missing parts? Please contact Customer Service at 1-800-447-0573, @ am-8pm (Eastern}), Monday Friday, or at 93076409 Page
/I SAFETY INFORMATION Please read and understand this entire manual before attempting to assemble,operate or install the product. CAUTION: Read instructions carefully and turn electricity off at main circuit breaker panel before beginning installation. CAUTION: Risk of fire. Min. 90°C supply conductors. Consult a qualified electrician to ensure correct branch circuit conductor WARNING: If any Special Control Devices are used with this Fixture, follow instructions carefully to assure full compliance with N.
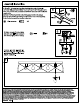
ASSEMBLY INSTRUCTIONS 4. Assemble nipples (KK) and pipes (HH, JJ) together to achieve a desirable hanging length. NOTE: Also at this time, you may choose to shorten the chain length and electrical/ground wires, but be sure to leave 6" minimum wire lengths beyond the canopy for connection. When completed, pass the wires through the assembled pipe lengths. Next, attach assembled pipes on fixture using nipple (KK). Secure tightly. Weave electric cord and ground wire through chain (FF) and chain loop (GG).
Assembly Instructions 5. Strip 3 * of insulation from the electrical wire ends. Using wire connector {BB), connect RIBBED fixture wire to the WHITE supply wire 5 @ from the junction box; connect the SMOOTH fixture wire to the BLACK fia supply wire. = Connect the fixture ground wire and supply ground wire using a wire nut or by fastening to the ground screw on the mounting strap. Push all wire connections into the outlet box. Wire connector E X3 Ribbed Sm oath {AA) and use finial (GG) to secure 6.