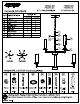
PROGRESS IGHTING™ P400252-009 P400252-031 9-LT 2-TIER CHANDELIER P400251-009 P400251-031 5-LT CHANDELIER PACKAGE CONTENTS QUANTITY PART| DESCRIPTION FA00251 | PA00I53 — A | Fixture Glass shade Pipe Knurled nut Seating 1 1 F_| Hex nut Round tube Seating 1 1 J Stem 1 1 = HARDWARE CONTENTS (not actual size) Wire nut Qiy:3 Mounting plate | Screw collar Qiy:1 Qty: ® © Chain holder Qty-1 Nipple Qty-1 Chain Qty:1 ® : Chain loop (1/81P) Qty:1 1 © o 93124057 Page: Missing parts? Please contact Customer Service at 1-
/I\ Safety Information Please read and understand this entire manual before attempting to assemble, operate or install the product. CAUTION: Read instructions carefully and tum electricity off at main circuit breaker panel before beginning installation. CAUTION: Risk of fire. Min. 80°C supply conductors. Consult a qualified electrician to ensure correct branch circuit conductor.
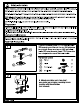
ASSEMBLY INSTRUCTIONS € © 9 P40025. 2 3. Equally adjust the arms by carefully turning them out from the center. (E)— 4. Pass the wires through the stem {J} ,seat ring (H) and round tube (G). Screw stem (J) into fixture (A), attach seat ring (H) and round tube into stem (J). Pass the wires through hex nut (F) / seat ring (E} / knurled nut (D) / pipe (C) to achieve overall desired length. Screw hex nut (F} into stem (J), attach seat ring (E} into stem (J) using knurled nut (D) to secure tightly.
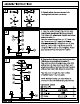
ASSEMBLY INSTRUCTIONS 6. Strip 3/8” of insulation from the electrical wire ends. Using wire nuts (BB), connect RIBBED fixture wire to the WHITE supply wire from the outlet box; connect the SMOOTH fixture wire to the BLACK supply wire. Connect the fixture ground wire and supply ground wire using a wire nut or by fastening to the ground screw on the mounting plate. Push all wire connections into the outlet box. Wire nut Tuck the wires into the outlet box and slip the canopy over the chain holder.