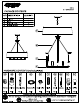
PROGRESS SIGHTING" P4618 6-LT CHANDELIER PACKAGE CONTENTS PART| DESCRIPTION QUANTITY A | Fixture 1 B | Arm 1 C | Candle Tube Fabric Shade 1 TI i HARDWARE CONTENTS (not actual size) Hex Nut | Wire Nut | Mounting Strap | Screw Collar | Chain Holder | Nipple Chain Canopy trainload Ball nut (1/8IP) Qty:2 Qty:3 Qty:1 Qty:1 Qty:1 Qty:1 Qty:1 Qiy:1 Qty:3 € THANK YOU for selecting Progress Lighting We can assist you with questions regarding product information, assembly or missing parts 800-447-0573 [] .
AN Safety Information Please read and understand this entire manual before attempting to assemble, operate or install the product. CAUTION: Read instructions carefully and tum electricity off at main circuit breaker panel before beginning installation. CAUTION: Risk of fire. Min. 90°C supply conductors. Consult a qualified electrician to ensure correct branch circuit conductor. WARNING: If any Special Control Devices are used with this fixture, follow instructions carefully to assure full compliance with N.
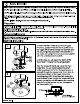
ASSEMBLY INSTRUCTIONS Equally adjust the arms by carefully turning them out from the center. 4. Attach each arm (B) onto the threaded lug on 4 the fixture ring (A) and secure it tightly. As you d this, you will need to pull up the slack on the cord. 5 NOTE: During this step, determine the hanging length of your fixture by removing chain links (GG) and optionally cutting the electrical and ground wire to length. Do NOT cut electrical or ground wires until this overall length is determined.
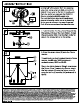
ASSEMBLY INSTRUCTIONS 6. Strip 3/8” of insulation from the electrical wire ends. Using wire nuts (BB), connect the RIBBED fixture wire to the WHITE supply wire from the outlet box; connect the SMOOTH fixture wire to the BLACK supply wire. Connect the fixture ground wire and supply ground wire using a wire nut or by fastening to the ground screw on the mounting strap. Push all wire connections into the outlet box. 7. Tuck the wires into the junction box and slip the canopy (HH) over the chain holder.