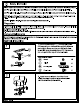
PROGRESS P500330-031 P500331-031 5-LT CHANDELIER 6-LT CHANDELIER PACKAGE CONTENTS PART| DESCRIPTION QUANTITY | QUANTITY] A | Fixture Frame Screw Round Seat ring Stem P500330-031 i HARDWARE CONTENTS (not actual size) @) (eg) (Ww) eas N D) a Hex nut | Wire nut | Mounting plate| Screw collar | Chain holder| Nipple| Chain [12" Pipe 6" Pipe Nipple |Chain loop| Canopy (1/81P) (1/8IP) links) (1/8IP) | | (1/8IP) Qy2 | Qs Qty:1 Qty:1 Qy1 |Qiy1 | Qty | Quirky | Qty Quirky | Qty Qty Missing parts? Please contact Custo
AN Safety Information Please read and understand this entire manual before attempting to assemble, operate or install the product. CAUTION: Read instructions carefully and tum electricity off at main circuit breaker panel before beginning installation. CAUTION: Risk of fire. Min. 90°C supply conductors. Consult a qualified electrician to ensure correct branch circuit conductor. WARNING: If any Special Control Devices are used with this fixture, follow instructions carefully to assure full compliance with N.
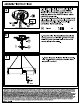
ASSEMBLY INSTRUCTIONS 3 3. Attach round arm (D) to frame (B) use screw (C) to secure tightly; then attach other end of round arm (D) to the steel plate of stem (G) use finial (E) to secure tightly. Pass the wires through the seat ring (F) / stem (G), thread fixture (A) onto the seat ring (F) / stem (G) to secure tightly. fy Canopy © X1 w Chain loop dw x1 4, Pass the wires through the seat ring (KK)/ one pipe pipe {HH) to achieve overall desired length.
ASSEMBLY INSTRUCTIONS 5. Strip 3/8” of insulation from the electrical wire 5 5 ends. Using wire nuts (BB), connect RIBBED fixture wire to the WHITE supply wire from the outlet box; connect the SMOOTH fixture wire to the BLACK supply wire. Connect the fixture ground wire and supply ground wire using a wire nut or by fastening to the ground screw on the mounting plate. Push all wire connections into the outlet box. Wire nut (= X3 6. Tuck the wires into the outlet box and slip the canopy over the chain holder.