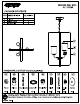
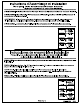
PROGRESS IGHTING™ PACKAGE CONTENTS 3-LT FOYER PART| DESCRIPTION QUANTITY A | Fixture 1 B | Glass shade 3 C | Socket ring 3 HARDWARE CONTENTS (not actual size) Hex nut Wire nut Qty:2 Qty:3 Mounting strap Qiy:1 Screw collar Qty:1 Chain holder Qty:1 Nipple Qty Qty-1 ® 0 Quick link Qty Canopy Qty:1 Missing parts? Please contact Customer Service at 1-800-447-0573, Dd am-8pm (Eastern), Monday Friday, or at 93135085 Page:
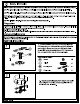
AN Safety Information Please read and understand this entire manual before attempting to assemble, operate or install the product. CAUTION: Read instructions carefully and tum electricity off at main circuit breaker panel before beginning installation. CAUTION: Risk of fire. Min. 90°C supply conductors. Consult a qualified electrician to ensure correct branch circuit conductor. WARNING: If any Special Control Devices are used with this fixture, follow instructions carefully to assure full compliance with N.
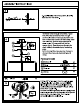
ASSEMBLY INSTRUCTIONS 3. Equally adjust the arms by carefully muting them out from the center. 4. Weave wires through chain (GG) / quick link (HH). Pass wires and chain through screw collar (DD) and canopy (JJ). Open one link of chain and attach it to chain loop, close the chain link. And the other end lock to chain holder (EE) use quick link (HH) to secure tightly. Pass the wires through the chain holder/ threaded nipple/ mounting plate.
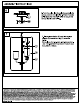
ASSEMBLY INSTRUCTIONS 6 6. Tuck the wires into the outlet box and slip the canopy over the chain holder. Thread the screw collar (DD) onto the chain holder to secure the canopy tightly to the ceiling. 7. Place glass shades (B) onto fixture glass holders (A) use socket ring (C) to secure i tightly. 1 CLD Screw lamp (not included) into fixture socket. Use 100-watt MAX incandescent medium base lamp, HSBC or SLED.