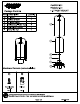
PROGRESS IGHTING™ Package Contents P540292-031 P540292-141 1-LT POST MOUNT Part | Description Quantity Fixture Glass shade Fixture cage Slotted cylinder nut Aluminum cover mmo G0 o>» Knurled nut Ala pals Hardware Contents (not actual size) a8 £ Mounting screw Qty:3 n Wire nut Qty:3 am-8pm (Eastern), Monday Friday, or at OD Missing parts? Please contact Customer Service at 1-800-447-0573, PAGE 1 of 5 SPEC.NO.
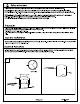
/I\ safety Information Please read and understand this entire manual before attempting to assemble, operate or install the product. CAUTION: Read instructions carefully and tum electricity off at main circuit breaker pane! before beginning installation. CAUTION: Risk of fire. Min. 80°C supply conductors. Consult a qualified electrician to ensure comet branch circuit conductor. WARNING: If any Special Control Devices are used with this fixture, follow instructions carefully to assure full compliance with N.
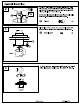
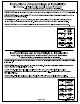
Assembly Instructions 2. Strip 3 " of insulation from the electrical wire ends. Using wire nuts (BB), connect white fixture wire to the white supply wire from the outlet box; connect the black fixture wire to the black supply wire from the outlet box. Connect the fixture ground wire and supply ground wire using a wire nut. Push all wire connections info the post. Wire nut =) x3 3. Insert fixture (A) onto post and use mounting screws (AA) to secure fixture tightly to post using holes drilled in step 1.
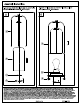
Assembly Instructions 5. Attach glass shade {B) to fixture cage (C) using knurled 6. Attach the fixture cage (C) onto the Fixture (A) using the nut (F) with aluminum cover (E). Secure tightly. four cylinder nut (D). Secure tightly. (o9— Bets oe | J+ WARRANTY AND EXCLUSIVE REMEDY: Progress products, when properly Installed and under normal conditions of use, are warranted to our customers only to be free from defects In material and ‘workmanship at time of shipment.