
Installation Guide


FOR FLUORESCENT FIXTURES ONLY---COLD WEATHER STARTING INFORMATION: For temperatures below 25°
leave the PL( lamp(s) on continuously - starting with warm lamps. NOTE: If lamp starting becomes a problem in any
cold weather applications; remove the lamp(s) from the fixture - bring the lamp(s) indoors so that they become warm -
then re-install the lamp(s) into the fixture and leave the fixture on continuously. Do not place lamp(s) in an oven,
microwave or similar heat producing device.
INSTALLATION INSTRUCTIONS
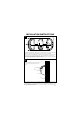
PLACE DIFFUSER on fixture base, then place bar grill or frame (depending on fixture model) over diffuser
and attach to base with mounting screws (8-32x1/2, 4 combination head screws provided).
NOTE: On models with hood, attach diffuser to base with one combination head mounting screw at center
top of base only. Place hood over diffuser and secure to base with remaining three mounting screws.
NOTE: Outdoor wall fixture MUST be caulked with an acrylic caulk where base of fixture meets mounting
surface. This provides a water tight seal when fixture is installed.
ON MODELS WITH HOOD, attach to wall with reflec-
tor up. Hood is to be placed above reflector as
shown.
IS009
4
5
mounting screws
bar grill diffuser
base
caulk
diffuser
hood
reflector
wall