
Installation Guide


Page 2 of 6
SPEC. NO. 93045757 1-15-16
1. Connect Trim to Power
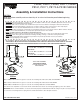
For retrofit: Screw socket adapter (1) into socket (2) as shown. Or to hard-wire: Cut medium base screw shell socket wires near socket,
discard socket. Cut and remove screw shell adapter from trim, discard adapter. Strip wires and connect (Blk-Blk, Wht-Wht) with UL listed
connectors.
For new construction with dedicated LED housing: Remove socket adapter assembly (1) and discard. Connect trim connector (3)
directly to mating LED housing connector (4) as shown.
2. Insert Trim into Recessed Can
Guide socket and wiring toward the can opening. Push trim up into recessed can, while twisting trim counterclockwise 1/4 turn, firmly
engaging the spring clips (5) until flush with ceiling.
3. To remove trim assembly, twist trim assembly counterclockwise 1/4 turn while pulling down.
WARNING: Risk of fire or electric shock. Do not alter, relocate or remove wiring, lampholders, power
supply or any other electrical component.
WARNING: Risk of fire or electric shock. LED retrofit kit installation requires knowledge of the
construction and operation of the luminaires’ electrical systems and the hazard involved. If not qualified,
do not attempt installation. Contact a qualified electrician.
WARNING: Risk of fire or electric shock. Install this kit only in the luminaires that have the construction
features and dimensions in photographs and/or drawing. Recessed housing dimension is 6-5/16"
diameter by 5-1/2" tall.
WARNING: Do not make or alter any open holes in an enclosure of wiring or electrical components
during installation.
Suitable for use with luminaires with a minimum of 75°C supply conductors.
The retrofit kit is accepted as a component of a luminaire where the suitability of the combination shall be
determined by CSA/UL or authorities having jurisdiction.