
Installation Guide

Assembly & Installation Instructions
PEOEU
IMPORTANT SAFEGUARDS
When using electrical equipment, basic safety precautions should always be followed including the following.
READ AND FOLLOW ALL SAFETY INSTRUCTIONS
1. Do not let power supply cords touch hot surfaces.
2. Do not mount near gas or electric heaters.
3. Equipment should be mounted in locations and at heights where it will not readily be subject to tampering by unauthorized
personnel.
4. The use of accessory equipment not authorized by the manufacturer may cause an unsafe condition.
5. Do not use the equipment for other than its intended purpose.
6. Servicing of this equipment should be performed by qualified service personnel.
7. Test cycling: the Life Safety Code (NFPA 101) requires testing of emergency lighting units once a month for a minimum of 30
seconds, and once a year for a minimum of 90 minutes.
8. Do not use outdoors
INSTALLER:
• SEE UNIT LABEL FOR ADDITIONAL MODEL SPECIFICATIONS
• SAVE THESE INSTRUCTIONS FOR USE BY OWNER/OCCUPANT
WARNING – This product contains chemicals known to the state of California to cause cancer, birth defects and/or other
reproductive harm. Thoroughly wash hands after installing, handling, cleaning, or otherwise touching this product.
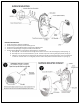
Surface Mounting
1. Separate front cover from back plate with a flat blade screwdriver. Open from top slot first and then from side slots gently
(see Figure 2).
2. Remove knout out hole in the center of the back plate. Remove knock out slots on the back plate that correspond to the size
of the junction Box.
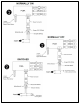
3. Feed AC supply leads through the center hole in the back plate. Then make the proper electrical connections. See electrical
connections section for proper instructions. Cap off unused hot lead.
4. Mount back plate to junction box with provided #8-32x0.875” screws (see Figure 1).
5. Attach battery connector and power connector.
6. Attach front cover to back plate (securely snaps into place).
7. Supply power and test the unit.
Surface Conduit Feed
1. Separate front cover from back plate with a flat blade screwdriver. Open from top slot first and then from side slots gently
(see Figure 2).
2. Unscrew the pipe plug from top of back plate.
3. Secure back plate to wall. Feed conduit into conduit entry opening (see Figure 3). Secure with appropriate hardware (not
provided).
4. Make the proper supply lead connections. See Electrical connections section for proper instructions. Cap off unused hot
lead.
5. Attach battery connector and power connector.
6. Attach front cover to back plate.
7. Supply power and test the unit.