User Manual Oven PBD34100X
Progress CONTENTS Safety information Safety instructions Product description Before first use Daily use Clock functions Using the accessories 2 3 5 6 6 9 9 Additional functions Hints and tips Care and cleaning Troubleshooting Installation Energy efficiency 10 10 20 23 25 26 Subject to change without notice. SAFETY INFORMATION Before the installation and use of the appliance, carefully read the supplied instructions.
Progress 3 General Safety • • • • • • • • Only a qualified person must install this appliance and replace the cable. Internally the appliance becomes hot when in operation. Do not touch the heating elements that are in the appliance. Always use oven gloves to remove or put in accessories or ovenware. Before maintenance cut the power supply. Ensure that the appliance is switched off before replacing the lamp to avoid the possibility of electric shock. Do not use a steam cleaner to clean the appliance.
Progress • Make sure not to cause damage to the mains plug and to the mains cable. Should the mains cable need to be replaced, this must be carried out by our Authorised Service Centre. • Do not let mains cables touch or come near the appliance door, especially when the door is hot. • The shock protection of live and insulated parts must be fastened in such a way that it cannot be removed without tools. • Connect the mains plug to the mains socket only at the end of the installation.
Progress 5 furniture panel until the appliance has cooled down completely after use. Care and cleaning WARNING! Risk of injury, fire, or damage to the appliance. • Before maintenance, deactivate the appliance and disconnect the mains plug from the mains socket. • Make sure the appliance is cold. There is the risk that the glass panels can break. • Replace immediately the door glass panels when they are damaged. Contact the Authorised Service Centre.
Progress Accessories • Wire shelf For cookware, cake tins, roasts. • Combi pan For cakes and biscuits. To bake and roast or as a pan to collect fat. BEFORE FIRST USE WARNING! Refer to Safety chapters. Initial Cleaning Remove all accessories and removable shelf supports from the appliance. Refer to "Care and cleaning" chapter. Clean the appliance before first use. Put the accessories and the removable shelf supports back to their initial position.
Progress 7 Activating and deactivating the appliance It depends on the model if your appliance has knob symbols, indicators or lamps: • The indicator comes on when the oven heats up. • The lamp comes on when the appliance operates. • The symbol shows whether the knob controls the oven functions or the temperature. 1. Turn the knob for the oven functions to select an oven function. 2. Turn the knob for the temperature to select a temperature. 3.
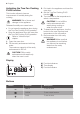
Progress Activating the True Fan Cooking PLUS function This function allows to have an improvement of humidity during the cooking. WARNING! Risk of burns and damage to the appliance. Released humidity can cause burns: • Do not open the appliance door during the True Fan Cooking PLUS operation. • Open the appliance door with care after the True Fan Cooking PLUS operation. Refer to “Hints and tips” chapter. 1. Open the oven door. 2. Fill the cavity embossment with tap water.
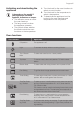
Progress 9 CLOCK FUNCTIONS Clock functions table Clock function Application Time of day To set, change or check the time of day. Minute Minder To set countdown time. This function has no effect on the operation of the appliance. Duration To set the cooking time of the oven. End To set the time of day when the oven should deactivate. You can use the functions Duration and End at the same time to set the time for how long the appliance should operate and when the appliance should deactivate.
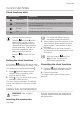
Progress Wire shelf and the deep pan together: Push the deep pan between the guide bars of the shelf support and the wire shelf on the guide bars above. Deep pan: Push the deep pan between the guide bars of the shelf support. • All accessories have small indentations at the top of the right and left side to increase safety. The indentations are also anti-tip devices. • The high rim around the shelf is a device which prevents cookware from slipping.
Progress 11 General information Cooking meat and fish • The appliance has five shelf positions. Count the shelf positions from the bottom of the appliance floor. • The appliance has a special system which circulates the air and constantly recycles the steam. With this system you can cook in a steamy environment and keep the food soft inside and crusty outside. It decreases the cooking time and energy consumption to a minimum. • Moisture can condense in the appliance or on the door glass panels.
Progress Food Water in the cavity embossment (ml) Temperature (°C) Time (min) Shelf position Comments Cookies, scones, croissants 100 150 - 180 10 - 20 2 Use baking tray.1) Plum cake, apple pie, cinnamon rolls 100 - 150 160 - 180 30 - 60 2 Use cake mould.1) 1) Preheat in an empty oven for 5 minutes before cooking.
Progress 13 Roasting Food Water in the cavity embossment (ml) Temperature (°C) Time (min) Shelf position Comments Roast pork 200 180 65 - 80 2 Pyrex round tray Roast beef 200 200 50 - 60 2 Pyrex round tray Chicken 200 210 60 - 80 2 Pyrex round tray Baking and roasting table Cakes Food Top / Bottom Heat True Fan Cooking Time (min) Comments Temperature (°C) Shelf position Temperature (°C) Shelf position Whisked recipes 170 2 160 3 (2 and 4) 45 - 60 In a cake mould Shor
Progress Food Top / Bottom Heat True Fan Cooking Time (min) Comments Temperature (°C) Shelf position Temperature (°C) Shelf position 160 2 150 2 90 - 120 In a 20 cm cake mould 175 1 160 2 50 - 60 In a bread tin Small cakes one level 170 3 140 - 150 3 20 - 30 In a baking tray Small cakes two levels - - 140 - 150 2 and 4 25 - 35 In a baking tray Small cakes three levels - - 140 - 150 1, 3 and 5 30 - 45 In a baking tray Biscuits / pastry stripes one level 140 3
Progress 15 Food Top / Bottom Heat True Fan Cooking Time (min) Comments Temperature (°C) Shelf position Temperature (°C) Shelf position Buns1) 190 3 190 3 12 - 20 In a baking tray Eclairs one level 190 3 170 3 25 - 35 In a baking tray Eclairs two levels - - 170 2 and 4 35 - 45 In a baking tray Plate tarts 180 2 170 2 45 - 70 In a 20 cm cake mould Rich fruit cake 160 1 150 2 110 - 120 In a 24 cm cake mould Victoria sandwich 170 1 160 2 (left and right) 50 - 6
Progress Food Scones1) Top / Bottom Heat True Fan Cooking Temperature (°C) Shelf position Temperature (°C) Shelf position 200 3 190 3 Time (min) Comments 10 - 20 In a baking tray Time (min) Comments 1) Preheat the oven for 10 minutes.
Progress 17 Food Top / Bottom Heat True Fan Cooking Time (min) Comments Temperature (°C) Shelf position Temperature (°C) Shelf position English roast beef, medium 210 2 200 2 60 - 70 On a wire shelf English roast beef, well done 210 2 200 2 70 - 75 On a wire shelf Shoulder of pork 180 2 170 2 120 - 150 With rind Shin of pork 180 2 160 2 100 - 120 2 pieces Lamb 190 2 175 2 110 - 130 Leg Chicken 220 2 200 2 70 - 85 Whole Turkey 180 2 160 2 210 - 240 Wh
Progress Turbo Grilling Beef Food Quantity Temperature (°C) Time (min) Shelf position Roast beef or fillet, per cm of thickness 190 - 200 5-6 1 or 2 per cm of thickness 180 - 190 6-8 1 or 2 per cm of thickness 170 - 180 8 - 10 1 or 2 Food Quantity (kg) Temperature (°C) Time (min) Shelf position Shoulder, neck, ham joint 1 - 1.5 160 - 180 90 - 120 1 or 2 Chop, spare rib 1 - 1.5 170 - 180 60 - 90 1 or 2 Meat loaf 0.
Progress 19 Food Quantity (kg) Temperature (°C) Time (min) Shelf position Chicken, half 0.4 - 0.5 each 190 - 210 35 - 50 1 or 2 Chicken, poulard 1 - 1.5 190 - 210 50 - 70 1 or 2 Duck 1.5 - 2 180 - 200 80 - 100 1 or 2 Goose 3.5 - 5 160 - 180 120 - 180 1 or 2 Turkey 2.5 - 3.5 160 - 180 120 - 150 1 or 2 Turkey 4-6 140 - 160 150 - 240 1 or 2 Food Quantity (kg) Temperature (°C) Time (min) Shelf position Whole fish 1 - 1.
Progress Vegetables Food Temperature (°C) Time (h) Beans 60 - 70 Peppers Shelf position 1 position 2 positions 6-8 3 1/4 60 - 70 5-6 3 1/4 Vegetables for sour 60 - 70 5-6 3 1/4 Mushrooms 50 - 60 6-8 3 1/4 Herbs 40 - 50 2-3 3 1/4 Temperature (°C) Time (h) Shelf position Plums 60 - 70 Apricots Fruit Food 1 position 2 positions 8 - 10 3 1/4 60 - 70 8 - 10 3 1/4 Apple slices 60 - 70 6-8 3 1/4 Pears 60 - 70 6-9 3 1/4 CARE AND CLEANING WARNING! Refer to
Progress 21 We recommend to do the cleaning procedure at least every 5 - 10 True Fan Cooking PLUS cycles. 1. Put 250 ml of white vinegar into the cavity embossment at the bottom of the oven. Use maximum 6% vinegar without herbs. 2. Let the vinegar dissolve the residual limestone at the ambient temperature for 30 minutes. 3. Clean the cavity with warm water and a soft cloth. Cleaning the door gasket • Regularly do a check of the door gasket. The door gasket is around the frame of the oven cavity.
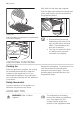
Progress 4. Put the door on a soft cloth on a stable surface. 2. Lift and turn the levers on the two hinges. 5. Release the locking system to remove the internal glass panel. 6. Turn the two fasteners by 90° and remove them from their seats. 3. Close the oven door halfway to the first opening position. Then pull forward and remove the door from its seat. 90° 7. First lift carefully and then remove the glass panel.
Progress 23 Replacing the lamp Put a cloth on the bottom of the interior of the appliance. It prevents damage to the lamp glass cover and the cavity. 1 WARNING! Danger of electrocution! Disconnect the fuse before you replace the lamp. The lamp and the lamp glass cover can be hot. 2 8. Clean the glass panel with water and soap. Dry the glass panel carefully. When the cleaning is completed, install the glass panel and the oven door. Do the above steps in the opposite sequence.
Progress Problem Possible cause Remedy The oven does not heat up. The necessary settings are not set. Make sure that the settings are correct. The oven does not heat up. The fuse is released. Make sure that the fuse is the cause of the malfunction. If the fuse releases again and again, contact a qualified electrician. The lamp does not operate. The lamp is defective. Replace the lamp. Steam and condensation settle on the food and in the cavity of the oven.
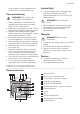
Progress 25 We recommend that you write the data here: Product number (PNC) ......................................... Serial number (S.N.) ......................................... INSTALLATION Securing the appliance to the cabinet WARNING! Refer to Safety chapters. Building In A B 548 21 558 min. 550 114 16 20 600 min. 560 589 594 573 594 5 3 Electrical installation The manufacturer is not responsible if you do not follow the safety precautions from the Safety chapters. 548 21 min.
Progress Total power (W) Section of the cable (mm²) Total power (W) Section of the cable (mm²) maximum 2300 3x1 maximum 3680 3 x 1.5 The earth cord (green / yellow cable) must be 2 cm longer than phase and neutral cables (blue and brown cables). ENERGY EFFICIENCY Product Fiche and information according to EU 65-66/2014 Supplier's name Progress Model identification PBD34100X Energy Efficiency Index 100.
Progress 27 ENVIRONMENT CONCERNS dispose appliances marked with the symbol with the household waste. Return the product to your local recycling facility or contact your municipal office. Recycle the materials with the symbol . Put the packaging in applicable containers to recycle it. Help protect the environment and human health and to recycle waste of electrical and electronic appliances.
www.progress-hausgeraete.