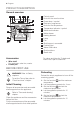
User Manual Steam oven PBD35100X
Progress CONTENTS Safety information Safety instructions Product description Before first use Daily use Clock functions Using the accessories 2 3 6 6 7 10 11 Additional functions Hints and tips Care and cleaning Troubleshooting Installation Energy efficiency 14 15 27 30 32 33 Subject to change without notice. SAFETY INFORMATION Before the installation and use of the appliance, carefully read the supplied instructions.
Progress 3 General Safety • • • • • • • • • Only a qualified person must install this appliance and replace the cable. WARNING: The appliance and its accessible parts become hot during use. Care should be taken to avoid touching heating elements. Children less than 8 years of age shall be kept away unless continuously supervised. Always use oven gloves to remove or put in accessories or ovenware. Before carrying out any maintenance, disconnect the appliance from the power supply.
Progress • All electrical connections should be made by a qualified electrician. • The appliance must be earthed. • Make sure that the parameters on the rating plate are compatible with the electrical ratings of the mains power supply. • Always use a correctly installed shockproof socket. • Do not use multi-plug adapters and extension cables. • Make sure not to cause damage to the mains plug and to the mains cable.
Progress 5 • Always cook with the oven door closed. • If the appliance is installed behind a furniture panel (e.g. a door) make sure the door is never closed when the appliance is in operation. Heat and moisture can build up behind a closed furniture panel and cause subsequent damage to the appliance, the housing unit or the floor. Do not close the furniture panel until the appliance has cooled down completely after use. Steam Cooking WARNING! Risk of burns and damage to the appliance.
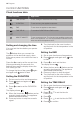
Progress PRODUCT DESCRIPTION General overview 1 2 3 4 5 6 7 8 9 16 5 15 4 10 3 11 2 1 14 13 12 Accessories • Wire shelf For cookware, cake tins, roasts.
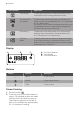
Progress 7 Accessories can become hotter than usual. The appliance can emit an odour and smoke. This is normal. Make sure that the airflow in the room is sufficient. DAILY USE WARNING! Refer to Safety chapters. Retractable knobs To use the appliance, press the control knob. The control knob comes out. 1. Turn the knob for the oven functions to select an oven function. 2. Turn the knob for the temperature to select a temperature. 3.
Progress Oven function Application Turbo Grilling To roast larger meat joints or poultry with bones on one shelf position. Also to make gratins and to brown. True Fan Cooking / Defrost To bake on up to three shelf positions at the same time and to dry food. Set the temperature 20 - 40 °C lower than for Top / Bottom Heat. This function can be used for defrosting frozen foods, such as vegetables and fruits. The defrosting time depends on the amount and size of the frozen food.
Progress 9 Use only water as the liquid. Do not use filtered (demineralised) or distilled water. Do not use other liquids. Do not put flammable or alcoholic liquids (grappa, whisky, cognac, etc.) into the water drawer. 3. Push the water drawer into its initial position. 4. Prepare the food in the correct cookware. 5. Set the temperature between 130 °C and 230 °C. Steam cooking does not give good results in temperatures above 230 °C.
Progress CLOCK FUNCTIONS Clock functions table Clock function Application TIME OF DAY To set, change or check the time of day. DURATION To set how long the appliance operates. END To set when the appliance deactivates. TIME DELAY To combine DURATION and END function. MINUTE MINDER To set countdown time. This function has no effect on the operation of the appliance. You can set the MINUTE MINDER at any time, also when the appliance is off.
Progress 11 Appliance turns on automatically later on, works for the set DURATION time and stops at the set END time. At the set time an acoustic signal sounds. 7. The appliance deactivates automatically. Press any button to stop the signal. 8. Turn the knob for the oven functions and the knob for the temperature to the off position. Setting the MINUTE MINDER 1. Press again and again until starts to flash. 2. Press or to set the necessary time. The Minute Minder starts automatically after 5 seconds. 3.
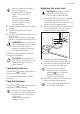
Progress Small indentation at the top increase safety. The indentations are also anti-tip devices. The high rim around the shelf prevents cookware from slipping of the shelf. The injector and the injector tube Accessories for steam cooking The steam kit accessories are not supplied with the appliance. For more information, please contact your local supplier.
Progress 13 Steel grill (E) • Do not put the hot baking dish on cold / wet surfaces. Steam cooking in a dietary baking dish Put the food onto the steel grill in the baking dish and put the lid on it. 1. Put the injector tube into the special hole in the lid of the dietary baking dish. C • Do not put cold liquids in the baking dish when it is hot. 2. Put the baking dish onto the second shelf position from the bottom. 3. Put the other end of the injector tube into the steam inlet.
Progress Make sure that you do not crush the injector tube or let it touch a heating element on the top of the oven. 4. Set the oven for the steam cooking function. Direct steam cooking Put the food onto the steel grill in the baking dish. Add some water. CAUTION! Do not use the lid of the dish. 2. Put the baking dish onto the first or second shelf position from the bottom. Make sure that you do not crush the injector tube or let it touch a heating element on the top of the oven. 3.
Progress 15 Safety thermostat Incorrect operation of the appliance or defective components can cause dangerous overheating. To prevent this, the oven has a safety thermostat which interrupts the power supply. The oven activates again automatically when the temperature drops. HINTS AND TIPS WARNING! Refer to Safety chapters. The temperature and baking times in the tables are guidelines only. They depend on the recipes and the quality and quantity of the ingredients used.
Progress Baking and roasting table Cakes Food Top / Bottom Heat True Fan Cooking Time (min) Comments Temperature (°C) Shelf position Temperature (°C) Shelf position Whisked recipes 170 2 160 3 (2 and 4) 45 - 60 In a cake mould Shortbread dough 170 2 160 3 (2 and 4) 20 - 30 In a cake mould Buttermilk cheesecake 170 1 165 2 60 - 80 In a 26 cm cake mould Apple cake (Ap- 170 2 160 2 (left and right) 80 - 100 In two 20 cm cake moulds on a wire shelf Strudel 175 3 150
Progress 17 Food Top / Bottom Heat True Fan Cooking Time (min) Comments Temperature (°C) Shelf position Temperature (°C) Shelf position Small cakes three levels - - 140 - 150 1, 3 and 5 30 - 45 In a baking tray Biscuits / pastry stripes one level 140 3 140 - 150 3 30 - 35 In a baking tray Biscuits / pastry stripes two levels - - 140 - 150 2 and 4 35 - 40 In a baking tray Biscuits / pastry stripes three levels - - 140 - 150 1, 3 and 5 35 - 45 In a baking tray Meringues o
Progress Food Victoria sandwich Top / Bottom Heat True Fan Cooking Temperature (°C) Shelf position Temperature (°C) Shelf position 170 1 160 2 (left and right) Time (min) Comments 50 - 60 In a 20 cm cake mould Time (min) Comments 1) Preheat the oven for 10 minutes.
Progress 19 Food Top / Bottom Heat True Fan Cooking Time (min) Comments Temperature (°C) Shelf position Temperature (°C) Shelf position Quiches1) 180 1 180 1 50 - 60 In a mould Lasagne1) 180 - 190 2 180 - 190 2 25 - 40 In a mould Cannello- 180 - 190 2 180 - 190 2 25 - 40 In a mould Time (min) Comments ni1) 1) Preheat the oven for 10 minutes.
Progress Food Top / Bottom Heat True Fan Cooking Time (min) Comments Temperature (°C) Shelf position Temperature (°C) Shelf position Chicken 220 2 200 2 70 - 85 Whole Turkey 180 2 Duck 175 2 160 2 210 - 240 Whole 220 2 120 - 150 Whole Goose 175 2 160 1 150 - 200 Whole Rabbit 190 2 175 2 60 - 80 Cut in pieces Hare 190 2 175 2 150 - 200 Cut in pieces Pheasant 190 2 175 2 90 - 120 Whole Time (min) Comments Fish Food Top / Bottom Heat True Fan Co
Progress 21 Food Quantity Pieces (g) Pork chops 4 600 Chicken (cut in 2) 2 Kebabs Breast of chicken Temperature (°C) Time (min) Shelf position 1st side 2nd side max. 12 - 16 12 - 14 4 1000 max. 30 - 35 25 - 30 4 4 - max. 10 - 15 10 - 12 4 4 400 max. 12 - 15 12 - 14 4 Hamburger 6 600 max. 20 - 30 - 4 Fish fillet 4 400 max. 12 - 14 10 - 12 4 Toasted sandwiches 4-6 - max. 5-7 - 4 Toast 4-6 - max.
Progress Food Quantity (kg) Temperature (°C) Time (min) Shelf position Pork knuckle (precooked) 0.75 - 1 150 - 170 90 - 120 1 or 2 Food Quantity (kg) Temperature (°C) Time (min) Shelf position Roast veal 1 160 - 180 90 - 120 1 or 2 Knuckle of veal 1.5 - 2 160 - 180 120 - 150 1 or 2 Food Quantity (kg) Temperature (°C) Time (min) Shelf position Leg of lamb, roast lamb 1 - 1.5 150 - 170 100 - 120 1 or 2 Saddle of lamb 1 - 1.
Progress 23 Defrost Food Quantity (g) Defrosting time (min) Further defrosting time (min) Comments Chicken 1000 100 - 140 20 - 30 Place the chicken on an upturned saucer placed on a large plate. Turn halfway through. Meat 1000 100 - 140 20 - 30 Turn halfway through. Meat 500 90 - 120 20 - 30 Turn halfway through.
Progress Food Temperature (°C) Time (h) Apple slices 60 - 70 Pears 60 - 70 Shelf position 1 position 2 positions 6-8 3 1/4 6-9 3 1/4 True Fan + Steam Cakes and pastries Food Temperature (°C) Time (min) Shelf position Comments Apple cake1) 160 60 - 80 2 In a 20 cm cake mould Tarts 175 30 - 40 2 In a 26 cm cake mould Fruit cake 160 80 - 90 2 In a 26 cm cake mould Sponge cake 160 35 - 45 2 In a 26 cm cake mould Panettone1) 150 - 160 70 - 100 2 In a 20 cm cake mou
Progress 25 Flans Food Temperature (°C) Time (min) Shelf position Comments Vegetables filled 170 - 180 30 - 40 1 In a mould Lasagne 170 - 180 40 - 50 2 In a mould Potato gratin 160 - 170 50 - 60 1 (2 and 4) In a mould Meat Food Quantity (g) Temperature (°C) Time (min) Shelf position Comments Roast pork 1000 180 90 - 110 2 On a wire shelf Veal 1000 180 90 - 110 2 On a wire shelf Roast beef rare 1000 210 45 - 50 2 On a wire shelf Roast beef medium 1000 200 55 -
Progress Steam reheating Food Temperature (°C) Time (min) Shelf position Comments Casserole / Gra- 140 15 - 25 2 Reheat on a plate Pasta and sauce1) 140 10 - 15 2 Reheat on a plate Side dishes (e.g. rice, potatoes, 140 10 - 15 2 Reheat on a plate 140 10 - 15 2 Reheat on a plate Meat1) 140 10 - 15 2 Reheat on a plate Vegetables1) 140 10 - 15 2 Reheat on a plate tin1) pasta)1) One-plate dishes1) 1) Preheat the oven for 10 minutes.
Progress 27 Meat Food Temperature (°C) Time (min) Shelf position Cooked ham 150 55 - 65 2 Poached chicken breast 150 25 - 35 2 Kasseler (smoked loin of pork) 150 80 - 100 2 Food Temperature (°C) Time (min) Shelf position Trout 150 25 - 30 2 Salmon filet 150 25 - 30 2 Food Temperature (°C) Time (min) Shelf position Rice 150 35 - 40 2 Unpeeled potatoes, medium 150 50 - 60 2 Boiled potatoes, quartered 150 35 - 45 2 Polenta 150 40 - 45 2 Fish Side dishes CARE A
Progress appliance if the door gasket is damaged. Contact an Authorised Service Centre. • To clean the door gasket, refer to the general information about cleaning. During the cleaning procedure, some water can drip from the steam inlet onto the cavity of the oven. Put a dripping pan on the shelf level directly below the steam inlet to prevent water from falling onto the bottom of the oven cavity. Removing the shelf supports To clean the oven, remove the shelf supports. 1.
Progress 29 Calcium deposit Water hardness (French degrees) (German degrees) over 180 mg/l over 18 over 10 1. Fill in the water tank with 850 ml of water and 50 ml of citric acid (five teaspoons). Deactivate the oven and wait for approximately 60 minutes. 2. Activate the oven and set the function True Fan + Steam. Set the temperature 230 °C. Deactivate it after 25 minutes and let it cool down for 15 minutes. 3. Activate the oven and set the function True Fan + Steam.
Progress When the cleaning is completed, install the glass panel and the oven door. Do the above steps in the opposite sequence. The screen-printing zone must face the inner side of the door. Make sure that after the installation the surface of the glass panel frame on the screen-printing zones is not rough when you touch it. Make sure that you install the internal glass panel in the seats correctly. A 4. Put the door on a soft cloth on a stable surface. 5.
Progress 31 What to do if... Problem Possible cause Remedy The oven does not heat up. The oven is deactivated. Activate the oven. The oven does not heat up. The clock is not set. Set the clock. The oven does not heat up. The necessary settings are not set. Make sure that the settings are correct. The oven does not heat up. The fuse is blown. Make sure that the fuse is the cause of the malfunction. If the fuse is blown again and again, contact a qualified electrician. The display shows "12.
Progress We recommend that you write the data here: Model (MOD.) ......................................... Product number (PNC) ......................................... Serial number (S.N.) ......................................... INSTALLATION Securing the appliance to the cabinet WARNING! Refer to Safety chapters. Building In A B 548 21 558 min. 550 16 20 600 114 min.
Progress 33 Total power (W) Section of the cable (mm²) Total power (W) Section of the cable (mm²) maximum 1380 3 x 0.75 maximum 3680 3 x 1.5 maximum 2300 3x1 The earth cord (green / yellow cable) must be 2 cm longer than phase and neutral cables (blue and brown cables). ENERGY EFFICIENCY Product Fiche and information according to EU 65-66/2014 Supplier's name Progress Model identification PBD35100X Energy Efficiency Index 105.
Progress Keep food warm Choose the lowest possible temperature setting to use residual heat and keep a meal warm. ENVIRONMENTAL CONCERNS dispose appliances marked with the symbol with the household waste. Return the product to your local recycling facility or contact your municipal office. Recycle the materials with the symbol . Put the packaging in applicable containers to recycle it. Help protect the environment and human health and to recycle waste of electrical and electronic appliances.
Progress 35
www.progress-hausgeraete.