User Manual Steam oven PBD46101X
Progress CONTENTS Safety information Safety instructions Product description Control panel Before first use Daily use Clock functions 2 3 6 7 9 10 13 Automatic programmes Using the accessories Additional functions Hints and tips Care and cleaning Troubleshooting Energy efficiency 15 16 20 21 41 45 48 Subject to change without notice. SAFETY INFORMATION Before the installation and use of the appliance, carefully read the supplied instructions.
Progress 3 General Safety • • • • • • • • • • Only a qualified person must install this appliance and replace the cable. WARNING: The appliance and its accessible parts become hot during use. Care should be taken to avoid touching heating elements. Always use oven gloves to remove or put in accessories or ovenware. Before carrying out any maintenance, disconnect the appliance from the power supply.
Progress Electrical connection WARNING! Risk of fire and electric shock. • All electrical connections should be made by a qualified electrician. • The appliance must be earthed. • Make sure that the parameters on the rating plate are compatible with the electrical ratings of the mains power supply. • Always use a correctly installed shockproof socket. • Do not use multi-plug adapters and extension cables. • Make sure not to cause damage to the mains plug and to the mains cable.
Progress 5 • • • • • – be careful when you remove or install the accessories. Discoloration of the enamel or stainless steel has no effect on the performance of the appliance. Use a deep pan for moist cakes. Fruit juices cause stains that can be permanent. This appliance is for cooking purposes only. It must not be used for other purposes, for example room heating. Always cook with the oven door closed. If the appliance is installed behind a furniture panel (e.g.
Progress PRODUCT DESCRIPTION General overview 1 2 3 4 1 2 3 4 5 5 6 4 10 3 7 2 8 1 9 Accessories 5 6 7 8 9 10 Control panel Electronic programmer Water drawer Socket for the core temperature sensor Heating element Lamp Fan Descaling pipe outlet Shelf support, removable Shelf positions Grill- / Roasting pan Wire shelf For cookware, cake tins, roasts. Baking tray For cakes and biscuits. To bake and roast or as a pan to collect fat.
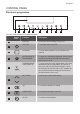
Progress 7 CONTROL PANEL Electronic programmer 1 2 3 4 5 6 7 8 9 10 Use the sensor fields to operate the oven. 1 2 3 4 Sensor Field Function Description - DISPLAY Shows the current settings of the oven. ON / OFF To turn the oven on and off. OPTIONS To set a heating function or an automatic pro‐ gramme. MY FAVOURITE PROGRAMME To store your favourite programme. Use it to have access to your favourite programme directly or when the oven is off.
Progress Sensor Field 10 Function Description MINUTE MINDER To set the Minute Minder. Display A B G C F E D A. Oven function symbol B. Temperature / time of day display C. Clock / Residual heat display / Minute Minder D. Residual heat indicator E. Indicators for the clock functions F. Heat-up indicator / Fast Heat Up indicator G. Number of an oven function / programme Other indicators of the display: Symbol / / Name Description Functions You can choose an oven function.
Progress 9 Heat up indicator If you turn on the heating function, appears. The bars show that the temperature in the oven increases or decreases. When the oven is at the set temperature, the bars go off the display. BEFORE FIRST USE WARNING! Refer to Safety chapters. To set the Time of day refer to "Clock functions" chapter. Initial Cleaning Remove all accessories and removable shelf supports from the oven. Refer to "Care and cleaning" chapter.
Progress Test strip Water Hardness Test strip 2 3 Water Hardness 4 You can change the water hardness in the settings menu. DAILY USE WARNING! Refer to Safety chapters. Oven func‐ tion Heating functions Oven func‐ tion True Fan Cooking Pizza Setting Application To bake on up to three shelf positions at the same time and to dry food. Set the temperature 20 40 °C lower than for Con‐ ventional Cooking. To bake pizza. To make intensive browning and a crispy bottom.
Progress 11 Oven func‐ tion Moist Fan Baking Bread Baking Application This function is designed to save energy during cooking. For the cooking instructions refer to "Hints and tips" chapter, Moist Fan Baking. The oven door should be closed during cooking so that the function is not in‐ terrupted and to ensure that the oven operates with the highest energy efficiency possible. When you use this function, the temperature in the cavity may differ from the set temperature. The residu‐ al heat is used.
Progress Changing the temperature Press or to change the temperature in steps: 5 °C. When the oven is at the set temperature a signal sounds and the Heat up indicator disappears. Checking the temperature You can check the current temperature in the oven when the function or programme works. 1. Press . The display shows the temperature in the oven. Press again to change the set temperature. 2. Press or the display shows again the set temperature automatically after 5 seconds.
Progress 13 Let the oven dry fully with the door open. To speed up the drying you can close the door and heat up the oven with the function: True Fan Cooking at temperature 150°C for approximately 15 minutes. CLOCK FUNCTIONS Clock functions table Clock function 00:00 Application TIME OF DAY To show or change the time of day. You can change the time of day only when the oven is on. DURATION To set how long the oven works. END To set when the oven turns off.
Progress Setting the END 1. Set an oven function and temperature. 2. Touch again and again until starts to flash. 3. Use or to set the END and or to confirm. First you set the minutes and then the hours. When the set time ends, an acoustic signal sounds for 2 minutes. and the time setting flash in the display. The appliance deactivates automatically. 4. Touch a sensor field or open the oven door to stop the acoustic signal. 5. Turn off the appliance. Setting the TIME DELAY function 1.
Progress 15 2. Press and hold: . When the display shows "00:00" the Count Up Timer starts to count up again. AUTOMATIC PROGRAMMES WARNING! Refer to Safety chapters. There are 25 automatic programmes. Use an automatic programme or recipe when you do not have the knowledge or experience on how to prepare a dish. The display shows the default cooking times for all automatic programmes.
Progress Programme number Programme name 23 CONVENIENCE CAKE 24 CONVENIENCE PIZZA 25 CONVENIENCE POTATO TYPES Automatic programmes 1. Activate the appliance. 2. Touch . The display shows , a symbol and the number of the automatic programme. or to choose the 3. Touch automatic programme. 4. Touch or wait five seconds until the appliance automatically starts to work. 5. When the set time ends, an acoustic signal sounds for two minutes. The symbol flashes. 6.
Progress 17 Core temperature sensor The core temperature sensor measures temperature inside the food. When the food is at the set temperature, the oven turns off. There are two temperatures to be set: • the oven temperature (minimum 120 °C), • the food core temperature. CAUTION! Use only the core temperature sensor supplied and the original replacement parts. Directions for the best results: • Ingredients should be at room temperature. • Core temperature sensor cannot be used for liquid dishes.
Progress When you cook with the core temperature sensor, you can change the temperature shown in the display. After you put the core temperature sensor in the socket and set an oven function and temperature, the display shows the current core temperature. Touch again and again to see three other temperatures: • the set core temperature • the current oven temperature • the current core temperature.
Progress 19 You can set the core temperature only when flashes. If is in the display but does not flash before you set the core and temperature, touch or to set a new value. 8. Set the oven function and the oven temperature. The display shows the current core temperature and the heat up symbol . When the dish is at the set core temperature, an acoustic signal sounds for 2 minutes and the value of the core flash. The appliance temperature and deactivates. 9.
Progress ADDITIONAL FUNCTIONS Using My Favourite Programme function Use this function to save your favourite temperature and time settings for an oven function or programme. 1. Set the temperature and time for an oven function or programme. 2. Touch and hold for more than three seconds. An acoustic signal sounds. 3. Deactivate the appliance. • To activate the function touch . The appliance activates your favourite programme. When the function operates, you can change the time and temperature.
Progress 21 Description Value to set 8 CLEANING REMINDER ON / OFF 9 SERVICE MENU - 10 RESTORE SETTINGS YES / NO 1) It is not possible to deactivate the tone of the ON / OFF sensor field. 1. Press and hold for 3 seconds. The display shows SET1 and "1" flashes. 2. Press or to set the setting. 3. Press . 4. Press or to change the value of the setting. . 5. Press To exit the Settings menu, press or press and hold .
Progress The temperature and baking times in the tables are guidelines only. They depend on the recipes and the quality and quantity of the ingredients used. Cooking recommendations Your oven may bake or roast differently to the oven you had before. The below tables provide you with the standard settings for temperature, cooking time and shelf position. If you cannot find the settings for a special recipe, look for the similar one. times.
Progress 23 Food Time (min) Bulgur (water / bulgur ratio 1:1) 25 - 35 Yeast dumplings 25 - 35 30 - 35 35 - 45 Fragrant rice (water / rice ratio 1:1) Green beans 35 - 45 Boiled potatoes, quartered 35 - 45 Cabbage white or red, stripes 40 - 45 Bread dumpling 35 - 45 Potato dumplings 35 - 45 Artichokes 50 - 60 55 - 65 Rice (water / rice ratio 1:1)1) 35 - 45 Dried beans, soaked (water / beans ratio 2:1) Polenta (liquid ratio 3:1) 40 - 50 Sauerkraut 60 - 90 40 - 55 Beetroot 70 - 90
Progress Food Temperature (°C) Time (min) Prawns, frozen 85 30 - 40 Salmon trout 1 kg 85 40 - 45 Meat Food Temperature (°C) Time (min) Chipolatas 80 15 - 20 Bavarian veal sausage (white sausage) 80 20 - 30 Vienna sausage 80 20 - 30 Chicken breast, poached 90 25 - 35 Cooked ham 1 kg 99 55 - 65 Chicken, poached 1 - 1.2 kg 99 60 - 70 Kasseler (smoked loin of pork), poached 90 70 - 90 Veal / pork loin 0.
Progress 25 Food Turbo Grilling (first step: cook meat) Full Steam (second step: add vege‐ tables) Temper‐ ature (°C) Time (min) Shelf po‐ sition Temper‐ ature (°C) Time (min) Shelf po‐ sition Roast beef 1 kg Brussels sprouts, polenta 180 60 - 70 meat: 1 99 40 - 50 meat: 1 vegeta‐ bles: 3 Roast pork 1 kg, Potatoes, vegeta‐ bles, gravy 180 60 - 70 meat: 1 99 30 - 40 meat: 1 vegeta‐ bles: 3 Roast veal 1 kg, Rice, vegeta‐ bles 180 50 - 60 meat: 1 99 30 - 40 meat: 1 vegeta‐ bles: 3
Progress Food Temperature (°C) Time (min) Food Temperature (°C) Time (min) Ready-tobake bagu‐ ettes 40 50 g 200 20 - 30 Lasagne 180 45 - 55 Chicken 1 kg 180 - 200 50 - 60 Ready-tobake rolls 200 20 - 30 Potato gra‐ tin 160 - 170 50 - 60 Ready-tobake bagu‐ ettes, fro‐ zen 40 - 50 g 200 25 - 35 Smoked loin of pork 0.6 - 1 kg 160 - 180 60 - 70 Roast beef 1 kg 180 - 200 60 - 90 Meat loaf, raw 0.5 kg 180 30 - 40 Duck 1.
Progress 27 Tips on baking Baking results Possible cause Remedy The bottom of the cake is not browned suffi‐ ciently. The shelf position is incor‐ rect. Put the cake on a lower shelf. The cake sinks and be‐ comes soggy, lumpy or streaky. The oven temperature is too high. The next time you bake, set a slightly lower oven temperature. The baking time is too short. Set a longer baking time. You cannot decrease baking times by setting higher temperatures. There is too much liquid in the mixture.
Progress Food Function Temperature (°C) Time (min) Shelf position Cheesecake Top / Bottom Heat 170 - 190 60 - 90 1 1) Preheat the oven. Cakes / pastries / breads on baking trays Food Function Tempera‐ ture (°C) Time (min) Shelf po‐ sition Plaited bread / Bread crown Top / Bottom Heat 170 - 190 30 40 3 Christmas stollen Top / Bottom Heat 160 - 1801) 50 70 2 Bread (rye bread): 1. First part of baking proce‐ dure. 2. Second part of baking pro‐ cedure. Top / Bottom Heat 1.
Progress 29 Biscuits Food Function Temperature (°C) Time (min) Shelf position Short pastry biscuits True Fan Cooking 150 - 160 10 - 20 3 Biscuits made with sponge mixture True Fan Cooking 150 - 160 15 - 20 3 Pastries made with egg white / Meringues True Fan Cooking 80 - 100 120 - 150 3 Macaroons True Fan Cooking 100 - 120 30 - 50 3 Biscuits made with yeast dough True Fan Cooking 150 - 160 20 - 40 3 Puff pastries True Fan Cooking 170 - 1801) 20 - 30 3 Rolls True Fan Cooki
Progress Food Function Temperature (°C) Time (min) Shelf position Stuffed vegeta‐ bles True Fan Cooking 160 - 170 30 - 60 1 1) Preheat the oven. Moist Fan Baking For best results follow suggestions listed in the table below.
Progress 31 Biscuits / small cakes / pastries / rolls Food Temperature (°C) Time (min) Short pastry biscuits 150 - 160 Biscuits made with sponge mixture Shelf position 2 positions 3 positions 20 - 40 1/4 1/3/5 160 - 170 25 - 40 1/4 - Biscuits made with egg white, meringues 80 - 100 130 - 170 1/4 - Macaroons 100 - 120 40 - 80 1/4 - Biscuits made with yeast dough 160 - 170 30 - 60 1/4 - Puff pastries 170 - 1801) 30 - 50 1/4 - Rolls 180 20 - 30 1/4 - 1) Preheat the oven
Progress Pizza Setting Food Temperature (°C) Time (min) Shelf position Pizza (thin crust) 210 - 2301)2) 15 - 25 2 Pizza (with many toppings) 180 - 200 20 - 30 2 Tarts 180 - 200 40 - 55 1 Spinach flan 160 - 180 45 - 60 1 Quiche Lorraine 170 - 190 45 - 55 1 Swiss Flan 170 - 190 45 - 55 1 Apple cake, covered 150 - 170 50 - 60 1 Vegetable pie 160 - 180 50 - 60 1 Unleavened bread 210 - 2301) 10 - 20 2 Puff pastry flan 160 - 1801) 45 - 55 2 Flammekuchen (Pizza-like
Progress 33 Food Quantity Function Tempera‐ ture (°C) Time (min) Shelf posi‐ tion Roast beef or fillet: rare per cm of thickness Turbo Grill‐ ing 190 - 2001) 5-6 1 Roast beef or fillet: medium per cm of thickness Turbo Grill‐ ing 180 - 1901) 6-8 1 Roast beef or fillet: well done per cm of thickness Turbo Grill‐ ing 170 - 1801) 8 - 10 1 Food Quantity (kg) Function Tempera‐ ture (°C) Time (min) Shelf po‐ sition Shoulder / Neck / Ham joint 1 - 1.
Progress Game Food Quantity (kg) Function Tempera‐ ture (°C) Time (min) Shelf posi‐ tion Saddle / Leg of hare up to 1 Top / Bot‐ tom Heat 2301) 30 - 40 1 Saddle of venison 1.5 - 2 Top / Bot‐ tom Heat 210 - 220 35 - 40 1 Haunch of venison 1.5 - 2 Top / Bot‐ tom Heat 180 - 200 60 - 90 1 Food Quantity (kg) Function Tempera‐ ture (°C) Time (min) Shelf posi‐ tion Poultry por‐ tions 0.2 - 0.25 each Turbo Grill‐ ing 200 - 220 30 - 50 1 Half chicken 0.4 - 0.
Progress 35 Grilling Food Temperature (°C) Time (min) Shelf position 1st side 2nd side Roast beef 210 - 230 30 - 40 30 - 40 2 Filet of beef 230 20 - 30 20 - 30 3 Back of pork 210 - 230 30 - 40 30 - 40 2 Back of veal 210 - 230 30 - 40 30 - 40 2 Back of lamb 210 - 230 25 - 35 20 - 25 3 Whole Fish, 500 - 1000 g 210 - 230 15 - 30 15 - 30 3/4 Frozen Foods Food Temperature (°C) Pizza, frozen 200 - 220 15 - 25 2 Pizza American, fro‐ zen 190 - 210 20 - 25 2 Pizza, chil
Progress • When the liquid in the jars starts to simmer (after approximately 35 - 60 minutes with one-litre jars), stop the oven or decrease the temperature to 100 °C (see the table).
Progress 37 Food Temperature (°C) Time (h) Mushrooms 50 - 60 6-8 Herbs 40 - 50 2-3 Fruit Food Temperature (°C) Time (h) Plums 60 - 70 Apricots Shelf position 1 position 2 positions 8 - 10 3 1/4 60 - 70 8 - 10 3 1/4 Apple slices 60 - 70 6-8 3 1/4 Pears 60 - 70 6-9 3 1/4 Bread Baking Preheating is not recommended.
Progress Pork Food core temperature (°C) Less Medium More Ham, Roast 80 84 88 Chop (saddle), Smoked pork loin, Smoked loin poached 75 78 82 Veal Food core temperature (°C) Less Medium More Roast veal 75 80 85 Knuckle of veal 85 88 90 Mutton / lamb Food core temperature (°C) Less Medium More Leg of mutton 80 85 88 Saddle of mutton 75 80 85 Leg of lamb, Roast lamb 65 70 75 Game Food core temperature (°C) Less Medium More Saddle of hare, Saddle of venison 65 70
Progress 39 Fish (salmon, trout, zander) Fish (whole / large / steamed), Fish (whole / large / roasted) Casseroles - Precooked vegeta‐ bles Food core temperature (°C) Less Medium More 60 64 68 Food core temperature (°C) Less Medium More Zucchini Casserole, Broccoli Casserole, Fennel Casserole 85 88 91 Casseroles - Savoury Food core temperature (°C) Less Medium More Cannelloni, Lasagne, Pasta bake 85 88 91 Casseroles - Sweet Food core temperature (°C) White bread casserole with / wi
Progress Baking on one level. Biscuits Use the third shelf position. Food Function Temperature (°C) Time (min) Short bread / Pastry stripes True Fan Cooking 140 25 - 40 Short bread / Pastry stripes Top / Bottom Heat 1601) 20 - 30 Small cakes (20 per tray) True Fan Cooking 1501) 20 - 35 Small cakes (20 per tray) Top / Bottom Heat 1701) 20 - 30 1) Preheat the oven. Multilevel Baking.
Progress 41 Food Container (Gastro‐ norm) Quantity (g) Shelf position Tem‐ pera‐ ture (°C) Time (min) Comments Broccoli1) 1 x 1/2 perforated 300 3 99 13 - 15 Put the baking tray on the first shelf posi‐ tion. Broccoli1) 2 x 1/2 perforated 2 x 300 2 and 4 99 13 - 15 Put the baking tray on the first shelf posi‐ tion. Broccoli1) 1 x 1/2 perforated max. 3 99 15 - 18 Put the baking tray on the first shelf posi‐ tion.
Progress can cause damage to the nonstick coating. Clean the moisture from the cavity after each use. 1. Pull carefully the supports up and out of the front catch. 1 3 Recommended cleaning products Do not use abrasive sponges or aggressive detergents. It can cause damage to the enamel and the stainless steel parts. You can buy our products at and at the best retailer shops. Removing the shelf supports Before maintenance, make sure that the oven is cool. There is a risk of burns.
Progress 43 Remove the baking tray after the end of the procedure. Steam Cleaning - S2 the cleaning function if you manually clean the appliance immediately after the function ends. Repeat the procedure a second time if the level of dirt is high. Remove as much dirt as possible manually. Cleaning Reminder Remove the accessories and the shelf support to clean the side walls. The steam cleaning functions support the steam cavity cleaning of the appliance.
Progress Remove the tray after the end of the procedure. If the function Descaling is not performed in the correct way, the display will show a message to repeat it. If the appliance is humid and wet, wipe it out with a dry cloth. Let the appliance dry fully with the door open. Descaling reminder There are two descaling reminders which remind you to perform the function: Descaling. These reminders activate each time you switch off the appliance. When reminder is active S3 flashes in the display.
Progress 45 1. Turn off the oven. Wait until the oven is cooled down. 2. Disconnect the oven from the mains. 3. Put a cloth on the bottom of the cavity. The top lamp 1. Turn the lamp glass cover to remove it. 9. Clean the glass panel with water and soap. Dry the glass panel carefully. When the cleaning is completed, do the above steps in the opposite sequence. Install the smaller panel first, then the larger and the door.
Progress Problem Possible cause Remedy The oven does not heat up. The Child Lock is on. Refer to "Using the Child Lock". The oven does not heat up. The fuse is blown. Make sure that the fuse is the cause of the malfunc‐ tion. If the fuse is blown again and again, contact a qualified electrician. The lamp does not operate. The lamp is defective. Replace the lamp. The display does not show the time during the off sta‐ tus. The display is deactivated.
Progress 47 Problem Possible cause Remedy There is dirty water on the bottom of the cavity after the descaling cycle. The grill- / roasting pan is on a wrong shelf position. Remove the residual water and the descaling agent from the bottom of the oven. Put the grill- / roasting pan on the first shelf position. The cleaning function is in‐ terrupted before it finishes. There was a power cut. Repeat the procedure. The cleaning function is in‐ terrupted before it finishes.
Progress We recommend that you write the data here: Model (MOD.) ......................................... Product number (PNC) ......................................... Serial number (S.N.) ......................................... ENERGY EFFICIENCY Product Fiche and information according to EU 65-66/2014 Supplier's name Progress Model identification PBD46101X Energy Efficiency Index 81.0 Energy efficiency class A+ Energy consumption with a standard load, conventional mode 1.
Progress 49 Residual heat If a programme with the Duration or End Time selection is activated and the cooking time is longer than 30 minutes, the heating elements automatically deactivate earlier in some oven functions. Moist Fan Baking Function designed to save energy during cooking. When you use this function the lamp automatically turns off after 30 seconds. You may turn on the lamp again but this action will reduce the expected energy savings. The fan and lamp continue to operate.
Progress
Progress 51
www.progress-hausgeraete.