
User manual


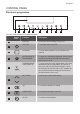


Heat up indicator
If you turn on the heating function,
appears. The bars show that the
temperature in the oven increases or
decreases.
When the oven is at the set temperature,
the bars go off the display.
BEFORE FIRST USE
WARNING! Refer to Safety
chapters.
To set the Time of day refer to
"Clock functions" chapter.
Initial Cleaning
Remove all accessories and removable
shelf supports from the oven.
Refer to "Care and cleaning"
chapter.
Clean the oven and the accessories
before first use.
Put the accessories and the removable
shelf supports back to their initial position.
Setting the water hardness
When you connect the oven to the mains
you have to set the water hardness level.
The table below shows the water
hardness range (dH) with the
corresponding Calcium deposit and the
quality of the water.
Water hardness Calcium deposit
(mmol/l)
Calcium deposit
(mg/l)
Water clas‐
sification
Class dH
1 0 - 7 0 - 1.3 0 - 50 Soft
2 7 - 14 1.3 - 2.5 50 - 100 Moderately
hard
3 14 - 21 2.5 - 3.8 100 - 150 Hard
4 over 21 over 3.8 over 150 Very hard
When the water hardness exceeds the
values in the table, fill the water drawer
with bottled water.
1. Take the 4 colour change strip
supplied with the steam set in the
oven.
2. Put all the reaction zones of the strip
into the water for approximately 1
second.
Do not put the strip into the running
water.
3. Shake the strip to remove the excess
of the water.
4. Wait 1 minute and check the water
hardness with the table below.
The colours of the reaction zones
continue to change. Do not check the
water hardness later than 1 minute
after test.
5. Set the water hardness: settings
menu.
Refer to the "Additional functions" chapter,
Using the settings menu.
Test strip Water Hardness
1
Progress 9