User Manual Oven PBP43100X
Progress CONTENTS Safety information Safety instructions Product description Control panel Before first use Daily use Clock functions Automatic programmes 2 3 6 7 9 9 11 13 Using the accessories Additional functions Hints and tips Care and cleaning Troubleshooting Installation Energy efficiency 14 15 17 27 31 32 34 Subject to change without notice. SAFETY INFORMATION Before the installation and use of the appliance, carefully read the supplied instructions.
Progress 3 General Safety • • • • • • • • • • Only a qualified person must install this appliance and replace the cable. WARNING: The appliance and its accessible parts become hot during use. Care should be taken to avoid touching heating elements. Children less than 8 years of age shall be kept away unless continuously supervised. Always use oven gloves to remove or put in accessories or ovenware. Before maintenance cut the power supply.
Progress • The appliance must be earthed. • Make sure that the electrical information on the rating plate agrees with the power supply. If not, contact an electrician. • Always use a correctly installed shockproof socket. • Do not use multi-plug adapters and extension cables. • Make sure not to cause damage to the mains plug and to the mains cable. Should the mains cable need to be replaced, this must be carried out by our Authorised Service Centre.
Progress 5 • If the appliance is installed behind a furniture panel (e.g. a door) make sure the door is never closed when the appliance is in operation. Heat and moisture can build up behind a closed furniture panel and cause subsequent damage to the appliance, the housing unit or the floor. Do not close the furniture panel until the appliance has cooled down completely after use. Care and cleaning WARNING! Risk of injury, fire, or damage to the appliance.
Progress • Before replacing the lamp, disconnect the appliance from the power supply. • Only use lamps with the same specifications. • Disconnect the appliance from the mains supply. • Cut off the mains electrical cable close to the appliance and dispose of it. • Remove the door catch to prevent children or pets from becoming trapped in the appliance. Disposal Service WARNING! Risk of electrical shock. WARNING! Risk of injury or suffocation.
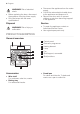
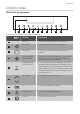
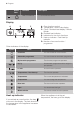
Progress 7 CONTROL PANEL Electronic programmer 1 2 3 4 5 6 7 8 9 10 11 Use the sensor fields to operate the appliance. 1 2 3 4 Sensor Field Function Description - DISPLAY Shows the current settings of the appliance. ON / OFF To activate and deactivate the appliance. OPTIONS To set an oven function or an automatic programme. MY FAVOURITE PROGRAMME To store your favourite programme. Use it to have access to your favourite programme directly or when the appliance is deactivated.
Progress Sensor Field 10 Function Description MINUTE MINDER To set the Minute Minder. Display A B G C F E D A. Oven function symbol B. Temperature / time of day display C. Clock / Residual heat display / Minute Minder D. Residual heat indicator E. Indicators for the clock functions F. Heat-up indicator / Fast Heat Up indicator G. Number of an oven function / programme Other indicators of the display: Symbol / / Name Description Functions You can choose an oven function.
Progress 9 BEFORE FIRST USE Preheating WARNING! Refer to Safety chapters. To set the Time of day refer to "Clock functions" chapter. Initial Cleaning Remove all accessories and removable shelf supports from the appliance. Refer to "Care and cleaning" chapter. Clean the appliance and the accessories before first use. Put the accessories and the removable shelf supports back to their initial position. Preheat the empty appliance before first use. 1.
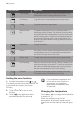
Progress Oven function Application Turbo Grilling To roast larger meat joints or poultry with bones on one shelf position. Also to make gratins and to brown. Fast Grilling To grill flat food in large quantities and to toast bread. Grilling To grill flat food and to toast bread. Moist Fan Baking To prepare baked goods in tin on one shelf position. To save energy during cooking. This function must be used in accordance with the cooking tables in order to achieve the desired cooking result.
Progress 11 Checking the temperature You can see the temperature in the appliance when the function or programme operates. 1. Touch . The Temperature / Time display shows the temperature in the appliance. to go back to the set 2. Touch temperature or the display shows it automatically after five seconds. Fast heat up function Do not put food in the oven when the Fast heat up function operates. The Fast heat up function is not available with every oven function.
Progress To change the time of day touch and again until starts to flash. again Setting the DURATION 1. Set an oven function and temperature. 2. Touch again and again until starts to flash. 3. Use or to set the minutes for DURATION time. 4. Touch or the DURATION time starts automatically after 5 seconds. 5. Use or to set the hours for DURATION time. 6. Touch . The DURATION time starts automatically after 5 seconds. When the set time ends, an acoustic signal sounds for 2 minutes.
Progress 13 2. Use to switch between options. First you set the seconds, then the minutes and the hours. 3. Use or to set the MINUTE to confirm. MINDER and 4. Touch or the MINUTE MINDER starts automatically after 5 seconds. When the set time ends, an acoustic signal sounds for 2 minutes and 00:00 and flash in the display. 5. Touch a sensor field or open the oven door to stop the acoustic signal. COUNT UP TIMER 1. To reset the Count Up Timer, touch again and again until flashes in the display. 2.
Progress Programme number Programme name 18 CONVENIENCE CAKE 19 CONVENIENCE PIZZA 20 CONVENIENCE POTATO TYPES Automatic programmes 1. Activate the appliance. . 2. Touch The display shows , a symbol and the number of the automatic programme. 3. Touch or to choose the automatic programme. or wait five seconds until the 4. Touch appliance automatically starts to work. 5. When the set time ends, an acoustic signal sounds for two minutes. The symbol flashes. 6.
Progress 15 Wire shelf and the deep pan together: Push the deep pan between the guide bars of the shelf support and the wire shelf on the guide bars above and make sure that the feet point down. Small indentation at the top increase safety. The indentations are also anti-tip devices. The high rim around the shelf prevents cookware from slipping of the shelf.
Progress To deactivate the Function Lock repeat step 3. If the Pyrolysis function operates, the door is locked. A message comes on in the display when you touch a sensor field. Using the settings menu The settings menu lets you activate or deactivate functions in the main menu. The display shows SET and the number of the setting. You can deactivate the appliance when the Function Lock is on. When you deactivate the appliance, the Function Lock deactivates.
Progress 17 Brightness of the display Cooling fan There are two modes of display brightness: When the appliance operates, the cooling fan activates automatically to keep the surfaces of the appliance cool. If you deactivate the appliance, the cooling fan can continue to operate until the appliance cools down. • Night brightness - when the appliance is deactivated, the brightness of the display is lower between 10 PM and 6 AM. • Day brightness: – when the appliance is activated.
Progress Cooking times Cooking times depend on the type of food, its consistency, and volume. cooking time, etc.) for your cookware, recipes and quantities when you use this appliance. Initially, monitor the performance when you cook.
Progress 19 Food Top / Bottom Heat True Fan Cooking Time (min) Comments Temperature (°C) Shelf position Temperature (°C) Shelf position 170 3 150 - 160 3 20 - 30 In a baking tray - - 140 - 150 2 and 4 25 - 35 In a baking tray - - 140 - 150 1, 3 and 5 30 - 45 In a baking tray Biscuits / pastry stripes one level 140 3 140 - 150 3 25 - 45 In a baking tray Biscuits / pastry stripes two levels - - 140 - 150 2 and 4 35 - 40 In a baking tray Biscuits / pastry stripes three
Progress Food Top / Bottom Heat True Fan Cooking Time (min) Comments Temperature (°C) Shelf position Temperature (°C) Shelf position Eclairs two levels - - 170 2 and 4 35 - 45 In a baking tray Plate tarts 180 2 170 2 45 - 70 In a 20 cm cake mould Rich fruit cake 160 1 150 2 110 - 120 In a 24 cm cake mould Victoria sand- 170 1 160 2 (left and right) 30 - 50 In a 20 cm cake mould Time (min) Comments wich1) 1) Preheat the oven for 10 minutes.
Progress 21 Flans Food Top / Bottom Heat True Fan Cooking Time (min) Comments Temperature (°C) Shelf position Temperature (°C) Shelf position Pasta flan 200 2 180 2 40 - 50 In a mould Vegetable flan 200 2 175 2 45 - 60 In a mould Quiches1) 180 1 180 1 50 - 60 In a mould Lasagne1) 180 - 190 2 180 - 190 2 25 - 40 In a mould Cannello- 180 - 190 2 180 - 190 2 25 - 40 In a mould Time (min) Comments ni1) 1) Preheat the oven for 10 minutes.
Progress Food Top / Bottom Heat True Fan Cooking Time (min) Comments Temperature (°C) Shelf position Temperature (°C) Shelf position Shin of pork 180 2 160 2 100 - 120 2 pieces Lamb 190 2 175 2 110 - 130 Leg Chicken 220 2 200 2 70 - 85 Whole Turkey 180 2 160 2 210 - 240 Whole Duck 175 2 220 2 120 - 150 Whole Goose 175 2 160 1 150 - 200 Whole Rabbit 190 2 175 2 60 - 80 Cut in pieces Hare 190 2 175 2 150 - 200 Cut in pieces Pheasant 190 2
Progress 23 Food Quantity Pieces (g) Beef steaks 4 600 Sausages 8 Pork chops Temperature (°C) Time (min) Shelf position 1st side 2nd side max. 10 - 12 6-8 4 - max. 12 - 15 10 - 12 4 4 600 max. 12 - 16 12 - 14 4 Chicken (cut in 2) 2 1000 max. 30 - 35 25 - 30 4 Kebabs 4 - max. 10 - 15 10 - 12 4 Breast of chicken 4 400 max. 12 - 15 12 - 14 4 Hamburger 6 600 max. 20 - 30 - 4 Fish fillet 4 400 max. 12 - 14 10 - 12 4 Toasted sandwiches 4-6 - max.
Progress Food Quantity (kg) Temperature (°C) Time (min) Shelf position Chop, spare rib 1 - 1.5 170 - 180 60 - 90 1 or 2 Meat loaf 0.75 - 1 160 - 170 50 - 60 1 or 2 Pork knuckle (precooked) 0.75 - 1 150 - 170 90 - 120 1 or 2 Food Quantity (kg) Temperature (°C) Time (min) Shelf position Roast veal 1 160 - 180 90 - 120 1 or 2 Knuckle of veal 1.
Progress 25 Moist Fan Baking During cooking, open the appliance door only when necessary.
Progress Defrost Food Quantity (g) Defrosting time (min) Further defrosting time (min) Comments Chicken 1000 100 - 140 20 - 30 Place the chicken on an upturned saucer placed on a large plate. Turn halfway through. Meat 1000 100 - 140 20 - 30 Turn halfway through. Meat 500 90 - 120 20 - 30 Turn halfway through.
Progress 27 Vegetables Food Temperature (°C) Cooking time until simmering (min) Continue to cook at 100 °C (min) Carrots1) 160 - 170 50 - 60 5 - 10 Cucumbers 160 - 170 50 - 60 - Mixed pickles 160 - 170 50 - 60 5 - 10 Kohlrabi / Peas / Asparagus 160 - 170 50 - 60 15 - 20 1) Leave standing in the oven after it is deactivated. Drying - True Fan Cooking • Cover trays with grease proof paper or baking parchment.
Progress Notes on cleaning • Clean the front of the appliance with a soft cloth with warm water and a cleaning agent. • To clean metal surfaces, use a dedicated cleaning agent. • Clean the appliance interior after each use. Fat accumulation or other food remains may result in a fire. The risk is higher for the grill pan. • Clean stubborn dirt with a special oven cleaner. • Clean all accessories after each use and let them dry. Use a soft cloth with warm water and a cleaning agent.
Progress 29 Option Description 1 1:00 h for a low degree of dirt 2 1:30 h for a usual degree of dirt 3 2:30 h for a high degree of dirt You can use the End function to delay the start of the cleaning procedure. 7. Touch to activate the Pyrolysis function. Cleaning reminder 2. Lift and turn the levers on the two hinges. To remind you that the pyrolytic cleaning is necessary, the cleaning reminder symbol flashes in the display after each deactivation of the appliance for the next 10 seconds.
Progress 4. Put the door on a soft cloth on a stable surface. 5. Hold the door trim (B) on the top edge of the door at the two sides and push inwards to release the clip seal. A B C 2 B 1 6. Pull the door trim to the front to remove it. 7. Hold the door glass panels by their top edge and carefully pull them out one by one. Start from the top panel. Make sure the glass slides out of the supports completely. Make sure that you install the middle panel of glass in the seats correctly.
Progress 31 2. Clean the glass cover. 3. Replace the lamp with a suitable 300 °C heat-resistant lamp. 4. Install the glass cover. TROUBLESHOOTING WARNING! Refer to Safety chapters. What to do if... Problem Possible cause Remedy You cannot activate or operate the oven. The oven is not connected to an electrical supply or it is connected incorrectly. Check if the oven is correctly connected to the electrical supply (refer to the connection diagram if available). The oven does not heat up.
Progress Problem Possible cause Remedy The display shows "C3". The cleaning function does not operate. You did not fully close the door, or the door lock is defective. Fully close the door. The display shows "F102". • You did not fully close the door. • The door lock is defective. • Fully close the door. • Deactivate the oven with the house fuse or the safety switch in the fuse box and activate it again. • If the display shows "F102" again, contact the Customer Care Department.
Progress 33 Electrical installation Building In The manufacturer is not responsible if you do not follow the safety precautions from the Safety chapters. 548 21 558 min. 550 114 16 20 600 min. 560 589 594 573 This appliance is supplied with a main plug and a main cable. Cable 594 Cable types applicable for installation or replacement: 5 3 H07 RN-F, H05 RN-F, H05 RRF, H05 VV-F, H05 V2V2-F (T90), H05 BB-F For the section of the cable refer to the total power on the rating plate.
Progress ENERGY EFFICIENCY Product Fiche and information according to EU 65-66/2014 Supplier's name Progress Model identification PBP43100X Energy Efficiency Index 81.2 Energy efficiency class A+ Energy consumption with a standard load, conventional mode 0.93 kWh/cycle Energy consumption with a standard load, fan-forced mode 0.69 kWh/cycle Number of cavities 1 Heat source Electricity Volume 72 l Type of oven Built-In Oven Mass 35.
Progress 35 Deactivating the display If necessary, you can fully deactivate the display. Touch and at the same time until the display goes out. This step also activates the appliance. from the temperature indicated on the display during a cooking cycle and cooking times may be different from the cooking times in other programmes. When you use Moist Fan Baking, the lamp automatically deactivates after 30 seconds. You may activate the lamp again but this action will reduce the expected energy savings.
www.progress-hausgeraete.