User Manual Oven PBP43100X
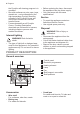
Progress CONTENTS Safety information Safety instructions Product description Control panel Before first use Daily use Clock functions Automatic programmes 2 3 6 7 9 9 11 13 Using the accessories Additional functions Hints and tips Care and cleaning Troubleshooting Installation Energy efficiency 14 15 17 30 33 34 36 Subject to change without notice. SAFETY INFORMATION Before the installation and use of the appliance, carefully read the supplied instructions.
Progress 3 • Children shall not carry out cleaning and user maintenance of the appliance without supervision. General Safety • • • • • • • • • • Only a qualified person must install this appliance and replace the cable. WARNING: The appliance and its accessible parts become hot during use. Care should be taken to avoid touching heating elements. Always use oven gloves to remove or put in accessories or ovenware. Before carrying out any maintenance, disconnect the appliance from the power supply.
Progress • Install the appliance in a safe and suitable place that meets installation requirements. Electrical connection WARNING! Risk of fire and electric shock. • All electrical connections should be made by a qualified electrician. • The appliance must be earthed. • Make sure that the parameters on the rating plate are compatible with the electrical ratings of the mains power supply. • Always use a correctly installed shockproof socket. • Do not use multi-plug adapters and extension cables.
Progress 5 • • • • • – do not put water directly into the hot appliance. – do not keep moist dishes and food in the appliance after you finish the cooking. – be careful when you remove or install the accessories. Discoloration of the enamel or stainless steel has no effect on the performance of the appliance. Use a deep pan for moist cakes. Fruit juices cause stains that can be permanent. This appliance is for cooking purposes only. It must not be used for other purposes, for example room heating.
Progress the Pyrolytic self cleaning program is in operation. • Non-stick surfaces on pots, pans, trays, utensils etc., can be damaged by the high temperature Pyrolytic cleaning operation of all Pyrolytic Ovens and can be also a source for low level harmful fumes. • Fumes released from all Pyrolytic Ovens / Cooking Residues as described are not harmful to humans, including infants or persons with medical conditions. Internal lighting WARNING! Risk of electric shock.
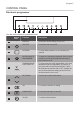
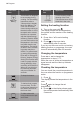
Progress 7 CONTROL PANEL Electronic programmer 1 2 3 4 5 6 7 8 9 10 Use the sensor fields to operate the oven. 1 2 3 4 Sensor Field Function Description - DISPLAY Shows the current settings of the oven. ON / OFF To turn the oven on and off. OPTIONS To set a heating function or an automatic pro‐ gramme. MY FAVOURITE PROGRAMME To store your favourite programme. Use it to have access to your favourite programme directly or when the oven is off.
Progress Sensor Field 10 Function Description MINUTE MINDER To set the Minute Minder. Display A B G C F E D A. Oven function symbol B. Temperature / time of day display C. Clock / Residual heat display / Minute Minder D. Residual heat indicator E. Indicators for the clock functions F. Heat-up indicator / Fast Heat Up indicator G. Number of an oven function / programme Other indicators of the display: Symbol / / Name Description Functions You can choose an oven function.
Progress 9 BEFORE FIRST USE WARNING! Refer to Safety chapters. To set the Time of day refer to "Clock functions" chapter. Initial Cleaning Remove all accessories and removable shelf supports from the oven. Refer to "Care and cleaning" chapter. Clean the oven and the accessories before first use. Put the accessories and the removable shelf supports back to their initial position. Preheating Preheat the empty oven before first use. 1. Set the function: and the maximum temperature. 2.
Progress Oven func‐ tion Moist Fan Baking Application This function is designed to save energy during cooking. For the cooking instructions refer to "Hints and tips" chapter, Moist Fan Baking. The oven door should be closed during cooking so that the function is not in‐ terrupted and to ensure that the oven operates with the highest energy efficiency possible. When you use this function, the temperature in the cavity may differ from the set temperature. The residu‐ al heat is used.
Progress 11 Fast heat up functions" chapter, Using the settings menu. Do not put food in the oven when the Fast heat up operates. The Fast heat up decreases the heat up time. The Fast heat up is available only for some oven functions. If Faulty tone is turned on in the settings menu, the signal sounds if the Fast heat up is not available for the set function. Refer to "Additional To turn on the Fast heat up press and hold for more than 3 seconds.
Progress 4. Press or the DURATION time starts automatically after 5 seconds. 5. Use or to set the hours for DURATION time. 6. Press . The DURATION time starts automatically after 5 seconds. When the set time ends, the signal sounds for 2 minutes. and time setting flash in the display. The oven turns off. 7. Press a sensor field or open the oven door to stop the signal. 8. Turn off the oven. Setting the END 1. Set an oven function and temperature. 2. Touch again and again until starts to flash. 3.
Progress 13 When the set time ends, an acoustic signal sounds for 2 minutes and 00:00 and flash in the display. 5. Touch a sensor field or open the oven door to stop the acoustic signal. 2. Press and hold: . When the display shows "00:00" the Count Up Timer starts to count up again. COUNT UP TIMER 1. To reset the Count Up Timer press: again and again until display shows flashing . AUTOMATIC PROGRAMMES WARNING! Refer to Safety chapters. There are 20 automatic programmes.
Progress 2. Touch . 3. Touch or to set the weight programme. The display shows: the cooking time, the duration symbol , a default weight, a unit of measurement (kg, g). 4. Touch or the settings save automatically after five seconds. The appliance activates. 5. You can change the default weight value with or . Touch . 6. When the set time ends, an acoustic signal sounds for two minutes. flashes. 7. Touch a sensor field or open the oven door to stop the acoustic signal. 8. Deactivate the appliance.
Progress 15 ADDITIONAL FUNCTIONS Using My Favourite Programme function Use this function to save your favourite temperature and time settings for an oven function or programme. 1. Set the temperature and time for an oven function or programme. 2. Touch and hold for more than three seconds. An acoustic signal sounds. 3. Deactivate the appliance. • To activate the function touch . The appliance activates your favourite programme. When the function operates, you can change the time and temperature.
Progress Description Value to set 4 KEY TONE1) CLICK / BEEP / OFF 5 FAULTY TONE ON / OFF 6 DEMO MODE Activation code: 2468 7 SERVICE MENU - 8 RESTORE SETTINGS YES / NO 1) It is not possible to deactivate the tone of the ON / OFF sensor field. 1. Press and hold for 3 seconds. The display shows SET1 and "1" flashes. 2. Press or to set the setting. 3. Press . 4. Press or to change the value of the setting. . 5. Press To exit the Settings menu, press or press and hold .
Progress 17 HINTS AND TIPS Baking cakes Do not open the oven door before 3/4 of the set cooking time is up. WARNING! Refer to Safety chapters. The temperature and baking times in the tables are guidelines only. They depend on the recipes and the quality and quantity of the ingredients used. If you use two baking trays at the same time, keep one empty level between them. Cooking meat and fish Use a deep pan for very fatty food to prevent the oven from stains that can be permanent.
Progress Food Conventional Cooking True Fan Cooking Time (min) Com‐ ments Temper‐ ature (°C) Shelf po‐ sition Temper‐ ature (°C) Shelf po‐ sition Butter‐ milk cheese‐ cake 170 1 165 2 80 - 100 In a 26 cm cake mould Strudel 175 3 150 2 60 - 80 In a bak‐ ing tray Jam-tart 170 2 165 2 (left and right) 30 - 40 In a 26 cm cake mould Christ‐ mas cake / Rich fruit cake 160 2 150 2 90 - 120 In a 20 cm cake mould.
Progress 19 Food Conventional Cooking True Fan Cooking Time (min) Com‐ ments Temper‐ ature (°C) Shelf po‐ sition Temper‐ ature (°C) Shelf po‐ sition Buns 190 3 190 3 12 - 20 In a bak‐ ing tray.
Progress Food Conventional Cooking True Fan Cooking Time (min) Com‐ ments Temper‐ ature (°C) Shelf po‐ sition Temper‐ ature (°C) Shelf po‐ sition Bread rolls 190 2 180 2 (2 and 4) 25 - 40 6 - 8 rolls in a bak‐ ing tray. Preheat the oven for 10 mi‐ nutes Pizza 230 - 250 1 230 - 250 1 10 - 20 In a bak‐ ing tray or a deep pan. Preheat the oven for 10 mi‐ nutes Scones 200 3 190 3 10 - 20 In a bak‐ ing tray.
Progress 21 Food Conventional Cooking True Fan Cooking Time (min) Com‐ ments Temper‐ ature (°C) Shelf po‐ sition Temper‐ ature (°C) Shelf po‐ sition Lasagne 180 - 190 2 180 - 190 2 25 - 40 In a mould. Preheat the oven for 10 mi‐ nutes Cannello‐ ni 180 - 190 2 180 - 190 2 25 - 40 In a mould.
Progress Food Conventional Cooking True Fan Cooking Time (min) Com‐ ments Temper‐ ature (°C) Shelf po‐ sition Temper‐ ature (°C) Shelf po‐ sition Shin of pork 180 2 160 2 100 - 120 2 pieces Lamb 190 2 175 2 110 - 130 Leg Chicken 220 2 200 2 70 - 85 Whole Turkey 180 2 160 2 210 - 240 Whole Duck 175 2 220 2 120 - 150 Whole Goose 175 2 160 1 150 - 200 Whole Rabbit 190 2 175 2 60 - 80 Cut in pieces Hare 190 2 175 2 150 - 200 Cut in pieces Phea
Progress 23 Food Quantity Time (min) Pieces Quantity (kg) 1st side 2nd side Beef steaks 4 0.6 10 - 12 6-8 Sausages 8 - 12 - 15 10 - 12 Pork chops 4 0.6 12 - 16 12 - 14 Chicken (cut in 2) 2 1 30 - 35 25 - 30 Kebabs 4 - 10 - 15 10 - 12 Breast of chicken 4 0.4 12 - 15 12 - 14 Hamburger 6 0.6 20 - 30 - Fish fillet 4 0.4 12 - 14 10 - 12 Toasted sandwiches 4-6 - 5-7 - Toast 4-6 - 2-4 2-3 Turbo Grilling Pork Use the first or the second shelf position.
Progress Food Tempera‐ ture (°C) Time (min) Food Tempera‐ ture (°C) Time (min) Knuckle of veal, 1.5 - 2 kg 160 - 180 120 - 150 Chicken, poulard, 1 1.5 kg 190 - 210 50 - 70 Duck, 1.5 2 kg 180 - 200 80 - 100 Goose, 3.5 - 5 kg 160 - 180 120 - 180 Turkey, 2.5 - 3.5 kg 160 - 180 120 - 150 Turkey, 4 6 kg 140 - 160 150 - 240 Food Tempera‐ ture (°C) Time (min) Whole fish, 1 - 1.5 kg 210 - 220 40 - 60 Lamb Food Tempera‐ ture (°C) Time (min) Leg of lamb, roast lamb, 1 - 1.
Progress 25 Food Accessories Tempera‐ ture (°C) Shelf po‐ sition Time (min) Sponge flan base flan base tin on wire shelf 180 2 15 - 25 Victoria Sand‐ wich baking dish on wire shelf 170 2 40 - 50 Poached fish, 0.3 kg baking tray or dripping pan 180 3 20 - 25 Whole fish, 0.2 kg baking tray or dripping pan 180 3 25 - 35 Fish fillet, 0.3 kg pizza pan on wire shelf 180 3 25 - 30 Poached meat, 0.25 kg baking tray or dripping pan 200 3 35 - 45 Shashlik, 0.
Progress In the first 10 minutes you can set an oven temperature between 80 °C and 150 °C. The default is 90 °C. After the temperature is set, the oven continues to cook at 80 °C. Do not use this function for poultry. Set the temperature to 120 °C. Always cook without a lid when you use this function. 1. Sear the meat in a pan on the hob on a very high setting for 1 - 2 minutes on each side. 2. Put the meat together with the hot roasting pan in the oven and on the wire shelf. 3.
Progress 27 Soft fruit Food Temperature (°C) Cooking time until simmering (min) Continue to cook at 100 °C (min) Strawberries / Blue‐ berries / Raspber‐ ries / Ripe goose‐ berries 160 - 170 35 - 45 - Food Temperature (°C) Cooking time until simmering (min) Continue to cook at 100 °C (min) Pears / Quinces / Plums 160 - 170 35 - 45 10 - 15 Food Temperature (°C) Cooking time until simmering (min) Continue to cook at 100 °C (min) Carrots1) 160 - 170 50 - 60 5 - 10 Cucumbers 160 - 170
Progress Fruit Food Temperature (°C) Time (h) Plums 60 - 70 Apricots Apple slices Pears Shelf position 1 position 2 positions 8 - 10 3 1/4 60 - 70 8 - 10 3 1/4 60 - 70 6-8 3 1/4 60 - 70 6-9 3 1/4 Information for test institutes Tests according to IEC 60350-1. Food Function Acces‐ sories Shel f po‐ si‐ tion Tem‐ pera‐ ture (°C) Time (min) Comments Small cake Conven‐ tional Cooking Baking tray 3 170 20 - 30 Put 20 small cakes per one baking tray.
Progress 29 Food Function Acces‐ sories Shel f po‐ si‐ tion Tem‐ pera‐ ture (°C) Time (min) Comments Fatless‐ ponge cake True Fan Cooking / Fan Cook‐ ing Wire shelf 2 160 40 - 50 Use a cake mould (26 cm di‐ ameter). Preheat the oven for 10 minutes. Fatless‐ ponge cake True Fan Cooking / Fan Cook‐ ing Wire shelf 2 and 4 160 40 - 60 Use a cake mould (26 cm di‐ ameter). Diago‐ nally shifted. Preheat the oven for 10 minutes.
Progress CARE AND CLEANING WARNING! Refer to Safety chapters. Notes on cleaning Clean the front of the oven with a soft cloth with warm water and a mild cleaning agent. CAUTION! Be careful when you remove the shelf supports. 1. Pull the front of the shelf support away from the side wall. To clean metal surfaces, use a dedicated cleaning agent. Clean the oven interior after each use. Fat accumulation or other food remains may result in a fire. The risk is higher for the grill pan.
Progress 31 temperature inside the oven is under safety conditions and the pyrolytic cleaning finishes. During the pyrolytic cleaning the lamp is turned off. 1. Remove the worst dirt manually. 2. Clean the inner side of the door with hot water, so that the residues do not burn from the hot air. 3. Turn on the oven. 4. Set the Pyrolysis function. Refer to "Oven functions". 5. Press . 6.
Progress forward and remove the door from its seat. When the cleaning is completed, install the glass panels and the oven door. Make sure that you put the glass panels (A and B) back in the correct sequence. Check for the symbol / printing on the side of the glass panel, each of the glass panels looks different to make the disassembly and assembly easier. When installed correctly the door trim clicks. A B 4. Put the door on a soft cloth on a stable surface. 5.
Progress 33 The back lamp 1. Turn the lamp glass cover to remove it. 2. Clean the glass cover. 3. Replace the lamp with a suitable 300 °C heat-resistant lamp. 4. Install the glass cover. TROUBLESHOOTING WARNING! Refer to Safety chapters. What to do if... Problem Possible cause Remedy You cannot activate or oper‐ ate the oven. The oven is not connected to an electrical supply or it is connected incorrectly.
Progress Problem Possible cause Remedy The display shows "C3". The cleaning function does not operate. You did not fully close the door, or the door lock is defective. Fully close the door. The display shows "F102". • • • • You did not fully close the door. The door lock is defec‐ tive. • The display shows an error code that is not in this table. There is an electrical fault. • • The appliance is activated and does not heat up. The fan does not operate. The display shows "Demo".
Progress 35 Building In 548 21 min. 550 80 60 520 600 114 18 20 589 594 min. 560 595+-1 198 60 5 3 523 20 548 70 60 21 min. 550 20 520 18 590 114 min.
Progress Securing the appliance to the cabinet A B Cable Cable types applicable for installation or replacement: H07 RN-F, H05 RN-F, H05 RRF, H05 VVF, H05 V2V2-F (T90), H05 BB-F For the section of the cable refer to the total power on the rating plate. You can also refer to the table: Electrical installation The manufacturer is not responsible if you do not follow the safety precautions from the Safety chapters. Total power (W) Section of the ca‐ ble (mm²) maximum 1380 3 x 0.
Progress 37 Energy saving Residual heat If a programme with the Duration or End Time selection is activated and the cooking time is longer than 30 minutes, the heating elements automatically deactivate earlier in some oven functions. The oven contains features which help you save energy during everyday cooking. General hints Make sure that the oven door is closed properly when the oven operates. Do not open the door too often during cooking.
Progress
Progress 39
www.progress-hausgeraete.