User Manual Oven PBP5325X
Progress CONTENTS Safety information Safety instructions Product description Control panel Before first use Daily use Clock functions Automatic programmes 2 3 6 7 8 9 11 12 Using the accessories Additional functions Hints and tips Care and cleaning Troubleshooting Technical information Energy efficiency 14 15 16 30 32 34 34 Subject to change without notice. SAFETY INFORMATION Before the installation and use of the appliance, carefully read the supplied instructions.
Progress 3 General Safety • • • • • • • • • Only a qualified person must install this appliance and replace the cable. Internally the appliance becomes hot when in operation. Do not touch the heating elements that are in the appliance. Always use oven gloves to remove or put in accessories or ovenware. Before maintenance cut the power supply. Ensure that the appliance is switched off before replacing the lamp to avoid the possibility of electric shock. Do not use a steam cleaner to clean the appliance.
Progress • Always use a correctly installed shockproof socket. • Do not use multi-plug adapters and extension cables. • Make sure not to cause damage to the mains plug and to the mains cable. Should the mains cable need to be replaced, this must be carried out by our Authorised Service Centre. • Do not let mains cables touch or come near the appliance door, especially when the door is hot.
Progress 5 • Before maintenance, deactivate the appliance and disconnect the mains plug from the mains socket. • Make sure the appliance is cold. There is the risk that the glass panels can break. • Replace immediately the door glass panels when they are damaged. Contact the Service. • Be careful when you remove the door from the appliance. The door is heavy! • Clean regularly the appliance to prevent the deterioration of the surface material. • Remaining fat or food in the appliance can cause fire.
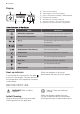
Progress • Cut off the mains cable and discard it. • Remove the door catch to prevent children and pets to get closed in the appliance. PRODUCT DESCRIPTION General overview 1 2 3 4 5 7 4 3 5 2 1 2 3 4 5 6 7 Control panel Electronic programmer Heating element Lamp Fan Shelf support, removable Shelf positions 1 6 Accessories Wire shelf For cookware, cake tins, roasts. Baking tray For cakes and biscuits. Combi pan For cakes and biscuits. To bake and roast or as a pan to collect fat.
Progress 7 CONTROL PANEL Electronic programmer 1 2 3 4 5 6 7 8 9 10 11 Use the sensor fields to operate the appliance. 1 2 Sensor Field Function Description - DISPLAY Shows the current settings of the appliance. ON / OFF To activate and deactivate the appliance. OPTIONS To set an oven function, a cleaning function or an automatic programme (only when the appliance is activated). MY FAVOURITE PROGRAMME To store your favourite programme.
Progress Display A B G C F E D A) B) C) D) E) F) G) Oven function symbol Temperature / time of day display Clock / Residual heat display / Minute Minder Residual heat indicator Indicators for the clock functions Heat-up indicator / Fast Heat Up indicator Number of an oven function / programme Other indicators of the display: Symbol / / Name Description Automatic programme You can choose an automatic programme. My favourite programme The favourite programme operates.
Progress 9 Setting the time After the first connection to the mains, all symbols in the display are on for some seconds. For the subsequent few seconds the display shows the software version. After the software version goes off, the display shows h and 12:00. 1. 2. 3. 4. Touch Touch Touch Touch or . or or to set the hours. to set the minutes. The Temperature / Time display shows the new time. Changing the time You can change the time of day only when the appliance is off. Touch .
Progress Oven function Application Grilling To grill flat food and to toast bread. Keep Warm To keep food warm. Defrost To defrost frozen food. Bottom Heat To bake cakes with crispy bottom and to preserve food. ECO Roasting The ECO functions let you optimize the energy consumption during cooking. It is necessary to set the cooking time first. To get more information about the recommended settings, refer to the cooking tables with the equivalent function.
Progress 11 The Fast heat up function decreases the heat up time. To activate the Fast heat up function touch for more than three seconds. and hold If you activate the Fast heat up function, the bars on the display flash one by one and comes on to show that the function operates. CLOCK FUNCTIONS Clock functions table Clock function Application COUNT UP TIMER To set the count up, which shows how long the appliance operates. This function has no effect on the operation of the appliance.
Progress Setting the END 1. Activate the appliance and set an oven function and temperature. 2. Touch again and again until the display shows . flashes in the display. or to set the END and 3. Use or to confirm. First you set the minutes and then the hours. When the set time ends, an acoustic signal sounds for two minutes. symbol and the time setting flash in the display. The appliance deactivates. 4. Touch a sensor field or open the oven door to stop the acoustic signal. 5. Deactivate the appliance.
Progress 13 Automatic programmes Programme number Programme name 1 BRAISED MEAT 2 ROAST PORK 3 ROAST VEAL 4 ROAST LAMB 5 ROAST GAME 6 CHICKEN, WHOLE 7 WHOLE FISH 8 PIZZA 9 QUICHE LORRAINE 10 LEMON SPONGE CAKE 11 CHEESE CAKE 12 ROLLS 13 FARMER BREAD 14 DOUGH PROVING 15 POTATO GRATIN 16 LASAGNE 17 CANNELLONI 18 CONVENIENCE CAKE 19 CONVENIENCE PIZZA 20 CONVENIENCE POTATO TYPES Automatic programmes 1. Activate the appliance. 2. Touch .
Progress The display shows: the cooking time, the duration symbol , a default weight, a unit of measurement (kg, g). 4. Touch or the settings save automatically after five seconds. The appliance activates. 5. You can change the default weight value with or . Touch . 6. When the set time ends, an acoustic signal sounds for two minutes. flashes. The appliance deactivates. 7. Touch a sensor field or open the door to stop the acoustic signal. USING THE ACCESSORIES WARNING! Refer to Safety chapters.
Progress 15 ADDITIONAL FUNCTIONS Using My Favourite Programme function To deactivate the Child Lock function repeat step 2. Use this function to save your favourite temperature and time settings for an oven function or programme. Using the Function Lock 1. Set the temperature and time for an oven function or programme. 2. Touch and hold for more than three seconds. An acoustic signal sounds. 3. Deactivate the appliance. • To activate the function touch .
Progress Description Value to set 4 KEY TONE1) CLICK / BEEP / OFF 5 FAULTY TONE ON / OFF 6 SERVICE MENU - 7 RESTORE SETTINGS ON / OFF 1) It is not possible to deactivate the tone of the ON / OFF sensor field. 1. When the appliance is deactivated, touch and hold for three seconds. The display shows SET1 and "1" flashes. or to set the setting. 2. Touch 3. Touch . 4. Touch or to change the value of the setting. 5. Touch .
Progress 17 The temperature and baking times in the tables are guidelines only. They depend on the recipes and the quality and quantity of the ingredients used. Baking • Your oven can bake or roast differently to the appliance you had before. Adapt your usual settings (temperature, cooking times) and shelf positions to the values in the tables. • The manufacturer recommends that you use the lower temperature the first time.
Progress Baking results Possible cause Remedy The cake is not ready in the baking time given. The oven temperature is too low. The next time you bake, set a slightly higher oven temperature.
Progress 19 Food Function Temperature (°C) Time (min) Shelf position Christmas stollen Conventional Cooking 160 - 1801) 50 - 70 2 Bread (rye bread): 1. First part of baking procedure. 2. Second part of baking procedure. Conventional Cooking 1. 2301) 2. 160 - 180 1. 20 2.
Progress Food Function Temperature (°C) Time (min) Shelf position Yeast cakes with delicate toppings (e.g.
Progress 21 Food Function Temperature (°C) Time (min) Shelf position Small cakes / Small cakes (20 per tray) Conventional Cooking 1701) 20 - 30 3 1) Preheat the oven.
Progress Biscuits / small cakes / small cakes / pastries / rolls Food Temperature (°C) Time (min) Short pastry biscuits 150 - 160 Short bread / Short bread / Pastry Stripes Shelf position 2 positions 3 positions 20 - 40 1/4 1/3/5 140 25 - 45 1/4 1/3/5 Biscuits made with sponge mixture 160 - 170 25 - 40 1/4 - Biscuits made with egg white, meringues 80 - 100 130 - 170 1/4 - Macaroons 100 - 120 40 - 80 1/4 - Biscuits made with yeast dough 160 - 170 30 - 60 1/4 - Puff past
Progress 23 Food Quantity Temperature (°C) Time (min) Shelf position Roast veal 1000 - 1500 g 120 120 - 150 1 Steaks 200 - 300 g 120 20 - 40 3 Pizza Setting Food Temperature (°C) Time (min) Shelf position Pizza (thin crust) 200 - 2301)2) 15 - 20 2 Pizza (with a lot of topping) 180 - 200 20 - 30 2 Tarts 180 - 200 40 - 55 1 Spinach flan 160 - 180 45 - 60 1 Quiche Lorraine 170 - 190 45 - 55 1 Swiss Flan 170 - 190 45 - 55 1 Cheesecake 140 - 160 60 - 90 1 Apple cak
Progress • Baste large roasts and poultry with their juices several times during roasting. This gives better roasting results. • You can deactivate the appliance approximately 10 minutes before the end of the roasting time, and use the residual heat. Roasting tables Beef Food Quantity Function Temperature (°C) Time (min) Shelf position Pot roast 1 - 1.
Progress 25 Lamb Food Quantity (kg) Function Temperature (°C) Shelf position Time (min) Shelf position Leg of lamb / Roast lamb 1 - 1.5 Turbo Grilling 150 - 170 100 - 120 1 Saddle of lamb 1 - 1.5 Turbo Grilling 160 - 180 40 - 60 1 Food Quantity Function Temperature (°C) Time (min) Shelf position Saddle / Leg of hare up to 1 kg Conventional Cooking 2301) 30 - 40 1 Saddle of venison 1.5 - 2 kg Conventional Cooking 210 - 220 35 - 40 1 Haunch of venison 1.
Progress Fish (steamed) Food Quantity (kg) Function Temperature (°C) Time (min) Shelf position Whole fish 1 - 1.5 Conventional Cooking 210 - 220 40 - 60 1 Grilling • Always grill with the maximum temperature setting. • Set the shelf into the shelf position as recommended in the grilling table. • Always set the pan to collect the fat into the first shelf position. • Grill only flat pieces of meat or fish. • Always preheat the empty oven with the grill functions for 5 minutes.
Progress 27 Frozen foods Food Temperature (°C) Time (min) Shelf position Pizza, frozen 200 - 220 15 - 25 2 Pizza American, frozen 190 - 210 20 - 25 2 Pizza, chilled 210 - 230 13 - 25 2 Pizza Snacks, frozen 180 - 200 15 - 30 2 French Fries, thin 200 - 220 20 - 30 3 French Fries, thick 200 - 220 25 - 35 3 Wedges / Croquettes 220 - 230 20 - 35 3 Hash Browns 210 - 230 20 - 30 3 Lasagne / Cannelloni, fresh 170 - 190 35 - 45 2 Lasagne / Cannelloni, frozen 160 - 180 40 -
Progress • Do not cover the food with a bowl or a plate, as this can extend the defrost time. Food Quantity Defrosting time (min) Further defrosting time (min) Comments Chicken 1 kg 100 - 140 20 - 30 Put the chicken on an upturned saucer in a big plate. Turn halfway through. Meat 1 kg 100 - 140 20 - 30 Turn halfway through. Meat 500 g 90 - 120 20 - 30 Turn halfway through.
Progress 29 Stone fruit Food Temperature (°C) Cooking time until simmering (min) Continue to cook at 100 °C (min) Pears / Quinces / Plums 160 - 170 35 - 45 10 - 15 Food Temperature (°C) Cooking time until simmering (min) Continue to cook at 100 °C (min) Carrots1) 160 - 170 50 - 60 5 - 10 Cucumbers 160 - 170 50 - 60 - Mixed pickles 160 - 170 50 - 60 5 - 10 Kohlrabi / Peas / Asparagus 160 - 170 50 - 60 15 - 20 Vegetables 1) Leave standing in the oven after it is deactivated.
Progress Food Pears Temperature (°C) Time (h) 60 - 70 6-9 Shelf position 1 position 2 positions 3 1/4 CARE AND CLEANING WARNING! Refer to Safety chapters. Notes on cleaning • Clean the front of the appliance with a soft cloth with warm water and a cleaning agent. • To clean metal surfaces, use a usual cleaning agent. • Clean the appliance interior after each use. Fat accumulation or other food remains may result in a fire. The risk is higher for the grill pan.
Progress 31 CAUTION! If there are other appliances installed in the same cabinet, do not use them at the same time as the Pyrolysis function. It can cause damage to the appliance. During the pyrolytic cleaning the door is locked. The symbol and the bars of the heat indicator come up, until the door unlocks. The door unlocks when the temperature inside the oven is under safety conditions and the pyrolytic cleaning finishes. During the pyrolytic cleaning the lamp is deactivated. 1.
Progress WARNING! Danger of electrocution! Disconnect the fuse before you replace the lamp. The lamp and the lamp glass cover can be hot. 2 B 1 7. Pull the door trim to the front to remove it. 8. Hold the door glass panels on their top edge one by one and pull them up out of the guide. 9. Clean the glass panel with water and soap. Dry the glass panel carefully. When the cleaning is completed, install the glass panels and the door. Do the above steps in the opposite sequence.
Progress 33 Problem Possible cause Remedy The oven does not heat up. The automatic switch-off is activated. Refer to "Automatic switchoff". The oven does not heat up. The Child Lock is on. Refer to "Using the Child Lock". The oven does not heat up. The fuse is released. Make sure that the fuse is the cause of the malfunction. If the fuse releases again and again, contact a qualified electrician. The lamp does not operate. The lamp is defective. Replace the lamp.
Progress Service data If you cannot find a solution to the problem yourself, contact your dealer or an Authorised Service Centre. the front frame of the appliance cavity. Do not remove the rating plate from the appliance cavity. The necessary data for the service centre is on the rating plate. The rating plate is on We recommend that you write the data here: Model (MOD.) ......................................... Product number (PNC) ......................................... Serial number (S.N.) .
Progress 35 Energy saving • Residual heat – In some oven functions if a programme with time selection (Duration, End, Time Delay) is activated and the cooking time is longer than 30 minutes, the heating elements deactivate automatically 10% earlier. The fan and lamp continue to operate. • Cooking with the lamp off deactivate the lamp during the cooking and activate only when you need it.
www.progress-hausgeraete.