Gebruiksaanwijzing User Instructions Inbouwoven Built-in oven PBP 5360
progress Inhoud Waarschuwingen en belangrijke veiligheidsinstructies ....................................................... 3 Beschrijving van het apparaat .......................................................................................... 5 Bedieningspaneel ............................................................................................................. 6 Eerste installatie ...............................................................................................................
progress Waarschuwingen en belangrijke veiligheidsinstructies Bewaar de bij dit apparaat geleverde gebruiksaanwijzing zorgvuldig. Mocht het apparaat aan derden doorgegeven of verkocht worden, of indien u het apparaat wanneer u gaat verhuizen in uw oude woning achterlaat, dan is het van groot belang dat de nieuwe gebruiker over deze gebruiksaanwijzing en de aanwijzingen kan beschikken. Deze aanwijzingen zijn bedoeld voor de veiligheid van de gebruikers en hun huisgenoten.
progress Veiligheid van personen · Dit apparaat is bestemd voor gebruik door volwassenen. Het is gevaarlijk om het door kinderen te laten gebruiken of hen ermee te laten spelen. · Houd kinderen uit de buurt, zolang de oven in werking is. Ook nadat u de oven heeft uitgeschakeld, blijft de deur nog lang heet.
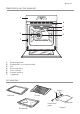
progress Beschrijving van het apparaat 1 2 3 4 5 6 7 1. 2. 3. 4. 5. 6. 7.
progress Bedieningspaneel Gaar— Temperatuur— functies indicatie 1 2 3 4 Drukknoppen 1. AAN/UIT 2. Oven-functietoets 3. Snelopwarmfunctie 4. Pyrolytische reinigingsfunctie 5. Verlagingstoets “ ” (tijd of temperatuur) 6. Verhogingstoets “ ” (tijd of temperatuur) 7. Kookwekker / bereidingsduur / einde bereidingsduur Alle functies van de oven worden elektronisch geregeld. U kunt willekeurige combinaties van gaarfuncties, gaartemperaturen en automatische tijdinstellingen kiezen.
progress Eerste installatie Verwijder al het verpakkingsmateriaal binnen en buiten, voordat u de oven in gebruik neemt. Wanneer de oven voor het eerst op de elektriciteit wordt aangesloten, verschijnt in het display automatisch 12:00 en het symbool knippert. Verzeker u ervan dat het juiste tijdstip van de dag is ingesteld voor het eerste gebruik van de oven. Om het juiste tijdstip van de dag in te stellen: 1.
progress Gedurende deze tijd kan er een onaangenaam luchtje ontstaan. Dit is heel normaal. Het wordt veroorzaakt door fabricageresten. Laat de oven vervolgens afkoelen en reinig dan de ovenruimte met een in warm zeepsop vochtig gemaakte doek. Reinig ook de roosters en bakplaten voor het eerste gebruik grondig. Pak, om de deur te openen, altijd de handgreep in het midden vast (afb. 3). “Aan-/Uit” - toets Voor het instellen van gaarfuncties of andere programma’s moet de oven worden ingeschakeld.
progress De temperatuur en de tijd instellen Druk de toetsen “ ” en “ ” in, om de vooraf ingestelde temperatuur te verhogen of verlagen, terwijl het symbool “°” knippert (afb. 6). De maximale temperatuur bedraagt 250°C. Druk de toetsen “ ” en “ ” in, om de vooraf ingestelde temperatuur te verhogen of verlagen, terwijl het symbool knippert.
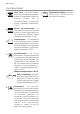
progress Functiesymbolen 1 2 3 4 5 6 Hete lucht - Bij deze instelling kunt u op verschillende bakplaten braden of tegelijkertijd braden en bakken, zonder dat er smaakoverdracht plaatsvindt. Vooraf ingestelde temperatuur: 175°C Boven- en onderwarmte - De warmte komt zowel van boven als onder en wordt gelijkmatig over de ovenruimte verdeeld. Vooraf ingestelde temperatuur: 200°C Onderwarmte - De verwarming komt uitsluitend van het onderste verwarmingselement van de oven.
progress Gebruik van de oven Belangrijk! - Bekleed de oven niet met aluminiumfolie, en leg geen bakplaten e.d. op de bodem, aangezien anders het email van de oven beschadigd raakt door de optredende warmtestuwing. Zet potten en pannen, hittebestendige potten en pannen alsmede aluminiumplaten altijd op het plateau, dat in één van de inzetniveaus is geschoven. Bij het verwarmen van levensmiddelen komt stoom vrij net als in een ketel.
progress Hete lucht De gerechten worden gegaard met hete lucht, die via een ventilator aan de achterwand van de oven gelijkmatig in de binnenruimte van de oven wordt verdeeld. De warmte komt snel en gelijkmatig in alle ovenzones terecht. Dat betekent dat u tegelijkertijd verschillende gerechten op meerdere niveaus kunt bakken, braden en stoven.
progress Boven- en onderwarmte - De warmte wordt het beste verdeeld bij gebruik van het middelste niveau. Wanneer u wilt dat uw baksel een bruinere bodem krijgt, moet u het op een lager niveau in de oven zetten. Wanneer u wilt dat uw baksel een bruinere bovenkant krijgt, moet u het op een hoger niveau in de oven zetten. - Het materiaal en de afwerking van de bakplaten en schalen is van invloed op de mate waarin het voedsel een bruin korstje krijgt.
progress Onderwarmte Deze functie is bijzonder geschikt voor het bakken van taart- en vlaaibodems, en voor het afbakken van quiches resp. flans, om ervoor te zorgen dat de quiche- resp. taartbodem gaar is. Grilleren - Te grilleren gerechten moeten altijd op het rooster van de grillplaat worden geplaatst, om ervoor te zorgen dat de lucht optimaal kan circuleren en het gerecht niet in het afdruipende vet resp. grillsap drijft. Als u dat wilt, kunt u gerechten zoals bijv.
progress Ventilatorgrill Dit is een alternatieve bereidingsmethode voor gerechten die anders met de normale grill bereid worden. Grillelement en ventilator werken samen, zodat de hete lucht rond de gerechten circuleert. De noodzaak om het voedsel te controleren en om te draaien is daardoor minder. Ventilatorgrill minimaliseert kookluchtjes in de keuken.
progress 6. Voor het selecteren van de draaispitfunctie druk net zo vaak op de toets oven-functies , tot op het display het symbool verschijnt. Ovendeur altijd gesloten houden. De vorken en het spit zijn puntig en scherp. Als u er gebruik van maakt, doe het met zorg om verwonding te voorkomen. Ontdooien De ventilator loopt zonder warmte en laat de lucht bij kamertemperatuur in de binnenruimte van de oven circuleren. Hierdoor wordt het voedsel sneller ontdooid.
progress Worden twee bakplaten met gebak tegelijkertijd in de oven geschoven, dan moet tussen de platen een inzetniveau open worden gelaten. Worden twee bakplaten met gebak tegelijkertijd in de oven geschoven, dan moeten de platen na ongeveer 2/3 van de baktijd van boven naar beneden verwisseld en gedraaid worden. Braden: Neem geen braadstukken die minder wegen dan 1 kg. Kleinere stukken kunnen tijdens het braden uitdrogen.
progress Programmeren van de oven Zo stelt u de kookwekker in 1. Gebruik de toets om de kookwekkerfunctie te selecteren. Het overeenkomknippert en op het stige symbool bedieningspaneel verschijnt “0.00” (afb. 7). 2. Stel met de toets “ ” de gewenste tijd in. De maximale tijdsduur is 23 uur 59 minuten. Nadat dit is ingesteld, wacht de kookwekker 3 seconden, waarna hij begint te lopen. 3. Na afloop van de geprogrammeerde tijd hoor u een akoestisch signaal. 4.
progress 3. Terwijl het symbool knippert, met de toets “ ” de gewenste tijd instellen. De maximale tijdsduur is 23 uur 59 minuten. De programmeerfunctie wacht 3 seconden, waarna hij begint te lopen. 4. Na afloop van de geprogrammeerde tijd wordt de oven automatisch uitgeschakeld. Er weerklinkt een akoestisch signaal en op het bedieningspaneel verschijnt “0.00”. 5. Druk op een willekeurige toets om het signaal uit te schakelen. Zo annuleert u de bereidingstijd: 1.
progress Speciale functies Automatische uitschakeling van de oven Wanneer de instellingen niet worden gewijzigd, wordt de oven automatisch volgens onderstaande tabel uitgeschakeld (afb. 12). Temperatuurinstelling: Uitschakeling oven: 250°C na 3 uur van 200 tot 245°C na 5,5 uur van 120 tot 195°C na 8,5 uur minder dan 120°C na 12 uur Afb.
progress Snelopwarmfunctie Na selectie van een bereidingsfunctie en van de temperatuur warmt de oven langzaam op tot de gewenste temperatuur is bereikt. Dit duurt 10 tot 15 minuten, afhankelijk van de geselecteerde functie en temperatuur. Als de noodzakelijke temperatuur sneller bereikt moet worden, kunt u de snelopwarmfunctie gebruiken. 1. Druk voor het inschakelen van de oven op de toets . 2. Stel de gewenste bereidingsfunctie en temperatuur in zoals beschreven op de voorgaande pagina’s. 3.
progress 2. Druk de toetsen en “ ” tegelijkertijd in. Er klinkt een kort signaal en op het display verschijnt 12:00 (afb. 15). Bij het inschakelen van de oven verschijnt het symbool op het display.Dat betekent dat de demo-modus geactiveerd is. Alle functies van de oven kunnen geselecteerd worden. De oven is niet echt in werking en de verwarmingselementen worden niet ingeschakeld. Schakel de oven uit en ga zoals hierboven beschreven te werk om de demomodus weer uit te schakelen.
progress Bak-tabellen Boven- en onderwarmte en hete lucht Tijden zijn exclusief voorverwarmen. Lege oven altijd 10 Minuten voorverwarmen. GERECHT Boven- en onderwarmte Niveau Temp.
progress Tijden zijn exclusief voorverwarmen. Lege oven altijd 10 Minuten voorverwarmen. Grilleren Hoeveelheid GERECHT Filetsteaks Biefstuk Grillworst Varkenskotelet Haantje (in 2 helften) Spiezen Kippenborst Hamburger* Stuks gr. 4 4 8 4 2 4 4 6 800 600 / 600 1000 / 400 600 4 4~6 4~6 400 / / Grilleren 4 3 2 1 Bereidingstijd (minuten) Temp.
progress Reiniging en onderhoud Trek voordat u de oven gaat schoonmaken altijd eerst de stekker uit het stopcontact en laat de oven afkoelen. Het apparaat mag niet worden gereinigd met een stoomreiniger. Belangrijk: Vóór alle reinigingswerkzaamheden het apparaat beslist spanningloos maken. Voor een lange levensduur is het nodig, regelmatig de volgende reinigingswerkzaamheden uit te voeren: • Maak de oven pas schoon als deze is afgekoeld. • Maak de geëmailleerde delen schoon met een sopje.
progress Pyrolytische reiniging De oven is bekleed met een speciaal hittebestendig email. Tijdens de pyrolytische zelfreiniging kan de temperatuur in het binnenste van de oven oplopen tot meer dan 500 °C en zo etensresten verbranden. Voor uw eigen veiligheid wordt de ovendeur tijdens de pyrolytische reiniging automatisch vergrendeld, zodra de temperatuur in de binnenruimte ca. 300 °C bereikt. Na beëindiging van de zelfreiniging blijft de ovendeur vergrendeld tot de oven is afgekoeld.
progress Gebruik van de pyrolytische zelfreiniging Voordat u de pyrolytische schoonmaakfunctie inschakelt, moet alle vuil worden verwijderd en moet u controleren of de oven leeg is. Laat niets in de oven zitten (bijv. pannen, roosters, bakplaat, braadslede, enz.), deze kunnen ernstig beschadigd raken. Vergewist u zich er voor het inschakelen van de pyrolytische reinigingsfunctie van of de ovendeur gesloten is.
progress Reiniging De beide inhangroosters alleen met in de handel gebruikelijke schoonmaakmiddelen buiten reinigen. De inhangroosters mogen in de vaatwasser worden gereinigd. Breng de inhangroosters na het reinigen weer aan; Ga daarbij in omgekeerde volgorde te werk. Controleer voordat u de ovenroosters in de oven schuift, of de kartelschroeven weer goed zijn vastgedraaid. Schakel de pyrolytische reinigingsfunctie op de volgende wijze in: 1. Schakel met de toets de oven in.
progress 4. Druk ter bevestiging van de gewenste . De pyrolytische functie op de toets melding Pyro knippert niet meer en het symbool verdwijnt, het akoestische signaal stopt, de binnenverlichting gaat uit en de pyrolytische reiniging begint (afb. 21). Naarmate de temperatuur in de oven toeneemt, stijgt het thermometersymbool langzaam en geeft daarmee de Afb. 21 temperatuurstijging in het binnenste van de oven aan. 5.
progress Programmering van de pyrolytische reinigingscyclus (starttijdkeuze, automatisch stoppen) Wanneer u dat wilt, kunt u programmeren, wanneer de pyrolytische reiniging moet starten en stoppen. 1. Schakel met de toets de oven in. Druk zo lang op toets tot het symbool van de functie Pyro (niveau 1 - P I) op het display verschijnt. De melding Pyro en het symbool knipperen tegelijkertijd op het display en er klinkt een geluidssignaal.
progress 4. Na een tijdje wordt de ovendeur vergrendeld en het bijbehorende symbool verschijnt. Na afloop van de pyrolytische reiniging wordt het tijdstip van de dag op het display weergegeven. De ovendeur is vergrendeld. Zodra de oven is afgekoeld, klinkt een akoestisch signaal en de ovendeur wordt ontgrendeld. U kunt de pyrolytische reinigingscyclus op elk moment onderbreken; Druk daarvoor op de toets .
progress De ovendeur De ovendeur bestaat uit drie glasplaten. De ovendeur kan worden gedemonteerd en de binnenste glasplaten kunnen worden verwijderd, om het schoonmaken gemakkelijker te maken. Belangrijk - Verwijder de ovendeur voordat u de deur gaat reinigen. De ovendeur kan tijdens het monteren plotseling dichtvallen, als u de binnenste glasplaten aan het verwijderen bent. ) Afb. 24 Ga als volgt te werk: 1. open volledig te deur. 2. Bepaal de positie van de twee scharnieren (afb. 24). 3.
progress 7. Ontgrendel het vergrendelsysteem om de binnenste glasplaten te verwijderen (afb. 28). 8. Draai de 2 houders 90° en verwijder ze uit hun zitting (afb. 29). 9. Hef voorzichtig de bovenste plaat en haal hem eraf (afb. 30). 10. Herhaal de procedure die beschreven is onder punt 9. voor de middelste plaat, die aan vier zijkanten voorzien is van een sierlijst (afb. 31). Afb. 28 90° Afb. 29 2 1 Afb. 30 1 2 Afb.
progress Reinig de ovendeur met lauw water en een zachte doek. Gebruik geen producten zoals schuursponsjes, staalwol, schuurmiddelen of zuren, omdat ze het speciaal warmtereflecterend oppervlak van de binnenste glasplaten kunnen beschadigen. Na het reinigen dient u de glasplaten weer in de deur aan te brengen, volg hierbij de omgekeerde volgorde van de hier boven beschreven procedure. Zorg ervoor dat u de platen correct aanbrengt.
progress Modellen van roestvrij staal of aluminium: Maak de ovendeur en het bedieningspaneel van roestvrij staal of aluminium schoon met een vochtige spons en droog hem daarna zorgvuldig af met een zachte doek. Gebruik geen metaalsponsjes, staalwol, zuren of schuurmiddelen die krassen op het oppervlak kunnen veroorzaken. Reinigen van de ovendeurdichting Rond de opening van de oven is een afdichting aangebracht. Controleer de toestand van deze afdichting regelmatig.
progress Het oplossen van problemen Wanneer het apparaat niet goed werkt, controleer dan het volgende, voordat u zich tot het Electrolux Service-Center wendt. PROBLEEM OPLOSSING De oven gaat niet aan. en kies vervolgens een druk op toets bereidingsfunctie.
progress Technische gegevens Vermogen verwarmingselementen Onderwarmte 1000 W Boven- en onderwarmte 1800 W Hete lucht 1825 W Grill 1650 W Ventilatorgrill Pyrolytische reiniging Ovenverlichting Motor van de heteluchtventilator Motor koelventilator Draaispit 1675 W 2475 W 40 W 25 W 25 W 4W Totale aansluitwaarde 2740 W Bedrijfsspanning (50 Hz) 230 V Inbouw Hoogte onder bovenkant in kolom 600 mm 587 mm Breedte Diepte 560 mm 550 mm Inzet Hoogte Breedte 335 mm 395 mm Diepte Ovencapaciteit 400 mm
progress Instructies voor de installateur Inbouw en installatie moeten uitgevoerd worden met strikte inachtneming van de geldende voorschriften. Elke ingreep mag slechts plaatsvinden als het apparaat uitgeschakeld is. Ingrepen mogen uitsluitend worden uitgevoerd door een erkend installateur. De fabrikant kan niet aansprakelijk gesteld worden als de veiligheidsvoorschriften niet opgevolgd worden.
progress Instructies voor de inbouw Om een probleemloze werking van het inbouwapparaat te kunnen waarborgen, moeten de keukenmeubelen of de uitsparing waarin het apparaat wordt ingebouwd de geschikte afmetingen hebben. In overeenstemming met de geldende voorschriften moeten alle delen, die de bescherming tegen aanraking van onder spanning staande en geïsoleerde delen garanderen, zodanig bevestigd zijn, dat ze niet zonder gereedschap verwijderd kunnen worden.
progress Bevestiging in het meubel 1. Open de ovendeur. 2. Bevestig de oven met behulp van de vier afstandhouders in het meubel (zie afbeelding - A). Deze passen exact in de gaten van het frame. Draai vervolgens de vier meegeleverde houtschroeven (zie afbeelding - B) vast. Klantenservice Wanneer het probleem na de beschreven controles niet kan wortden opgelost, bel dan de dichtstbijzijnde klantenservice van de fabrikant en geef de aard van het defect, het model van het apparaat (Mod.
progress Contents Warnings and important safety information ..................................................................... 42 Description of appliance ................................................................................................. 44 Control panel ................................................................................................................. 45 Before using for the first time ......................................................................................
progress Warnings and important safety information Always keep these user instructions with the appliance. Should the appliance be passed on to third persons or sold, or if you leave this appliance behind when you move house, it is very important that the new user has access to these user instructions and the accompanying information. These warnings are provided for the safety of users and co-residents. So read them carefully before connecting and/or using the appliance.
progress Personal safety · · · This appliance is intended for use by adults. It is dangerous to allow children to use it or play with it. Children should be kept away while the oven is working. Even after you have switched the oven off, the door remains hot for a long time.
progress Description of appliance 1 2 3 4 5 6 7 1. 2. 3. 4. 5. 6. 7.
progress Control panel Cooking functions 1 2 Temperature indicator 3 4 Time indicator 5 6 Push buttons 1. ON / OFF 2. Cooking functions button 3. Fast heat-up function 4. Pyrolytic cleaning function 5. Decrease button “ ” (Time or temperature) 6. Increase button “ ” (Time or temperature) 7. Minute minder / Cooking time function / End of cooking function All the oven functions are controlled by an electronic programmer.
progress Before using for the first time Remove all packaging, both inside and outside the oven, before using the oven. When the oven is first connected to the electrical supply, the display will automatically show 12:00 and the symbol flashes. Ensure the correct time of day is set before using the oven. Setting the clock: 1. Press the button and, while the symbol is flashing, set the correct time of day by pressing buttons “ ” or “ ” (Fig. 1).
progress During this time, an unpleasant odour may be emitted. This is absolutely normal. It is caused by manufacturing residues. Once this operation is carried out, let the oven cool down, then clean the oven cavity with a soft cloth soaked in warm soapy water. Before cooking for the first time, thoroughly wash the shelves and the baking tray. To open the oven door, always hold the handle in the centre (Fig. 3).
progress To set the temperature and cooking time Press the buttons “ ” and “ ” to increase or decrease the pre-set temperature while the “°” symbol is flashing (Fig. 6). The maximum temperature is 250°C. Press the buttons “ ” and “ ” to increase or decrease the pre-set cooking time while the symbol flashes. Safety thermostat To prevent dangerous overheating (through incorrect use of the appliance or defective components), the oven is fitted with a safety thermostat, which interrupts the power supply.
progress Function symbols 1 2 3 4 5 6 7 Hot air - With this setting, you can roast or roast and bake on several levels at the same time without this leading to any flavour transfer. Pre-set temperature: 175°C Top and bottom heating element - The heat comes from above and below and is evenly distributed in the oven compartment. Pre-set temperature: 200°C Bottom oven element - The heat only comes from the bottom heating element in the oven compartment.
progress Using the oven Important! - Do not lay aluminium foil, or place baking trays, etc. on the oven floor, as the heat built up will damage the oven surface enamel. Always place pans and pots, ovenproof pans and pots as well as aluminium trays on the shelf which has been inserted in the shelf runners. When food is heated, steam is created, similar to a kettle. When the steam comes into contact with the glass in the oven door, it condenses and creates water droplets.
progress Hot air The food is cooked by means of preheated air force-blown evenly round the inside of the oven by a fan set on the rear wall of the oven itself. The heat reaches all parts of the oven evenly and fast. This means that you can simultaneously cook different types of food positioned on the various oven shelves.
progress Top and bottom heating element - The middle shelf position allows for the best heat distribution. If you want a base browning, simply place the cakes and pastries on to a lower shelf position in the oven. To increase top browning, raise the shelf position. - The material and finish of the baking trays and dishes used will affect base browning.
progress Bottom oven element This function is particularly useful when baking cakes and pastry bases as well as finishing off quiches or flans, to ensure that the quiche or pastry base is cooked through. Grilling - Most foods should be placed on the grid in the grill pan to allow maximum circulation of air and to lift the food out of the fats or juices. If preferred, foods such as, e. g. fish, liver and kidneys may be placed directly on the grill pan.
progress Thermal grill Thermal grill offers an alternative method of cooking food items normally associated with conventional grilling. The grill element and the oven fan operate simultaneously, circulating hot air around the food. The need to check and turn the food is reduced. Thermal grill helps to minimise cooking smells in the kitchen. With the exception of toast and rare steaks, you can thermally grill all the foods you would normally cook under a conventional grill.
progress Always keep the oven door closed. The forks and the spit of the turnspit are pointed and sharp (if your appliance is equipped with). When using, manipulate them with caution to avoid any injury. Defrosting The oven fan operates without heat and circulates the air, at room temperature, inside the oven. This increases the speed of defrosting. However, please note that the temperature of the kitchen will influence the speed of defrosting.
progress If two baking trays with pastries or biscuits are inserted into the oven at the same time, the trays must be swapped and turned around after about 2/3 of the baking time. When roasting: Do not roast joints smaller than 1 kg. Smaller pieces could dry out when roasting. Dark meat, which is to be well done on the outside but remain medium or rare inside, must be roasted at a higher temperature (200°C-250°C). White meat, poultry and fish, on the other hand, require a lower temperature (150°C175°C).
progress Programming the oven To set the minute minder 1. Using the button to select the minute minder function. The relevant symbol will flash and the control panel will display “0.00” (Fig. 7). 2. Using the button “ ” to enter the required time. The maximum time is 23 hours 59 minutes. After it has been set, the minute minder will wait 3 seconds and then start running. 3. When the programmed time has elapsed, an acoustic alarm will be heard. Fig. 7 4.
progress 3. While the symbol is flashing, press the button “ ” to select the required time. The maximum time is 23 hours 59 minutes. The programmer will wait 3 seconds and then start running. 4. After the time programmed has elapsed, the oven switches off automatically. An acoustic alarm will be heard and “0.00” will appear on the control panel. 5. To switch off the acoustic alarm, press any button. To cancel the programmed cooking time: 1. Press the button flashes. , until the symbol 2.
progress Special functions Oven safety switch-off The oven will switch off automatically if any change of setting is made, according to the following table (Fig. 12). Temperature setting: the oven will switch off: 250ºC after 3 hours from 200 up to 245°C after 5.5 hours from 120 up to 195°C after 8.5 hours less than 120°C after 12 hours Fig.
progress Fast heat-up function After a cooking function and the temperature have been selected, the cavity will gradually heat up until the selected temperature is reached. This will take from 10 to 15 minutes, depending on the selected function and temperature. If it is necessary to reach the required temperature in a shorter time, the “Fast Heat Up” function can be used. 1. Switch the oven on by pressing button . 2. Set the required cooking function and temperature as explained in the previous pages.
progress 2. Press the bottons and “ ” at the same time. A short acoustic alarm will be heard and the time 12:00 appears in the display (Fig. 15). When the oven is switched on, the symbol appears in the display.This means that the demo function is activated. All oven functions can be selected. The oven is not really working and the heating elements do not switch on. Switch off the oven and follow the above described procedure to disable the demo mode.
progress Cooking tables Top and bottom heating element and hot air Timings do not include pre-heating. The empty oven should always be pre-heated for 10 minutes.
progress Timings do not include pre-heating. The empty oven should always be pre-heated for 10 minutes. Grilling Quantity Grilling TYPE OF DISH Fillet steaks Beef steaks Sausages Pork chops Chicken (cut in 2) Kebabs Breast of chicken Hamburger* Pieces g 4 4 8 4 2 4 4 6 800 600 / 600 1000 / 400 600 4 4~6 4~6 400 / / Cooking time in minutes Temp.
progress Cleaning and maintenance Before any cleaning, switch the oven off and let it cool down. The appliance must not be cleaned with a superheated steam cleaner or a steam jet cleaner. Important: Before carrying out any cleaning operation, the device must be disconnected from the power supply. To ensure a long life for your appliance, it is necessary to perform the following cleaning operations regularly: • Only perform when the oven has cooled down. • Clean the enamelled parts with soapy water.
progress Pyrolytic cleaning The oven cavity is coated with a special enamel resistant to high temperatures. During the pyrolytic cleaning operation, the temperature inside the oven can reach about 500°C thus burning food residues. For your security, during the pyrolytic cleaning operation, the oven door automatically locks when the temperature inside the oven approaches about 500 °C. 300 °C has been reached.
progress How to use the pyrolytic cleaning function Before activating the pyrolytic cleaning function, remove any excessive spillage and make sure that the oven is empty. Do not leave anything inside it (e.g. pans, grids, baking tray, drip pan, etc.) as they could become severely damaged. Ensure that the oven door is closed before activating the pyrolytic cleaning function.
progress Do the same thing on the other side of the oven. Cleaning Clean the two sets of side rails on the outside only with commercially available detergents. The side rails must not be cleaned in the dishwasher. Once the cleaning is carried out; refit the shelf supports following the procedure in reverse. Please ensure that the retaining nuts are secure when refitting the shelf support. To activate the pyrolytic cleaning function proceed as follows: 1. Using the button switch on the oven.
progress 4. To confirm the desired pyrolytic cleaning function, press the button . The display Pyro stops flashing and the symbol will disappear, the acoustic signal will stop, the oven lamp will switch off and the pyrolytic cleaning cycle starts (Fig. 21). As soon as the temperature in the oven increases, the thermometer symbol increases slowly, indicating that the temperature inside the oven is increasing. 5.
progress To programme the pyrolytic cleaning cycle (delayed start, automatic stop) If you desire, you can programme the starting and ending time of the pyrolytic cleaning cycle. 1. Use the button to switch on the oven. as often as Press the button necessary, until the Pyro function symbol (level 1 - P I) appears in the display. Simultaneously the “Pyro indicator and the symbol will flash in the display and an acoustic signal will be emitted.
progress 4. After some time the door lock will be Activated and the respective symbol will be displayed. At the end of the pyrolytic cleaning process, the display shows the time of day. The oven door is locked. Once the oven has cooled down, an acoustic signal will be emitted and the door will unlock. To stop the pyrolitic cleaning cycle at any time: press the button .
progress The oven door The oven door consists of three panes of glass. The oven door can be disassembled and the internal panes can be removed to make cleaning easier. Important - Remove the oven door before cleaning it. The oven door could abruptly close if you try to remove the internal panes of glass when the door is still assembled. ) Fig. 24 To do so, proceed as follows. 1. open the door fully. 2. Locate the two door hinges (Fig. 24). 3. Lift and turn the levers on the two hinges (Fig. 25). 4.
progress 7. Release the locking system to remove the internal panes of glass (Fig. 28). 8. Turn the 2 fasteners 90° and extract them from their seats (Fig. 29). 9. Gently lift and carefully take off the uppermost pane (Fig. 30). 10. Repeat the procedure described in point 9. for the middle pane marked by a decorative frame on 4 sides (Fig. 31). Fig. 28 90° Fig. 29 2 1 Fig. 30 1 2 Fig.
progress Clean the oven door with lukewarm water and a soft cloth. Do not use products such as scouring pads, steel wool, abrasive sponges or acids because they could damage the special heat-reflecting surface of the internal panes of glass. After cleaning, reassemble the panes in the door and then the oven door, following the procedure described above in reverse. Make sure you reposition the panes correctly.
progress Cleaning the oven door seals A seal is fitted around the opening of the oven. Check the condition of the seal on a regular basis. If you notice damage to the seal, please contact the nearest service centre immediately. Do not use the oven until the seal has been replaced. Replacing the oven light Separate the appliance from the power supply by switching off the fuse.
progress Troubleshooting If the appliance is not working correctly, please check the following before contacting the Electrolux Service Centre. PROBLEM SOLUTION The oven does not switch on. Press the button and then select a cooking function.
progress Technical data Heating element ratings Bottom oven element 1000 W Top and bottom heating element 1800 W Hot air Grill 1825 W 1650 W Thermal grill 1675 W Pyrolytic cleaning 2475 W Oven light 40 W Hot air fan motor 25 W Cooling fan motor 25 W Rotisserie 4W Total connection rating 2740 W Operating voltage (50 Hz) 230 V Dimensions of the recess Height Under the upper edge in column 600 mm 587 mm Width 560 mm Depth 550 mm Oven levels Height 335 mm Width 395 mm Depth O
progress Instructions for the Installer Installation and connection must be done in compliance with the regulations in force. Any interventions must be carried out when the appliance is switched off. Only qualified service engineers may repair the appliance The manufacturing company disclaims any liability if the safety measures are not observed.
progress Installation instructions For ensuring a trouble free use of the installed appliance, the unit or the column where the appliance is to be installed should have appropriate dimensions. In accordance with the regulations in force, all parts which ensure the shock protection of live and insulated parts must be fastened in such a way that they cannot be undone without tools. These also include the fixing of any end walls at the beginning or end of a line of builtin units.
progress Securing the oven to the cabinet 1. Open the oven door. 2. Fix the oven into the unit using the four distance brackets (see figure - A). These fit exactly into the holes in the frame. Then tighten the four wood screws supplied (see figure B). Customer service If the problem persists after the checks described, contact your nearest service centre and describe the fault, appliance model (Mod.), product number (Prod. No.) and series number (Ser. No.) which you will find on the oven rating plate.
www.progress-hausgeraete.de 35906-1101 06/08 R.