User Manual Steamer PCD41100X PCD41100XC
Progress CONTENTS Safety information Safety instructions Product description Control panel Before first use Daily use Clock functions 2 3 6 6 8 9 10 Automatic programmes Using the accessories Additional functions Hints and tips Care and cleaning Troubleshooting Technical data 11 12 13 15 19 21 22 Subject to change without notice. SAFETY INFORMATION Before the installation and use of the appliance, carefully read the supplied instructions.
Progress 3 General Safety • • • • • • • • • Only a qualified person must install this appliance and replace the cable. WARNING: The appliance and its accessible parts become hot during use. Care should be taken to avoid touching heating elements. Children less than 8 years of age shall be kept away unless continuously supervised. Always use oven gloves to remove or put in accessories or ovenware. Before carrying out any maintenance, disconnect the appliance from the power supply.
Progress • All electrical connections should be made by a qualified electrician. • The appliance must be earthed. • Make sure that the parameters on the rating plate are compatible with the electrical ratings of the mains power supply. • Always use a correctly installed shockproof socket. • Do not use multi-plug adapters and extension cables. • Make sure not to cause damage to the mains plug and to the mains cable.
Progress 5 • Always cook with the oven door closed. • If the appliance is installed behind a furniture panel (e.g. a door) make sure the door is never closed when the appliance is in operation. Heat and moisture can build up behind a closed furniture panel and cause subsequent damage to the appliance, the housing unit or the floor. Do not close the furniture panel until the appliance has cooled down completely after use. Steam Cooking WARNING! Risk of burns and damage to the appliance.
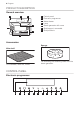
Progress PRODUCT DESCRIPTION General overview 1 2 4 4 7 1 2 3 4 5 6 7 3 3 2 1 5 Control panel Electronic programmer Water drawer Lamp Steam generator with cover Shelf support, removable Shelf positions 6 Accessories Sponge Wire shelf For absorbing the remaining water from the steam generator. For cookware, cake tins, roasts.
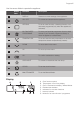
Progress 7 Use the sensor fields to operate the appliance. Sensor Field Function Description - DISPLAY Shows the current settings of the appliance. ON / OFF To activate and deactivate the appliance. OPTIONS To set an oven function, a cleaning function or an automatic programme (only when the appliance is activated). MY FAVOURITE PROGRAMME To store your favourite programme. Use it to have access to your favourite programme directly or when the appliance is deactivated.
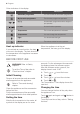
Progress Other indicators of the display: Symbol / / Name Description Automatic programme You can choose an automatic programme. My favourite programme The favourite programme operates. kg / g An automatic programme with a weight input operates. h / min A clock function operates. Temperature The current temperature is indicated. Temperature You can change the temperature. Light You deactivated the light. Minute minder The minute minder function operates.
Progress 9 DAILY USE WARNING! Refer to Safety chapters. Operating the appliance To operate the appliance you can use: • the manual mode • automatic programmes Changing the temperature Touch or to change the temperature in steps of 5 °C. When the appliance is at the set temperature, an acoustic signal sounds three times and the Heat up indicator goes out. Checking the temperature You can see the temperature in the appliance when the function or programme operates. 1. Touch .
Progress operates and keep it closed as much as possible during the cooking. – Use metal dishes to improve the energy saving. – When possible, put the food inside the oven without heating it up. – When the cooking duration is longer than 30 minutes, reduce the oven temperature to minimum, 3 - 10 minutes before the end of the cooking time, depending on the duration of the cooking. The residual heat inside the oven will continue to cook. – Use the residual heat to warm up other foods.
Progress 11 If you touch or while you set the DURATION, the appliance switches to the setting of the END function. 6. When the set time ends, an acoustic signal sounds for two minutes. and time setting flash in the display. The appliance deactivates. 7. Touch a sensor field or open the oven door to stop the acoustic signal. 8. Deactivate the appliance. Setting the END 1. Activate the appliance and set an oven function and temperature. 2. Touch again and again until the display shows .
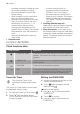
Progress Programme number Programme name 2 POACHED CHICKEN BREAST 3 SALMON TERRINE 4 POACHED FISH (TROUT) 5 SMALL PIKE DUMPLINGS 6 FLAN CARAMEL 7 COCONUT PUDDING 8 CHOCOLATE CREAM 9 ESPRESSO FLAN 10 STUFFED LETTUCE 11 CAULIFLOWER FLAN 12 ASPARGUS FLAN 13 SPINACH TERRINE 14 VEGETABLES, MEDITERRANEAN 15 VEGETABLES, TRADITIONAL 16 PEELING TOMATOES 17 POTATOES IN THEIR JACKET 18 BOILED POTATOES 19 RICE 20 GNOCCHI Automatic programmes 1. Activate the appliance. . 2.
Progress 13 Push the shelf between the guide bars of the shelf support and make sure that the feet point down. Small indentation at the top increase safety. The indentations are also anti-tip devices. The high rim around the shelf prevents cookware from slipping of the shelf. ADDITIONAL FUNCTIONS Using My Favourite Programme function Use this function to save your favourite temperature and time settings for an oven function or programme. 1. Set the temperature and time for an oven function or programme.
Progress The settings menu lets you turn on or turn off functions in the main menu. The display shows SET and the number of the setting. Description Value to set 1 RESIDUAL HEAT INDICATOR ON / OFF 2 KEY TONE1) CLICK / BEEP / OFF 3 FAULTY TONE ON / OFF 4 SERVICE MENU - 5 RESTORE SETTINGS YES / NO 1) It is not possible to deactivate the tone of the ON / OFF sensor field. 1. When the appliance is turned off, touch and hold for three seconds. The display shows SET1 and "1" flashes.
Progress 15 HINTS AND TIPS WARNING! Refer to Safety chapters. The temperature and baking times in the tables are guidelines only. They depend on the recipes and the quality and quantity of the ingredients used. Cooking with steam • Use only heat and corrosion resistant cookware or chrome steel food containers (for some models only). • The correct shelf positions are in the table below. Count the shelf positions from the bottom to the top.
Progress Vegetables Food Temperature (°C) Time (min) Shelf position Water in the water drawer (ml) Artichokes 96 50 - 60 1 800 Auberginen 96 15 - 25 1 450 Cauliflower, whole 96 35 - 45 1 600 Cauliflower, florets 96 25 - 30 1 500 Broccoli, whole 96 30- 40 1 550 Broccoli, florets 96 20 - 25 1 400 Mushroom slices 96 15 - 20 1 400 Peas 96 20 - 25 1 450 Fennel 96 35 - 45 1 600 Carrots 96 35 - 45 1 600 Kohlrabi, strips 96 30 - 40 1 550 Peppers, strip
Progress 17 Food Temperature (°C) Time (min) Shelf position Water in the water drawer (ml) White haricot beans 96 25 - 35 1 500 Savoy cabbage 96 20 - 25 1 400 Courgette, slices 96 15 1 350 Side dishes / accompaniments Food Temperature (°C) Time (min) Shelf position Water in the water drawer (ml) Yeast dumplings 96 30 - 40 1 600 Potato dumplings 96 35 - 45 1 600 Unpeeled potatoes, medium 96 45 - 55 1 750 Rice (water / rice ratio 1.
Progress Food Temperature (°C) Time (min) Shelf position Water in the water drawer (ml) Salmon trout, approx.
Progress 19 CARE AND CLEANING WARNING! Refer to Safety chapters. Notes on cleaning • Clean the front of the appliance with a soft cloth with warm water and a cleaning agent. • To clean metal surfaces, use a dedicated cleaning agent. • Clean the appliance interior after each use. Fat accumulation or other food remains may result in a fire. • Clean stubborn dirt with a special oven cleaner. • Clean all accessories after each use and let them dry. Use a soft cloth with warm water and a cleaning agent.
Progress 3. Put clean water (100 - 200 ml) into the water drawer to flush the steam generation system. 4. Remove the water from the steam generator with the sponge and rub it dry. 5. Keep the door open to let the appliance dry fully. 7. Pull the door trim to the front to remove it. 8. Hold the door glass panels on their top edge one by one and pull them up out of the guide. Removing and installing the door You can remove the door and the internal glass panels to clean it.
Progress 21 2. Remove the metal ring and clean the glass cover. 3. Replace the lamp with a suitable 300 °C heat-resistant lamp. 4. Attach the metal ring to the glass cover. 5. Install the glass cover. TROUBLESHOOTING WARNING! Refer to Safety chapters. What to do if... Problem Possible cause Remedy You cannot activate or operate the oven. The oven is not connected to an electrical supply or it is connected incorrectly.
Progress Problem Possible cause Remedy Steam and condensation settle on the food and in the cavity of the oven. You left the dish in the oven for too long. Do not leave the dishes in the oven for longer than 15 - 20 minutes after the cooking process ends. The display shows an error code that is not in this table. There is an electrical fault. Deactivate the oven with the house fuse or the safety switch in the fuse box and activate it again.
X Fan motor & cooling system * X X Wiring Accessories (meat probe, shelves, baking tray + cleaning tools like sponges)* Hg Cd Cr6+ Hazardous substances PBBs PBDEs Notes: 1. This table is compiled according to SJ/T 11364-2014. 2. means that this kind of hazardous substance content in all of the homogenous materials of this part is under the limitations regulated in GB/ T26572-2011. 3.
www.progress-hausgeraete.