User Manual Microwave combi-oven PCM43100X
Progress CONTENTS Safety information Safety instructions Product description Control panel Before first use Daily use Microwave mode Clock functions 2 4 7 7 9 10 12 16 Automatic programmes Using the accessories Additional functions Hints and tips Care and cleaning Troubleshooting Installation Technical data 18 19 20 21 41 42 43 47 Subject to change without notice. SAFETY INFORMATION Before the installation and use of the appliance, carefully read the supplied instructions.
Progress 3 General Safety • • • • • • • • • • • • • • Only a qualified person must install this appliance and replace the cable. WARNING: The appliance and its accessible parts become hot during use. Care should be taken to avoid touching heating elements. Children less than 8 years of age shall be kept away unless continuously supervised. Always use oven gloves to remove or put in accessories or ovenware. Before maintenance cut the power supply.
Progress • • • • • • • • When heating food in plastic or paper containers, keep an eye on the appliance due to the possibility of ignition. The appliance is intended for heating food and beverages. Drying of food or clothing and heating of warming pads, slippers, sponges, damp cloth and similar may lead to risk of injury, ignition or fire. If smoke is emitted, switch off or unplug the appliance and keep the door closed in order to stifle any flames.
Progress 5 • • • • • • • • • • • power supply. If not, contact an electrician. Always use a correctly installed shockproof socket. Do not use multi-plug adapters and extension cables. Make sure not to cause damage to the mains plug and to the mains cable. Should the mains cable need to be replaced, this must be carried out by our Authorised Service Centre. Do not let mains cables touch or come near the appliance door, especially when the door is hot.
Progress damage to the appliance, the housing unit or the floor. Do not close the furniture panel until the appliance has cooled down completely after use. Care and cleaning WARNING! Risk of injury, fire, or damage to the appliance. • Before maintenance, deactivate the appliance and disconnect the mains plug from the mains socket. • Make sure the appliance is cold. There is the risk that the glass panels can break. • Replace immediately the door glass panels when they are damaged.
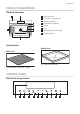
Progress 7 PRODUCT DESCRIPTION General overview 1 1 2 3 4 5 6 7 8 2 3 4 4 8 5 6 3 2 1 Control panel Electronic programmer Heating element Microwave generator Lamp Fan Shelf support, removable Shelf positions 7 Accessories Baking tray Wire shelf For cakes and biscuits. For cookware, cake tins, roasts.
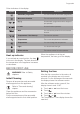
Progress Use the sensor fields to operate the appliance. Sensor Field Function Description - DISPLAY Shows the current settings of the appliance. ON / OFF To activate and deactivate the appliance. OPTIONS To set an oven function or an automatic programme (only when the appliance is activated). MICROWAVE To activate the Microwave function. When the function is active, press this sensor field to change the microwave power.
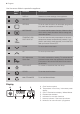
Progress 9 Other indicators of the display: Symbol / / Name Description Automatic programme You can choose an automatic programme. Microwave function The microwave function operates. kg / g An automatic programme with a weight input operates. h / min A clock function operates. Watt You can set the power for the microwave function. Temperature / Fast heat up The function operates. Temperature The current temperature is indicated. Temperature You can change the temperature.
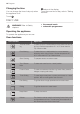
Progress Changing the time You can change the time of day only when the appliance is off. Touch flashes in the display. To set the new time of day, refer to "Setting the time". . DAILY USE • the manual mode • automatic programmes WARNING! Refer to Safety chapters. Operating the appliance To operate the appliance you can use: Oven functions Oven function Application True Fan Cooking To bake on up to 2 shelf positions at the same time and to dry food.
Progress 11 Oven function Application Bottom Heat To bake cakes with crispy bottom and to preserve food. ECO Roasting When you use this function during cooking, it allows you to optimize the energy consumption. To get more information about the recommended settings, refer to the cooking tables with the equivalent function (Turbo Grilling). Setting the oven function 1. Activate the appliance with . The display shows the set temperature, the symbol and the number of the oven function. 2.
Progress heat inside the oven will continue to cook. – Use the residual heat to warm up other foods. • Cooking with fan - when possible, use the cooking functions with fan to save energy. • Residual heat – In some oven functions if a programme with time selection (Duration, End, Time Delay) is activated and the cooking time is longer than 30 minutes, the heating elements deactivate automatically 10% earlier. The fan and lamp continue to operate.
Progress 13 Defrosting fruit, vegetables: • Ready meals in metal packaging or plastic trays with metal covers can only be defrosted or heated in the microwave if they are expressively designated as suitable for use in the microwave. • You must follow the manufacturer's instructions printed on the packaging (e.g. remove the metal cover and pierce the plastic film). • If fruit and vegetables should remain raw, do not defrost them fully in the appliance but let them defrost completely at a room temperature.
Progress Cookware / Material Microwave Defrosting Grilling Heating Cooking Ready meals in packaging3) 1) With no silver, gold, platinum or metal plating / decorations. 2) Without quartz or metal components, or glazes which contain metals 3) You must follow the manufacturer’s instructions about the maximum temperatures. Tips for the microwave Result Remedy You cannot find details for the amount of food prepared. Find details for similar type of food.
Progress 15 Microwave functions Functions Description Microwave Creates the heat directly in the food. Use it to heat pre-prepared meals and drinks, to defrost meat or fruit, and to cook vegetables and fish. Combi Use it to operate the oven function and the microwave mode together. Use it to cook food in a shorter time and brown it at the same time. Quick Start Use it to activate the Microwave function with one touch of the sensor field onds. with the maximum microwave power.
Progress If you set the END function for the normal oven function, it changes to the DURATION in the Combi function. If you set the DURATION for the normal oven function function, it stays active for the Combi function. If the set DURATION is longer than 90 minutes, it is not possible to activate the Combi function. to activate the Quick Start 2. Touch function. Each touch of adds 30 seconds to the duration time. You can change the microwave power (refer to "Setting the Microwave function").
Progress 17 Clock function Application TIME OF DAY To show the time of day. To change the time of day, refer to "Setting the time". DURATION To set how long the appliance operates. END To set when the appliance deactivates. You can use Duration and End at the same time (Time delay) if you want the appliance to activate and deactivate automatically later. Count Up Timer The Count Up Timer is not activated if Duration and End are set.
Progress 4. Touch a sensor field or open the oven door to stop the acoustic signal. When the Time delay function is activated, the display shows a static symbol of the oven with a dot and . function, The dot shows which clock function is on in the Clock / residual heat display. Setting the Time delay function The DURATION and END can be used at the same time, if the appliance is to be switched on and off automatically later.
Progress 19 5. When the set time ends, an acoustic signal sounds for two minutes. The symbol flashes. The appliance deactivates. 6. Touch a sensor field or open the door to stop the acoustic signal. Automatic programmes with weight input If you set the weight of the meat, the appliance calculates the roasting time. 1. Activate the appliance. 2. Touch . 3. Touch or to set the weight programme. The display shows: the cooking time, the duration symbol , a default weight, a unit of measurement (kg, g). 4.
Progress ADDITIONAL FUNCTIONS Using the Child Lock The Child Lock prevents an accidental operation of the appliance. 1. To activate the function deactivate the appliance with . Do not set an oven function. 2. Touch and hold and at the same time for 2 seconds. An acoustic signal sounds. SAFE comes on in the display. To deactivate the Child Lock function repeat step 2. Using the Function Lock You can activate the function only when the appliance operates.
Progress 21 Temperature (°C) Switch-off time (h) 200 - 230 5.5 After the Automatic switch-off, touch a sensor field to operate the appliance again. The Automatic switch-off does not work with the functions: Light, Slow Cooking, Duration, End, Time delay. • Day brightness: – when the appliance is activated. – if you touch a sensor field during the night brightness (apart from ON / OFF), the display goes back to the day brightness mode for the next 10 seconds.
Progress Tips on baking Baking results Possible cause Remedy The bottom of the cake is not browned sufficiently. The shelf position is incorrect. Put the cake on a lower shelf. The cake sinks and becomes soggy, lumpy or streaky. The oven temperature is too high. The next time you bake, set a slightly lower oven temperature. The cake sinks and becomes soggy, lumpy or streaky. The baking time is too short. Set a longer baking time.
Progress 23 Food Function Temperature (°C) Time (min) Shelf position Sponge cake / Sponge cake Top / Bottom Heat 160 35 - 50 2 Flan base - short pas- True Fan Cooking 170 180 10 - 25 2 try1) Flan base - sponge mixture True Fan Cooking 150 170 20 - 25 2 Apple pie / Apple pie (2 tins Ø 20 cm, diagonally off set) True Fan Cooking 160 70 - 90 2 Apple pie / Apple pie (2 tins Ø 20 cm, diagonally off set) Top / Bottom Heat 180 70 - 90 1 Cheesecake, tray2) Top / Bottom Heat 160 170
Progress Food Function Temperature (°C) Time (min) Shelf position Buttered almond cake / Top / Bottom Heat 190 - 210 20 - 30 2 sugar cakes1) Fruit flans (made with yeast dough / sponge True Fan Cooking 150 - 160 35 - 55 3 Top / Bottom Heat 170 35 - 55 1 Fruit flans made with short pastry True Fan Cooking 160 - 170 40 - 80 3 Yeast cakes with delicate toppings (e.g.
Progress 25 Food Function Temperature (°C) Time (min) Shelf position Rolls1) Top / Bottom Heat 190 - 210 10 - 25 2 Small cakes / Small True Fan Cooking 160 20 - 35 3 Top / Bottom Heat 170 20 - 35 2 cakes1) Small cakes / Small cakes1) 1) Preheat the oven.
Progress Food Temperature (°C) Time (min) Shelf position Dry streusel cake 150 - 160 30 - 45 1/3 1) Preheat the oven.
Progress 27 Pizza Setting Food Temperature (°C) Time (min) Shelf position Pizza (thin crust)1) 200 - 230 15 - 20 3 Pizza (with a lot of top- 180 - 200 20 - 30 3 Tarts 180 - 200 40 - 55 3 Spinach flan 160 - 180 45 - 60 3 Quiche Lorraine (Savoury flan) 170 - 190 45 - 55 3 Swiss Flan 170 - 190 45 - 55 3 Cheesecake 140 - 160 60 - 90 3 Apple cake, covered 150 - 170 50 - 60 3 Vegetable pie 160 - 180 50 - 60 3 Unleavened bread1) 230 10 - 20 3 Puff pastry flan1) 160 - 1
Progress Roasting tables Beef Food Function Quantity (kg) Power (Watts) Temperature (°C) Time (min) Shelf position Pot roast Top / Bottom Heat 1 - 1.5 200 230 60 - 80 1 Food Function Quantity (kg) Power (Watts) Temperature (°C) Time (min) Shelf position Shoulder, neck, ham joint Turbo Grilling 1 - 1.5 200 160 - 180 50 - 70 1 Meat loaf Turbo Grilling 0.75 - 1 200 160 - 170 35 - 50 1 Pork knuckle (precooked) Turbo Grilling 0.
Progress 29 Poultry Food Function Quantity (kg) Power (Watts) Temperature (°C) Time (min) Shelf position Poultry portions Turbo Grilling 0.2 0.25 each 200 200 - 220 20 - 35 1 Chicken half Turbo Grilling 0.4 - 0.5 each 200 190 - 210 25 - 40 1 Chicken poulard Turbo Grilling 1 - 1.5 200 190 - 210 60 - 80 1 Duck Turbo Grilling 1.
Progress Food Func tion Quantity (kg) Power (Watts) Temperature (°C) Time (min) Shelf position Savoury dishes with raw ingredients (potatoes, vegetables) True Fan Cooking - 400 600 160 - 180 30 - 45 2 Grilling • Always grill with the maximum temperature setting. • Set the shelf into the shelf position as recommended in the grilling table. • Always set the pan to collect the fat into the first shelf position. • Grill only flat pieces of meat or fish.
Progress 31 Food Time (min) Shelf position 1st side 2nd side Fillet steaks / veal steaks 7 - 10 6-8 3 Toast / Toast 1-3 1-3 3 Toast with topping 6-8 - 2 Frozen foods • Do not cover it with a bowl or a plate. This can extend the defrost time. • Remove the food packaging. Put the food on a plate.
Progress Food Function Temperature (°C) Time (min) Shelf position Chips2) (300 600 g) Top / Bottom Heat or Turbo Grilling 200 - 220 as per manufacturer's instructions 2 Baguettes3) Top / Bottom Heat as per manufacturer's instructions as per manufacturer's instructions 2 Fruit cake Top / Bottom Heat as per manufacturer's instructions as per manufacturer's instructions 2 1) Preheat the oven. 2) Turn 2 or 3 times during cooking. 3) Preheat the oven.
Progress 33 Preserving - Bottom Heat • Use only preserve jars of the same dimensions available on the market. • Do not use jars with twist-off and bayonet type lids or metal tins. • Use the first shelf from the bottom for this function. • Put no more than six one-litre preserve jars on the baking tray. • Fill the jars equally and close with a clamp. • The jars cannot touch each other. • Put approximately 1/2 litre of water into the baking tray to give sufficient moisture in the oven.
Progress Food Temperature (°C) Time (h) Shelf position Mushrooms 50 - 60 6-8 3 Herbs 40 - 50 2-3 3 Plums 60 - 70 8 - 10 3 Apricots 60 - 70 8 - 10 3 Apple slices 60 - 70 6-8 3 Pears 60 - 70 6-9 3 Microwave cooking tables Defrosting meat Food Power (Watts) Quantity (kg) Time (min) Standing time (min) Comments Whole cuts of meat 200 0.5 10 - 12 10 - 15 Turn halfway through. Steak 200 0.2 3-5 5 - 10 Turn halfway through, remove defrosted parts.
Progress 35 Defrosting poultry Food Power (Watts) Quantity (kg) Time (min) Standing time (min) Comments Chicken 200 1 25 - 30 10 - 20 Turn halfway through, cover defrosted parts with aluminium foil. Chicken breast 200 0.1 - 0.2 3-5 10 - 15 Turn halfway through, cover defrosted parts with aluminium foil. Chicken thighs 200 0.1 - 0.2 3-5 10 - 15 Turn halfway through, cover defrosted parts with aluminium foil.
Progress Defrosting sausage Food Power (Watts) Quantity (kg) Time (min) Standing time (min) Comments Sliced sausage 100 0.1 2-4 20 - 40 Turn halfway through. Defrosting dairy products Food Power (Watts) Quantity (kg) Time (min) Standing time (min) Comments Quark 100 0.25 10 - 15 25 - 30 Remove aluminium parts, turn halfway through. Butter 100 0.25 3-5 15 - 20 Remove aluminium parts, turn halfway through. Cheese 100 0.
Progress 37 Food Power (Watts) Quantity Time (min) Standing time (min) Comments Dry cake (e. g. Pound cake) 100 1 piece 2-4 15 - 20 Turn plate halfway through. Fruit cake 100 1 piece 1-2 15 - 20 Turn plate halfway through. Bread 100 1 kg 15 - 20 10 - 15 Turn halfway through. Sliced bread 100 0.5 kg 8 - 12 10 - 15 Turn halfway through. Bread rolls 100 4 rolls 5-8 5 - 10 Turn halfway through.
Progress Defrosting or heating Food Power (Watts) Quantity Time (min) Standing time (min) Comments Baby food in jars 300 0.2 kg 2-3 - Stir halfway through, check temperature. Baby milk (bottle, 180 ml) 1000 0.2 kg 0:20 - 0:40 - Put spoon into bottle, stir and check temperature. Convenience food 600 0.4 - 0.5 kg 14 - 20 5 Remove any aluminium lids, turn halfway through. Frozen ready meals 400 0.4 - 0.5 kg 4-6 5 Remove any aluminium lids, turn halfway through.
Progress 39 Food Power (Watts) Quantity Time (min) Standing time (min) Comments Fish fillets 500 0.5 kg 6-8 - Cook covered, turn container several times during cooking. Vegetables, short cooking time, 600 0.5 kg 12 - 16 - Add approx. 50 ml water, cook covered, stir halfway through. 600 0.5 kg 14 - 18 - Add approx. 50 ml water, cook covered, stir halfway through. 600 0.5 kg 14 - 20 - Add approx. 50 ml water, cook covered, stir halfway through. 600 0.5 kg 18 - 24 - Add approx.
Progress Food Power (Watts) Quantity Time (min) Standing time (min) Comments Popcorn 1000 - 3-4 - Put the popcorn on a plate on the bottom level. Egg custard 300 1 kg 34 - 36 120 Turn container around by 1/4, halfway through the cooking time. Sponge cake 600 0.475 kg 8-9 5 Turn container around by 1/4, halfway through the cooking time. Meatloaf 400 0.9 kg 25 - 27 5 Turn container around by 1/4, halfway through the cooking time.
Progress 41 Food Ovenware Po wer (Wa tts) Temperature (°C) Tim e (mi n) Shel f position Comments Potatoes au gratin (1.1 kg) Gratin dish 400 180 39 41 1 Turn container around by 1/4, halfway through cooking time. 5 min standing time. Roast pork neck (1.1 kg) Glass dish with strainer 300 200 70 1 Turn in between, 10 min standing time. CARE AND CLEANING WARNING! Refer to Safety chapters.
Progress WARNING! Danger of electrocution! Disconnect the fuse before you replace the lamp. The lamp and the lamp glass cover can be hot. CAUTION! Always hold the halogen lamp with a cloth to prevent grease residue from burning on the lamp. 1. Deactivate the appliance. 2. Remove the fuses from the fuse box or deactivate the circuit breaker. The top lamp 1. Turn the lamp glass cover counterclockwise to remove it. 2. Clean the glass cover. 3. Replace the lamp with a suitable 300 °C heat-resistant lamp.
Progress 43 Problem Possible cause Remedy It takes too long to cook the dishes or they cook too quickly. The temperature is too low or too high. Adjust the temperature if necessary. Follow the advice in the user manual. Steam and condensation settle on the food and in the cavity of the oven. You left the dish in the oven for too long. Do not leave the dishes in the oven for longer than 15 - 20 minutes after the cooking process ends. The display shows an error code that is not in this table.
Progress 450mm min. 20mm min. 560mm 114 mm 548mm 455mm 15mm 450mm 440mm min. 550mm 546mm 594mm 21mm 548mm min. 20mm 114 mm 450mm 15mm 450mm min. 560mm 455mm 450mm 440mm 455mm 450mm min.
Progress 45 548mm 114 mm 15mm min. 20mm 450mm 455mm 450mm 440 mm 455mm 450mm 450mm 440mm 450mm min. 560mm min. 550mm 455mm 450mm 440mm 546mm 594mm 21mm 548mm min. 20mm 114 mm 450mm 15mm 590mm min. 550mm 455mm 450mm 440mm min.
Progress H05VV-F H05RR-F min.
Progress 47 TECHNICAL DATA Technical data Voltage 220 - 240 V Frequency 50 Hz ENVIRONMENTAL CONCERNS dispose appliances marked with the symbol with the household waste. Return the product to your local recycling facility or contact your municipal office. Recycle the materials with the symbol . Put the packaging in applicable containers to recycle it. Help protect the environment and human health and to recycle waste of electrical and electronic appliances.
www.progress-hausgeraete.