User Manual Oven PHN12001X
Progress CONTENTS Safety information Safety instructions Product description Before first use Daily use Using the accessories 2 3 6 6 6 8 Additional functions Hints and tips Care and cleaning Troubleshooting Installation Energy efficiency 8 9 15 18 19 20 Subject to change without notice. SAFETY INFORMATION Before the installation and use of the appliance, carefully read the supplied instructions.
Progress 3 General Safety • • • • • • • • • • • Only a qualified person must install this appliance and replace the cable. The control panel must be connected to specified heating unit with matching colours of connectors, to avoid possible hazard. WARNING: The appliance and its accessible parts become hot during use. Care should be taken to avoid touching heating elements. Always use oven gloves to remove or put in accessories or ovenware.
Progress • Keep the minimum distance from other appliances and units. • Install the appliance in a safe and suitable place that meets installation requirements. • Parts of the appliance carry current. Close the appliance with furniture to prevent touching the dangerous parts. • The appliance is equipped with an electric cooling system. It must be operated with the electric power supply. Electrical connection WARNING! Risk of fire and electric shock.
Progress 5 • • • • – do not put ovenware or other objects in the appliance directly on the bottom. – do not put aluminium foil directly on the bottom of cavity of the appliance. – do not put water directly into the hot appliance. – do not keep moist dishes and food in the appliance after you finish the cooking. – be careful when you remove or install the accessories. Discoloration of the enamel or stainless steel has no effect on the performance of the appliance. Use a deep pan for moist cakes.
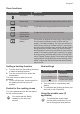
Progress PRODUCT DESCRIPTION General overview 1 2 3 4 5 6 2 7 8 4 11 9 3 2 10 1 Accessories • Wire shelf For cookware, cake tins, roasts. 1 2 3 4 5 6 7 8 9 10 11 Control panel Knobs for the hob Power lamp / symbol Knob for the heating functions Control knob (for the temperature) Temperature indicator / symbol Air vents for the cooling fan Heating element Lamp Shelf support, removable Shelf positions • Baking tray For cakes and biscuits. BEFORE FIRST USE WARNING! Refer to Safety chapters.
Progress 7 Oven functions Oven function Application Off position The oven is off. Bottom Heat To bake cakes with crispy bottom and to preserve food. Fast Grilling To grill flat food in large quantities and to toast bread. Conventional Cooking (Top / Bottom Heat) To bake and roast food on one shelf position. Conventional Baking This function is designed to save energy during cooking. For the cooking instructions refer to "Hints and tips" chapter, Conventional Baking.
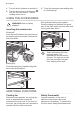
Progress 1. Turn the knob clockwise to position 9. 2. Turn the knob slowly to the symbol until you can hear a click. The two cooking zones are on. 3. To set the necessary heat setting refer to "Heat settings". USING THE ACCESSORIES WARNING! Refer to Safety chapters. Inserting the accessories Wire shelf and baking tray together: Push the baking tray between the guide bars of the shelf support and the wire shelf on the guide bars above.
Progress 9 interrupts the power supply. The oven turns on again automatically when the temperature drops. HINTS AND TIPS Baking cakes Do not open the oven door before 3/4 of the set cooking time is up. WARNING! Refer to Safety chapters. The temperature and baking times in the tables are guidelines only. They depend on the recipes and the quality and quantity of the ingredients used. Cooking meat and fish Leave the meat for approximately 15 minutes before carving so that the juice does not seep out.
Progress Food Top / Bottom Heat Time (min) Comments Temperature (°C) Shelf position Jam-tart 170 2 30 - 40 In a 26 cm cake mould Fruit cake 170 2 60 - 70 In a 26 cm cake mould Sponge cake (Fatless sponge cake) 170 2 35 - 45 In a 26 cm cake mould Christmas cake / Rich fruit cake 170 2 50 - 60 In a 20 cm cake mould Plum cake1) 170 2 50 - 60 In a bread tin Small cakes 170 3 20 - 30 In a baking tray Biscuits1) 150 3 20 - 30 In a baking tray Meringues 100 3 90 - 12
Progress 11 Food Top / Bottom Heat Time (min) Comments Temperature (°C) Shelf position Pizza1) 190 1 20 - 30 On a deep pan Scones1) 200 3 10 - 20 In a baking tray Time (min) Comments 1) Preheat the oven for 10 minutes.
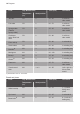
Progress Food Top / Bottom Heat Time (min) Comments Temperature (°C) Shelf position English roast beef medium 210 2 51 - 55 On a wire shelf and a deep pan English roast beef well done 210 2 55 - 60 On a wire shelf and a deep pan Shoulder of pork 180 2 120 - 150 On a deep pan Shin of pork 180 2 100 - 120 2 pieces on a deep an Lamb 190 2 110 - 130 Leg Chicken 200 2 70 - 85 Whole on a deep pan Turkey 180 1 210 - 240 Whole on a deep pan Duck 175 2 120 - 150 Whole
Progress 13 Food Quantity Time (min) Pieces Quantity (kg) 1st side 2nd side Fillet steaks 4 0.8 12 - 15 12 - 14 Beef steaks 4 0.6 10 - 12 6-8 Sausages 8 - 12 - 15 10 - 12 Pork chops 4 0.6 12 - 16 12 - 14 Chicken (cut in 2) 2 1 30 - 35 25 - 30 Kebabs 4 - 10 - 15 10 - 12 Breast of chicken 4 0.4 12 - 15 12 - 14 Hamburger 6 0.6 20 - 30 - Fish fillet 4 0.
Progress Food Accessories Tempera‐ ture (°C) Shelf po‐ sition Time (min) Victoria Sand‐ wich baking dish on wire shelf 170 2 35 - 45 Poached fish, 0.3 kg baking tray or dripping pan 180 3 35 - 45 Whole fish, 0.2 kg baking tray or dripping pan 180 3 35 - 45 Fish fillet, 0.3 kg pizza pan on wire shelf 180 3 35 - 45 Poached meat, 0.25 kg baking tray or dripping pan 200 3 40 - 50 Shashlik, 0.
Progress 15 Food Function Acces‐ sories She lf po‐ si‐ tion Tem‐ pera‐ ture (°C) Time (min) Comments Small cake Conven‐ tional Cooking Baking tray 3 170 20 - 30 Put 20 small cakes per one baking tray. Apple pie Conven‐ tional Cooking Wire shelf 1 170 80 - 120 Use 2 tins (20 cm diameter), di‐ agonally shifted. Sponge cake Conven‐ tional Cooking Wire shelf 2 170 35 - 45 Use a cake mould (26 cm di‐ ameter).
Progress If you have nonstick accessories, do not clean them using aggressive agents, sharp-edged objects or a dishwasher. It can cause damage to the nonstick coating. Moisture can condense in the oven or on the door glass panels. To decrease the condensation, operate the oven for 10 minutes before cooking. Clean the moisture from the cavity after each use. Stainless steel or aluminium ovens Clean the oven door with a damp cloth or sponge only. Dry it with a soft cloth.
Progress 17 6. Turn the two fasteners by 90° and remove them from their seats. 3. Close the oven door halfway to the first opening position. Then lift and pull forward and remove the door from its seat. 90° 7. First lift carefully and then remove the glass panel. 1 4. Put the door on a soft cloth on a stable surface. 2 8. Clean the glass panels with water and soap. Dry the glass panels carefully. Do not clean the glass panels in the dishwasher.
Progress A 1. Turn off the oven. Wait until the oven is cooled down. 2. Disconnect the oven from the mains. 3. Put a cloth on the bottom of the cavity. The back lamp Replacing the lamp WARNING! Risk of electric shock. The lamp can be hot. 1. Turn the lamp glass cover to remove it. 2. Clean the glass cover. 3. Replace the lamp with a suitable 300 °C heat-resistant lamp. 4. Install the glass cover. TROUBLESHOOTING WARNING! Refer to Safety chapters. What to do if...
Progress 19 We recommend that you write the data here: Product number (PNC) ......................................... Serial number (S.N.) ......................................... INSTALLATION WARNING! Refer to Safety chapters. Building In Building Under CAUTION! Only a qualified and competent person must do the installation of the appliance. If you do not contact a qualified or competent person, the guarantee becomes invalid if there is damage. 540 21 min. 550 600 558 114 19 20 min.
Progress H07 RN-F, H05 RN-F, H05 RRF, H05 VVF, H05 V2V2-F (T90), H05 BB-F For the section of the cable refer to the total power on the rating plate. Connecting the terminal board The appliance has a six-pole terminal board. The jumpers (bridges) are set for operation on a 400 V three-phase with a neutral wire.
Progress 21 Energy saving to minimum 3 - 10 minutes before the end of the cooking time, depending on the duration of the cooking. The residual heat inside the oven will continue to cook. The oven contains features which help you save energy during everyday cooking. Use the residual heat to warm up other dishes. General hints Make sure that the oven door is closed properly when the oven operates. Do not open the door too often during cooking.
Progress
Progress 23
www.progress-hausgeraete.