User Manual Oven PHN13001X
Progress CONTENTS Safety information Safety instructions Product description Before first use Daily use Using the accessories 2 3 6 6 6 8 Additional functions Hints and tips Care and cleaning Troubleshooting Installation Energy efficiency 9 9 18 20 21 23 Subject to change without notice. SAFETY INFORMATION Before the installation and use of the appliance, carefully read the supplied instructions.
Progress 3 General Safety • • • • • • • • • • • Only a qualified person must install this appliance and replace the cable. The control panel must be connected to specified heating unit with matching colours of connectors, to avoid possible hazard. WARNING: The appliance and its accessible parts become hot during use. Care should be taken to avoid touching heating elements. Always use oven gloves to remove or put in accessories or ovenware.
Progress • Keep the minimum distance from other appliances and units. • Install the appliance in a safe and suitable place that meets installation requirements. • Parts of the appliance carry current. Close the appliance with furniture to prevent touching the dangerous parts. • The appliance is equipped with an electric cooling system. It must be operated with the electric power supply. Electrical connection WARNING! Risk of fire and electric shock.
Progress 5 • • • • – do not put ovenware or other objects in the appliance directly on the bottom. – do not put aluminium foil directly on the bottom of cavity of the appliance. – do not put water directly into the hot appliance. – do not keep moist dishes and food in the appliance after you finish the cooking. – be careful when you remove or install the accessories. Discoloration of the enamel or stainless steel has no effect on the performance of the appliance. Use a deep pan for moist cakes.
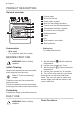
Progress PRODUCT DESCRIPTION General overview 1 2 3 4 5 6 2 7 12 4 8 9 3 10 2 1 11 Accessories • Wire shelf For cookware, cake tins, roasts. 1 2 3 4 5 6 7 8 9 10 11 12 Control panel Knobs for the hob Power lamp / symbol Knob for the heating functions Control knob (for the temperature) Temperature indicator / symbol Air vents for the cooling fan Heating element Lamp Fan Shelf support, removable Shelf positions • Baking tray For cakes and biscuits.
Progress 7 Oven function Application Oven function The oven is off. Moist Baking Off posi‐ tion Fan Cook‐ ing To roast or roast and bake food with the same cooking temperature on more than one shelf position, without flavour transference. To bake and roast food on one shelf position. Conven‐ tional Cooking (Top / Bottom Heat) To bake cakes with crispy bottom and to preserve food. Bottom Heat Turbo Grilling Fast Grill‐ ing To roast larger meat joints or poultry with bones on one shelf position.
Progress Heat settings Knob indication 0 1-9 Function Off position Heat settings Double zone switch 1. Turn the knob to a necessary heat setting. 2. To complete the cooking process, turn the knob to the off position. Using the double zone (if applicable) To activate the double zone, turn the knob clockwise. Do not turn it through the stop position. 1. Turn the knob clockwise to position 9. 2. Turn the knob slowly to the symbol until you can hear a click. The two cooking zones are on. 3.
Progress 9 ADDITIONAL FUNCTIONS Cooling fan When the oven operates, the cooling fan turns on automatically to keep the surfaces of the oven cool. If you turn off the oven, the cooling fan can continues to operate until the oven cools down. dangerous overheating. To prevent this, the oven has a safety thermostat which interrupts the power supply. The oven turns on again automatically when the temperature drops.
Progress Baking and roasting table Cakes Food Top / Bottom Heat Fan Cooking Time (min) Com‐ ments Temper‐ ature (°C) Shelf po‐ sition Temper‐ ature (°C) Shelf po‐ sition Whisked recipes 170 2 165 2 (1 and 3) 45 - 60 In a cake mould Short‐ bread dough 170 2 160 2 (1 and 3) 20 - 30 In a cake mould Buttermilk cheese cake 170 1 165 2 70 - 80 In a 26 cm cake mould Apple cake (Ap‐ ple pie) 170 1 160 2 (1 and 3) 80 - 100 In two 20 cm cake moulds on a wire shelf Strudel 175
Progress 11 Food Top / Bottom Heat Fan Cooking Time (min) Com‐ ments Temper‐ ature (°C) Shelf po‐ sition Temper‐ ature (°C) Shelf po‐ sition Biscuits1) 150 3 140 3 (1 and 3) 30 - 35 In a bak‐ ing tray Merin‐ gues 100 3 115 3 35 - 40 In a bak‐ ing tray Buns1) 190 3 180 3 80 - 100 In a bak‐ ing tray Choux1) 190 3 180 3 (1 and 3) 15 - 20 In a bak‐ ing tray Plate tarts 180 3 170 2 25 - 35 In a 20 cm cake mould Victoria sandwich 180 1 or 2 170 2 45 - 70 Left + r
Progress Food Top / Bottom Heat Fan Cooking Temper‐ ature (°C) Shelf po‐ sition Temper‐ ature (°C) Shelf po‐ sition 190 2 180 Pizza1) 190 1 Scones1) 200 3 Bread Time (min) Com‐ ments 2 (1 and 3) 25 - 40 6 - 8 rolls in a bak‐ ing tray 190 1 20 - 30 On a deep pan 190 2 10 – 20 In a bak‐ ing tray Time (min) Com‐ ments rolls1) 1) Preheat the oven for 10 minutes.
Progress 13 Meat Food Top / Bottom Heat Fan Cooking Time (min) Com‐ ments Temper‐ ature (°C) Shelf po‐ sition Temper‐ ature (°C) Shelf po‐ sition Beef 200 2 190 2 50 - 70 On a wire shelf and a deep pan Pork 180 2 180 2 90 - 120 On a wire shelf and a deep pan Veal 190 2 175 2 90 - 120 On a wire shelf and a deep pan English roast beef rare 210 2 200 2 44 - 50 On a wire shelf and a deep pan English roast beef me‐ dium 210 2 200 2 51 - 55 On a wire shelf and a deep pa
Progress Food Top / Bottom Heat Fan Cooking Time (min) Com‐ ments Temper‐ ature (°C) Shelf po‐ sition Temper‐ ature (°C) Shelf po‐ sition Hare 190 2 175 2 150 - 200 Cut in pieces Pheasant 190 2 175 2 90 - 120 Whole Time (min) Com‐ ments Fish Food Top / Bottom Heat Fan Cooking Temper‐ ature (°C) Shelf po‐ sition Temper‐ ature (°C) Shelf po‐ sition Trout / Sea bream 190 2 175 2 (1 and 3) 40 - 55 3-4 fishes Tuna fish / Sal‐ mon 190 2 175 2 (1 and 3) 35 - 60 4 -
Progress 15 Food Quantity Toast Time (min) Pieces Quantity (kg) 1st side 2nd side 4-6 - 2-4 2-3 Turbo Grilling Use the third shelf position. Set the maximum temperature of 200 °C. Food Quantity Time (min) Pieces (kg) 1st side 2nd side Rolled joints (turkey) 1 1 30 - 40 20 - 30 Chicken (cut in two) 2 1 25 - 30 20 - 30 Chicken drum‐ sticks 6 - 15 - 20 15 - 18 Quail 4 0.
Progress Food Accessories Tempera‐ ture (°C) Shelf po‐ sition Time (min) Swiss roll baking tray or dripping pan 170 2 30 - 40 Brownie baking tray or dripping pan 180 2 30 - 40 Soufflè, 6 pieces ceramic ramekins on wire shelf 200 3 30 - 40 Sponge flan base flan base tin on wire shelf 170 2 20 - 30 Victoria Sand‐ wich baking dish on wire shelf 170 2 35 - 45 Poached fish, 0.3 kg baking tray or dripping pan 180 3 35 - 45 Whole fish, 0.
Progress 17 Food Accessories Tempera‐ ture (°C) Shelf po‐ sition Time (min) Vegetables, mediterrean 0.7 kg baking tray or dripping pan 180 4 35 - 40 Information for test institutes Tests according to IEC 60350-1. Food Function Acces‐ sories She lf po‐ si‐ tion Tem‐ pera‐ ture (°C) Time (min) Comments Small cake Conven‐ tional Cooking Baking tray 3 170 20 - 30 Put 20 small cakes per one baking tray.
Progress CARE AND CLEANING WARNING! Refer to Safety chapters. Notes on cleaning Clean the front of the oven with a soft cloth with warm water and a mild cleaning agent. To clean metal surfaces, use a dedicated cleaning agent. Clean the oven interior after each use. Fat accumulation or other food remains may result in a fire. To clean the door gasket, refer to the general information about cleaning. Removing the shelf supports To clean the oven, remove the shelf supports.
Progress 19 4. Put the door on a soft cloth on a stable surface. 2. Lift and turn the levers fully on both hinges. 5. Release the locking system to remove the internal glass panel. 6. Turn the two fasteners by 90° and remove them from their seats. 3. Close the oven door halfway to the first opening position. Then lift and pull forward and remove the door from its seat. 90° 7. First lift carefully and then remove the glass panel.
Progress 8. Clean the glass panels with water and soap. Dry the glass panels carefully. Do not clean the glass panels in the dishwasher. When the cleaning is completed, install the glass panel and the oven door. 1. Turn off the oven. Wait until the oven is cooled down. 2. Disconnect the oven from the mains. 3. Put a cloth on the bottom of the cavity. When installed correctly the door trim clicks. 1. Turn the lamp glass cover to remove it. 2. Clean the glass cover. 3.
Progress 21 Service data If you cannot find a solution to the problem yourself, contact your dealer or an Authorised Service Centre. on the front frame of the oven cavity. Do not remove the rating plate from the oven cavity. The necessary data for the service centre is on the rating plate. The rating plate is We recommend that you write the data here: Model (MOD.) ......................................... Product number (PNC) ......................................... Serial number (S.N.) ...........
Progress Building In 540 21 min. 550 558 600 114 19 20 min. 560 591 598 570 594 Securing the appliance to the cabinet A Connecting the terminal board The appliance has a six-pole terminal board. The jumpers (bridges) are set for operation on a 400 V three-phase with a neutral wire. B 1 = 45 mm 2 = 45 mm 3 = 60 mm 4 = 60 mm = 70 mm Electrical installation The manufacturer is not responsible if you do not follow the safety precautions from the Safety chapters.
Progress 23 1 2 3 4 5 230V 3~ L3 PE L1 L2 1 2 3 4 5 230V 1~ L1 1 2 3 400V 2N~ L1 L2 1 2 3 400V 3N~ N 4 5 PE N 4 5 PE L1 L2 L3 N PE ENERGY EFFICIENCY Product Fiche and information according to EU 65-66/2014 Supplier's name Progress Model identification PHN13001X Energy Efficiency Index 94.9 Energy efficiency class A Energy consumption with a standard load, conventional mode 0.83 kWh/cycle Energy consumption with a standard load, fan-forced mode 0.
Progress When possible, do not preheat the oven before you put the food inside. Cooking with fan When possible, use the cooking functions with fan to save energy. When the cooking duration is longer than 30 minutes, reduce the oven temperature to minimum 3 - 10 minutes before the end of the cooking time, depending on the duration of the cooking. The residual heat inside the oven will continue to cook.
Progress 25
Progress
Progress 27
www.progress-hausgeraete.