user manual Refrigerator PK1200
progress CONTENTS Safety information Operation First use Daily use Helpful hints and tips 2 4 4 4 5 Care and Cleaning 6 What to do if… 6 Technical data 8 Installation 8 Environmental concerns 12 Subject to change without notice SAFETY INFORMATION In the interest of your safety and to ensure the correct use, before installing and first using the appliance, read this user manual carefully, including its hints and warnings.
progress 3 • • • • 2. Make sure that the power plug is not squashed or damaged by the back of the appliance. A squashed or damaged power plug may overheat and cause a fire. 3. Make sure that you can come to the mains plug of the appliance. 4. Do not pull the mains cable. 5. If the power plug socket is loose, do not insert the power plug. There is a risk of electric shock or fire. 6. You must not operate the appliance without the lamp cover1) of interior lighting. This appliance is heavy.
progress Environment Protection This appliance does not contain gasses which could damage the ozone layer, in either its refrigerant circuit or insulation materials. The appliance shall not be discarded together with the urban refuse and rubbish. The insulation foam contains flammable gases: the appliance shall be disposed according to the applicable regulations to obtain from your local authorities. Avoid damaging the cooling unit, especially at the rear near the heat exchanger.
progress 5 Movable shelves The walls of the refrigerator are equipped with a series of runners so that the shelves can be positioned as desired. To make these adjustments proceed as follows: gradually pull the shelf in the direction of the arrows until it comes free, then reposition as required. Positioning the door shelves To permit storage of food packages of various sizes, the door shelves can be placed at different heights.
progress CARE AND CLEANING Caution! Unplug the appliance before carrying out any maintenance operation. This appliance contains hydrocarbons in its cooling unit; maintenance and recharging must therefore only be carried out by authorized technicians. Periodic cleaning The equipment has to be cleaned regularly: • clean the inside and accessories with lukewarm water and some neutral soap. • regularly check the door seals and wipe clean to ensure they are clean and free from debris.
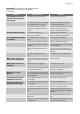
progress 7 Important! There are some sounds during normal use (compressor, refrigerant circulation). Problem Possible cause Solution The appliance is switched off. Switch on the appliance. The mains plug is not connected to the mains socket correctly. Connect the mains plug to the mains socket correctly. The appliance has no power. There is no voltage in the mains socket. Connect a different electrical appliance to the mains socket. Contact a qualified electrician. The lamp is in stand-by.
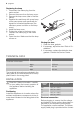
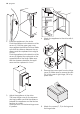
progress Replacing the lamp 1. Disconnect the mains plug from the mains socket. 2. Remove the screw from the lamp cover. 3. Remove the lamp cover (refer to the illustration). 4. Replace the used lamp with a new lamp of the same power and specifically designed for household appliances. (the maximum power is shown on the lamp cover). 5. Install the lamp cover. 6. Tighten the screw to the lamp cover. 7. Connect the mains plug to the mains socket. 8. Open the door. Make sure that the lamp comes on.
progress 9 for this purpose. If the domestic power supply socket is not earthed, connect the appliance to a separate earth in compliance with current regulations, consulting a qualified electrician. The manufacturer declines all responsibility if the above safety precautions are not observed. This appliance complies with the E.E.C. Directives. Door reversibility The door of the appliance opens to the right. If you want to open the door to the left, follow these steps before you install the appliance: 1.
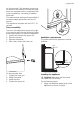
progress 4mm 44mm 4. Attach the appliance to the niche with 4 screws. 2. Install the appliance in the niche. Push the appliance in the direction of the arrows (1) until the upper gap cover stops against the kitchen furniture. Make sure that the distance between the appliance and the cupboard front-edge is 44 mm. Push the appliance in the direction of the arrows (2) against the cupboard on the opposite side of the hinge. Make sure that the clearance between the appliance and the cupboard is 4 mm.
progress 11 Attach the hinge covers (E) to the hinge. Ha D C E Hc E 7. Disconnect the parts (Ha), (Hb), (Hc) and (Hd). Ha 10. Open the appliance door and the kitchen furniture door at an angle of 90°. Insert the small square (Hb) into guide (Ha). Put together the appliance door and the furniture door and mark the holes. Hb 8 mm Hc Hd Ha 8. Install the part (Ha) on the inner side of the kitchen furniture. 11.
progress 13. Press the part (Hd) on the part (Hb). 8 mm Hb K Ha Hd 12. Place the small square on the guide again and fix it with the screws supplied. Align the kitchen furniture door and the appliance door by adjusting the part Hb. Do a final check to make sure that: • All screws are tightened. • The magnetic sealing strip is attached tightly to the cabinet. Important! If the ambient temperature is low (for example, in the Winter), the size of the gasket decreases.
progress 13
progress
progress 15
www.electrolux.