
Assembly Sheet


ASSEMBLY TIPS :
1. Remove hardware from box and sort by size.
2. Please check to see that all hardware and parts are present prior to start of assembly.
3. Please follow attached instructions in the same sequence as numbered to assure fast and
easy assembly.
MODEL : B118-23
REVISION : C
Page 1 of 9
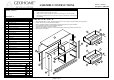
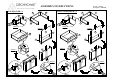
Component List
1
2
3
No QtyDescriptions
1
1
Side Panel (Left)
Side Panel (Right)
Top Horizontal (Back)
1
Left Leg (Front)
1
1
1
2
Apron Panel (Front & Back)
4
5
6
7
Left Leg (Back)
Right Leg (Front)
Right Leg (Back)
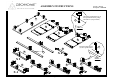
Hardware List
28
46
64
No
20
A
B
C
D
QtyDescriptions
Big Camlock
Ø15 x 12mm
Camlock Screw
Wooden Dowel 6mm x 30mm
PHCB Screw M4 x 16mm
Top Panel
Back Panel
1
1
Center Panel
1
1
1
Top Horizontal (Front)
E
PHCB Screw M4 x 32mm
12
F
Truss Head Screw M4 x 15mm
G
6
H
Handle
f u r n i t u r e
Item No : B118-23
Description : DRESSER
X 2
X 4
J
I
L
R
Q
T
V
U
S
K
H
B
C
E
D
A
G
F
R
Q
N
P
O
M
I
J
K
L
M
N
O
P
Q
R
S
8
30
Small Camlock
Ø12 x 10mm
18
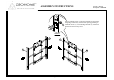
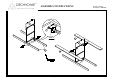
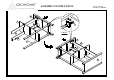
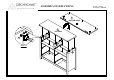
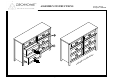
ASSEMBLY INSTRUCTIONS
2
Top Drawer Front
Top Drawer Side (Left)
2
2
6
Top Drawer Side (Right)
Drawer Bottom Shelf
Top Drawer Back
2
6
Drawer Bottom support
Bottom Drawer Side (Left)
4
4
Bottom Drawer Side (Right)
Bottom Drawer Back
4
4
Bottom Drawer Front
T
U
V
I M P O R T A N T N O T E :
· Place all wooden parts on a clean and smooth surface such as a rug or carpet to avoid the parts from being scratched.
· Check to be sure that you have all parts and hardware.
· Remove all wrapping materials, including staples & packing straps before you start to assemble.
· Do not tighten all screws/bolts until all completely assembled.
· Keep all hardware parts out of reach of children !
· Tighten screws periodically ! With the use of this product bolts and screws may become loose over time !
· Don't attempt to modify parts !