ITEMS #0831710 #0831709 PULL-DOWN KITCHEN FAUCET MODELS #51-K814-PS-BN #51-K814-PS-WH ® Project Source® is a registered trademark of LF, LLC. All rights reserved. Français / Español p. 9 ATTACH YOUR RECEIPT HERE Serial Number________________ Purchase Date_______________ Questions, problems, missing parts? Before returning to your retailer, call our customer service department at 1-866-389-8827, 8 a.m. - 8 p.m., EST, Monday - Friday.
PACKAGE CONTENTS B C A D PART A B C D DESCRIPTION Faucet body assembly Escutcheon Gasket Weight HARDWARE CONTENTS (not shown actual size) AA BB CC Lock Nut Metal Washer Hex Bolt Qty. 1 Qty. 1 Qty.
SAFETY INFORMATION Please read and understand this entire manual before attempting to assemble, operate or install the product. CAUTION • If you solder the joints during installation of the faucet, the seats, cartridges, and washers must be removed before using a flame or the warranty will be voided on these parts. • Cover the sink drain to avoid losing parts. WARNING • Protect your eyes with safety glasses when cutting or soldering water supply lines.
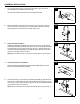
ASSEMBLY INSTRUCTIONS 1. Turn off water at the supply valve at the main water supply, disconnect the supply lines, and remove old faucet body. 1 Clean and dry surface area where new faucet will be mounted. 2. Before installation, remove the quick connector (2.1) from the free end of the hose (2.2) by unscrewing it in a counterclockwise direction. Unscrew the locking nut (2.3) and remove the metal washer (2.4). 2 2.4 2.3 2.2 2.1 3.
ASSEMBLY INSTRUCTIONS 6. Install the metal washer (BB) onto the threaded shank (6.1). Thread the locking nut (AA) onto the shank (6.1). Lock the locking nut (AA) into position by tightening the hex bolts (CC). Do not overtighten. 6 Hardware Used BB Metal washer x1 AA Lock nut x1 CC Hex bolt x2 6.1 BB CC AA 7. After inserting the hose (7.1) through the hole in the sink surface, retract the hose (7.1) back down, and reattach the quick connector (7.
ASSEMBLY INSTRUCTIONS 10. IMPORTANT: After installation is complete, turn on the hot and cold water supply. Check for leaks. Pull the hose assembly (10.1) out of the spout (10.2) and remove the spray head (10.3) by unscrewing it from the hose assembly (10.1) in a counterclockwise direction. Be sure to hold the end of the hose assembly (10.1) down into the sink and turn the faucet (10.4) on to the warm positon where it mixes hot and cold water. Flush line for one minute. Check for leaks.
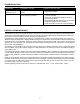
TROUBLESHOOTING PROBLEM POSSIBLE CAUSE CORRECTIVE ACTION Water does not completely shut off. Rubber valve seat is dirty, stuck, or broken. 1. Call customer service at 1-866-389-8827 for a replacement cartridge. Improper water pattern. Aerator dirty or small parts inside aerator improperly installed. 1. Remove the aerator from the spout end by turning it counter-clockwise. 2. Gently flush the small parts inside the aerator to clear away any debris. 3.
REPLACEMENT PARTS LIST For replacement parts, call our customer service department at 1-866-389-8827, 8 a.m. - 8 p.m., EST, Monday - Friday.
ARTICLE #0831710 #0831709 ROBINET DE CUISINE À BEC RÉTRACTABLE MODÈLE #51-K814-PS-BN #51-K814-PS-WH ® Project Source® est une marque de commerce déposée de LF, LLC. Tous droits réservés. ARTÍCULO #0831710 #0831709 Project Source® es una marca registrada de LF, LLC. Todos los derechos reservados.
CONTENU DE L’EMBALLAGE / CONTENIDO DEL PAQUETE B C A D PIÈCE / PIEZA A B C D DESCRIPTION / DESCRIPCIÓN Ensemble du corps de robinet / Ensamblaje del cuerpo del grifo Écusson / Escudo de bocallave Joint / Empaquetadura Poids / Peso QUANTITÉ / CANTIDAD QUINCAILLERIE INCLUSE (grandeur non réelle) / ADITAMENTOS (no es el tamaño real) AA Écrou de blocage Contratuerca Qté : 1 Cant. 1 BB CC Rondelle en métal Boulon à tête hexagonale Arandela de metal Perno hexagonal Qté : 1 Qté : 2 Cant. 1 Cant.
CONSIGNES DE SÉCURITÉ / INFORMACIÓN DE SEGURIDAD Assurez-vous de lire et de comprendre l’intégralité de ce manuel avant de tenter d’assembler, d’installer ou d’utiliser le produit. ATTENTION • Si vous avez l’intention de souder les joints pendant l’installation du robinet, retirez d’abord les sièges, les cartouches et les rondelles; sans quoi, la garantie ne couvrira plus ces pièces. • Couvrez le drain du lavabo pour éviter de perdre des pièces.
INSTRUCTIONS POUR L’ASSEMBLAGE / INSTRUCCIONES DE ENSAMBLAJE 1. Coupez l’eau au robinet d’alimentation de la conduite d’eau principale, puis débranchez les conduites d’alimentation et retirez le vieux corps de robinet. 1 Nettoyez et séchez la surface où le nouveau robinet sera installé. Cierre la válvula de entrada de agua principal, desconecte las líneas de entrada y retire el cuerpo del grifo viejo. Limpie y seque el área superficial donde se colocará el nuevo grifo. 2.
INSTRUCTIONS POUR L’ASSEMBLAGE / INSTRUCCIONES DE ENSAMBLAJE 5. Tirez le tuyau (5.1) vers le haut dans l’ensemble du corps de robinet (A), jusqu’à ce qu’il soit de niveau avec le bas de la tige (5.2). Ne tirez pas l’extrémité du tuyau (5.1) au-delà de la tige (5.2). Insérez l’ensemble du corps de robinet (A) dans le trou de l’évier (5.3). 5 5.4 5.1 A REMARQUE : Ne remettez pas le tuyau (5.1) dans le bec (5.4) du robinet avant l’étape 7. 5.2 Retire la manguera (5.
INSTRUCTIONS POUR L’ASSEMBLAGE / INSTRUCCIONES DE ENSAMBLAJE 9. Raccordez les conduites d’alimentation en eau aux tiges du robinet / Conecte a las tuberías de suministro de agua. 9 Du froid Frío Chaud Caliente (9.1) Utilisez une conduite d’alimentation IPS de 1/2 po ou (9.2) des écrous d’accouplement (non inclus) munis de (9.3) colonnes montantes à bout sphérique (non incluses). 9.1 Rétablissez l’alimentation en eau ou ouvrez le robinet d’arrêt, et vérifiez s’il y a des fuites.
MODE D’EMPLOI / INSTRUCCIONES DE FUNCIONAMIENTO La manija de palanca controla el flujo de agua caliente o fría del grifo. Gire la manija hacia delante para que salga agua fría; gire la manija hacia atrás para que salga agua caliente. Al alejar la manija del cuerpo del grifo (hacia la derecha) se abre el cartucho y el agua fluye desde la boquilla. El grado en que abra la manija determina el volumen del flujo de agua.
DÉPANNAGE / SOLUCIÓN DE PROBLEMAS PROBLÈME PROBLEMA CAUSE POSSIBLE CAUSA POSIBLE MESURE CORRECTIVE ACCIÓN CORRECTIVA L’alimentation en eau ne peut être coupée complètement. El paso de agua no se cierra completamente. Le siège de valve en caoutchouc est sale, bloqué ou brisé. El alojamiento de la válvula de goma está sucio, atascado o roto. 1. Communiquez avec notre service à la clientèle au 1 866 389-8827 pour obtenir une cartouche de rechange. 1.
GARANTIE À VIE LIMITÉE / GARANTÍA LIMITADA DE POR VIDA Le distributeur garantit à l’acheteur ou au consommateur initial que ce produit sera exempt de tout défaut de matériaux ou de fabrication dans des conditions d’utilisation résidentielle normales. Le distributeur choisira de fournir des pièces de rechange ou de remplacer le produit défectueux si ce dernier a été utilisé selon les directives du fabricant. Le distributeur offre à l’acheteur initial une garantie limitée de 5 ans sur le fini de ce produit.
LISTE DES PIÈCES DE RECHANGE / LISTA DE PIEZAS DE REPUESTO Pour obtenir des pièces de rechange, communiquez avec le service à la clientèle au 1 866 389-8827, entre 8 h et 20 h (HNE), du lundi au vendredi. Para obtener piezas de repuesto, llame a nuestro Departamento de Servicio al Cliente al 1-866-389-8827, de lunes a viernes de 8 a.m. a 8 p.m., hora estándar del Este.