
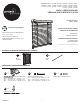
Installation Guide

3
CAUTION: REMOVAL OF MORE THAN 5 SLATS WILL VOID THE WARRANTY./PRECAUCIÓN: RETIRAR MÁS DE 5
LISTONES ANULARÁ LA GARANTÍA.
CAUTION: DO NOT CUT THE VERTICAL LADDER STRINGS, AS THIS WILL VOID THE WARRANTY.
ASSEMBLY INSTRUCTIONS/INSTRUCCIONES DE ENSAMBLAJE
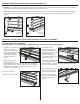
OPTIONAL: ADJUST LENGTH OF BLIND/AJUSTE DEL LARGO DE LA PERSIANA
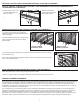
Remove the cut slats.
Retire los listones cortados.
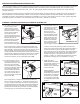
OPTIONAL: To install hold down brackets (DD), lower blind (A) to desired position. Screw hold down brackets (DD) into wall or window sill
using medium screws (CC) and attach blind (A) to the hole in the cap on bottom rail.
OPCIONAL: para instalar los soportes de fijación inferior (DD), baje la persiana (A) a la posición deseada. Atornille los soportes de fijación
inferior (DD) a la pared o al alféizar de la ventana con tornillos medianos (CC) y fije la persiana (A) a partir del orificio en la tapa del riel
inferior.
DD
A
CC
4a
Inside Mount
Montaje interior
DD
A
CC
4b
Outside Mount
Montaje exterior
4.
Lower blind (A) to maximum
length. Cut the desired
number of the bottom most
slats, leaving the bottom rail
as is. Blind (A) is able to
shorten MAX 5 slats (up to
10”) with no operation
concerns.
Baje la persiana (A) a su
largo máximo. Corte el
número deseado de los listones que se encuentran más abajo y
deje el riel inferior como está. La persiana (A) se puede reducir a
un MÁXIMO de 5 listones (hasta 25,4 cm) sin tener que preocu-
parse por el funcionamiento.
1.
2.
Going down from the
remaining slats, skip over
one horizontal ladder string
and cut the excess horizontal
ladder strings below.
CAUTION: Do not cut the
vertical ladder strings, as this
will void the warranty.
Corte el exceso de las hileras
de la escalera horizontal.
PRECAUCIÓN: no corte las hileras de la escalera vertical puesto
que esto anulará la garantía.
3.
Remove the plugs from the
bottom rail with a flathead
screw driver (not included).
Retire los tapones del riel
inferior con un destornillador
de cabeza plana (no se
incluye).
4.