INTELLI-CHARGE BATTERY CHARGER 12 VOLT, 7 STAGE SWITCHMODE P/No.
IMPORTANT SAFETY INFORMATION Please read this manual thoroughly before use and store in a safe place for future reference. WARNING • Explosive gases may escape from the battery during charging. Prevent flames and sparks. Provide adequate ventilation. • Before charging, read the instructions. • For indoor use. Do not expose to rain. • For charging 12 Volt lead acid batteries ONLY. • Disconnect the 240V mains supply before making or breaking the connections to the battery.
FEATURES 7-STAGE AUTOMATIC CHARGING This is a fully automatic battery charger with 7 charge stages. Automatic charging protects your battery from being overcharged so you can leave the charger connected to the battery indefinitely. 7-stage charging is a very comprehensive and accurate charging technique that gives your battery longer life and better performance compared to using traditional chargers.
Absorption (Constant Voltage) The absorption stage charges the battery to 100% by adjusting the charge rate allowing the battery to absorb more power. Equalisation (Calcium mode only) Designed especially for calcium batteries, this stage returns calcium batteries to full service by removing acid stratification of the electrolyte.
CHARGE STATUS INDICATOR The CHARGING and FULLY CHARGED LEDs will illuminate and flash in various patterns to indicate the different stages of charging. See below for flash patterns. Red LED Power Blue LED Charging Green LED Desulphation Soft Start (Fast Flash) (Slow Flash) Bulk Absorption/ Equalisation Analyse Recondition Float Full CHARGING LED: blue LED illuminates and flashes during charging process. FULLY CHARGED LED: green LED illuminates (solid) when fully charged.
SPECIFICATIONS P/No. IC700 & IC700W IC1000 IC1500 Type 7 stage 7 stage 7 stage Input (Nominal) 240VAC, 50Hz 240VAC, 50Hz 240VAC, 50Hz Input Power 110W 160W 240W Output Voltage 12V 12V 12V Output Current 7A, 4A, 2A, 1A 10A, 6A, 4A, 2A 15A, 8A, 4A, 2A Minimum Start Voltage 2.5V 2.5V 2.5V Back Drain 1mA 1mA 1mA (with remote 2mA) CHARGE CONTROL Desulphation High Frequency Pulse charge up to 11V Soft Start Half the rated set current up to 12V Bulk Set current up to: 14.
Battery Chemistry Selection (Mode) Button DC Leads LED Battery Chemistry Display Indicates selected battery chemistry type LED Charge Status Display Indicates Power, Charging and Fully Charged Power Cord Adjustable Charge Rate Thermostatically Controlled Cooling Fan IC700 IC700W IC1000 IC1500 61 61 65 61 FOR LEAD ACID CELL BATTERIES FOR LEAD ACID CELL BATTERIES Mounting Flange FOR LEAD ACID CELL BATTERIES FOR LEAD ACID CELL BATTERIES 108 108 FOR LEAD ACID CELL BATTERIES 108 112 FOR L
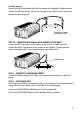
CHARGING INSTRUCTIONS STEP 1 – CHECK THE ELECTROLYTE LEVEL Prior to charging the battery, remove the vent caps and check the electrolyte level (not required on sealed & maintenance free batteries). The electrolyte should be 6mm (1/4”) above the battery’s plates. If low, top up with distilled water to the correct level and refit the vent caps. STEP 2A – CONNECTION OUT OF THE VEHICLE Connect the RED lead (battery clip) from the charger to the Positive (+) battery post.
Positively earthed Connect the BLACK lead (battery clip) from the charger to the Negative (-) battery terminal. Connect the RED lead (battery clip) from the charger to the vehicle’s chassis away from the fuel line or moving parts.
ADJUSTABLE CHARGE RATES: 12 VOLT BATTERIES Current setting 1A 2A 4A 6A 7A 8A 10A 15A AH C-7 C-20 7 20 14 40 30 80 40 120 50 140 60 160 70 200 85 300 CCA C-7 C-20 40 120 80 240 180 480 240 720 300 800 360 1000 450 1000 465 2000 MCA C-7 C-20 55 170 110 330 250 650 330 1000 350 900 500 1300 500 1200 600 2500 7 7 7 7 7 7 6 6 Time – – – – – – – – 24h 24h 24h 24h 24h 24h 20h 20h STEP 5 – SET BATTERY CHEMISTRY TYPE Battery Chemistry should be selected by the type of battery being charged (refer to the batte
STEP 8 – CHECK THE ELECTROLYTE LEVEL (CALCIUM MODE ONLY) Check the electrolyte level and top up if required. MOUNTING INSTRUCTIONS INTELLI-CHARGE Chargers are designed for indoor, out of weather use only. Ensure that both charger and battery are in a well-ventilated space during charging. The battery charger end plates include a mounting flange for easy mounting.
7. Fit the correctly rated fuse. Inline fuse Ring terminal FOR LEAD ACID CELL BATTERIES If the charger is used in a Permanent/Hard Wired application and the vehicle will not be used for some time, it is best to leave the charger connected to mains power (turned ‘On’) so that it can maintain the battery fully charged. Ensure any modification to the 240V mains lead is carried out by a qualified person and that connection to supply mains is in accordance with National wiring rules.
CALCIUM (BULK AND ABSORPTION 14.7 VOLTS, EQUALISATION AND RECONDITION UP TO 16 VOLTS) This charge mode is best suited for Calcium batteries that have been deeply discharged and require an equalization charge to restore a full electrolyte reading. If the battery requires a simple ‘top-up’, the WET charge mode can be used. LOCKING THE BATTERY CHARGER SETTINGS Locking the battery charger settings will disable the CHARGE RATE & MODE keys from use.
FREQUENTLY ASKED QUESTIONS Q. How do I know if the battery is charged? A. The charger’s FULLY CHARGED LED will illuminate (solid). Alternatively use a Battery Hydrometer (Projecta Part No. BH100). A reading of 1.250 or more in each cell indicates a fully charged battery. Q. I have connected the charger properly but the ‘CHARGING LED’ does not come on? A. In some cases batteries can be flattened to the point where they have very little or no voltage.
Q. What happens if my battery charger is in Desulphation mode or Soft Start mode, but I want to start bulk charging? A. Desulphation mode is time limited to 6 hours and Soft Start is limited to 1 hour. If you can not wait for the battery charger to move through these stages you can select Power Supply mode to charge the battery. After an hour of charging in Power Supply mode, there should be sufficient charge in the battery to bypass both Desulphation and Soft Start.
WARRANTY STATEMENT Applicable only to product sold in Australia Brown & Watson International Pty Ltd of 1500 Ferntree Gully Road, Knoxfield, Vic.