INTELLI-CHARGE BATTERY CHARGER 7 STAGE SWITCHMODE P/No.
IMPORTANT SAFETY INFORMATION Please read this manual thoroughly before use and store in a safe place for future reference. WARNING • Explosive gases may escape from the battery during charging. Prevent flames and sparks. Provide adequate ventilation. • Before charging, read the instructions. • For indoor use. Do not expose to rain. • For charging lead acid batteries ONLY (for the size and voltage specified in the specifications table).
7-STAGE AUTOMATIC CHARGING This is a fully automatic battery charger with 7 charge stages. Automatic charging protects your battery from being overcharged so you can leave the charger connected to the battery indefinitely. 7-stage charging is a very comprehensive and accurate charging technique that gives your battery longer life and better performance compared to using traditional chargers.
ABSORPTION (CONSTANT VOLTAGE) The absorption stage charges the battery to 100% by adjusting the charge rate allowing the battery to absorb more power. EQUALISATION (CALCIUM MODE ONLY) Designed especially for calcium batteries, this stage returns calcium batteries to full service by removing acid stratification of the electrolyte.
BATTERY CHEMISTRY SELECTION The Multi-Chem function allows you to set the charging profile to suit each battery’s chemistry type (GEL, AGM, WET and Calcium). This ensures correct and thorough charging and maximises battery performance and battery life. The following section describes the charge profiles for each chemistry type. POWER SUPPLY (CONSTANT VOLTAGE OF 13.8 VOLTS) This sets the charger in power supply mode giving a constant voltage of 13.8VDC.
FEATURES ADJUSTABLE CHARGE RATE The charger’s output can be adjusted to suit the size of the battery for optimum charging. REMOTE CONTROL DISPLAY* Control and monitor the charger’s performance from a remote control display, allowing the charger to be flush or surface mounted out of the way and out of sight. The battery charger and remote are synchronised for operation either locally or by remote. RUBBER END CAPS (IC2500W ONLY) Protective rubber moulded end caps for the toughest workshop conditions.
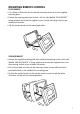
MOUNTING REMOTE CONTROL FLUSH MOUNT • Cut a 93mm x 70mm hole into the desired mounting surface to suit the supplied mounting plate. • Position the mounting plate into the hole with the side labelled ‘FLUSH MOUNT’ facing outwards and screw the supplied screws into the mounting surface as per the below illustration. OU SH M NT FLU OU SH M NT • Clip the remote control into the mounting bracket.
K BUL RGE CHA RB ABSO Y FULL RGED CHA REMOVING REMOTE CONTROL AMP ON VOLT/ REC E P T TY BA FLUSH MOUNT 1. Pull the remote control sideways and firmly lift E RG A CH MP LT/A VO 2.
CONTROLS The battery charger and remote control* interfaces are synchronised and identical in operation allowing you to monitor the battery charger’s performance and customise the charge settings to best suit your battery. The function of each button is explained below: 1. VOLT/AMP: Change LCD screen display from battery voltage to input current 2. CHARGE RATE: Set the charge rate to suit the size of the battery 3. BATTERY TYPE: Set the charging profile to suit the battery’s chemistry type 4.
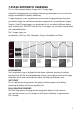
LED CHARGE INDICATORS BATTERY CHARGER & REMOTE CONTROL* These battery chargers include coloured LEDs that illuminate various signals to indicate different stages of charging.
CHARGING INSTRUCTIONS STEP 1 – CHECK THE ELECTROLYTE LEVEL Prior to charging the battery, remove the vent caps and check the electrolyte level (not required on sealed & maintenance free batteries). The electrolyte should be 6mm (1/4”) above the battery’s plates. If low, top up with distilled water to the correct level and refit the vent caps. STEP 2 – CONNECT TO BATTERY There are three options for connecting to battery.
STEP 2B – BATTERY IN VEHICLE Determine if the vehicle is Positively (+) or Negatively (-) earthed. Negatively earthed vehicles have a cable (usually black) from the Negative battery terminal to the vehicle’s chassis. Negatively earthed (most vehicles) Connect the RED lead (battery clip) from the charger to the Positive (+) battery terminal. Connect the BLACK lead (battery clip) from the charger to the vehicle’s chassis away from the fuel line or moving parts.
STEP 2C – PERMANENT HARD WIRING It is possible to hardwire the DC charging leads to the battery for permanent installations. The DC leads are pre-wired with cable lugs to make this process easier. It is recommended to fit a circuit breaker or inline fuse with the following ratings. (See below) IC2500 & IC2500W = 30 Amp IC3500 = 50 Amp IC5000 = 100 Amp IC800-24 = 12 Amp Connection: 1. Unscrew and remove the battery clips from the DC leads using a 4mm allen key.
STEP 3 – REMOTE CONTROL* & TEMPERATURE SENSOR* (OPTIONAL) If you require the temperature sensor and remote control, install before connecting the charger to 240V mains power. These accessories are optional; the charger will operate normally with or without accessories being fitted. To install the remote control, insert the data plug into the data socket at the rear of the battery charger. Cable length: 4.5 metres. Warning: Ensure the cable is secured safely away from moving parts.
STEP 5 – SET CHARGE RATE The charge rate should be set according to the size of the battery. See the recommended charge rates for various battery sizes in the table below. (Not all ouputs are available on all models) a. Press the CHARGE RATE button. The LCD screen will flash the present setting. b. Press the CHARGE RATE button repeatedly until desired setting is displayed. c. Wait for the LCD screen to stop flashing.
STEP 7 – CHARGING During normal charging the LCD screen will default to the VOLTS display; to view input current press the VOLTS/AMPS button. During Equalisation and Recondition, the LCD screen will display rapid horizontal lines. STATUS Equalisation (Calcium Only) Recondition (Auto) Recondition (Manual) LCD DISPLAY ––– ––– ––– Rapid horizontal (scrolling) lines The LED indicators will also illuminate and flash various signals, indicating the different stages of charging.
INITIATING RECONDITION MODE The recondition mode can restore batteries from a deeply discharged state by equalising the cells (equalisation charge) ensuring they are operating at full capacity. A recondition charge should be performed periodically to optimise the battery’s health and performance. STEP 1 Follow STEPS 1 to 6 of the “Charging Instructions” of this booklet. Ensure the battery is removed from the vehicle to prevent the battery’s electrolyte from spilling over and damaging the car or engine bay.
FAULTS & ERRORS There are three error codes that may be displayed.
SPECIFICATIONS P/No. IC2500 & IC2500W IC3500 IC5000 IC800-24 Type 7 stage 7 stage 7 stage 7 stage Input (nominal) 240VAC, 50Hz 240VAC, 50Hz 240VAC, 50Hz 240VAC, 50Hz Input Power 792W 1080W 1488W 480W Output Voltage 12V 12V 12V 24V Output Current 2, 6, 12, 25A 2, 8, 16, 35A 2, 6, 12, 25, 50A 2, 4, 6, 8A Minimum Start Voltage 2.5V 2.5V 2.5V 4.
PRODUCT OVERVIEW Temperature Sensor Input On/Off Switch LCD Screen Remote Input 24V 8A 7-Stage POWER ON TEMPERATURE SENSOR BULK CHARGE OFF REMOTE ABSORPTION FULLY CHARGED VOLTS/AMPS CHARGE RATE BATTERY TYPE RECONDITION ON Charge Status LEDs Display & Charge Selection Buttons POWER ON IC800-24 Power Cord Fan DC Leads 12V 25A 7-Stage BULK CHARGE OFF IC2500 TEMPERATURE SENSOR IC2500W REMOTE ABSORPTION FULLY CHARGED VOLTS/AMPS CHARGE RATE BATTERY TYPE RECONDITION ON 12V 35A 7-Stage 81
FREQUENTLY ASKED QUESTIONS Q. How do I know if the battery is charged? A. The charger’s FULLY CHARGED LED will illuminate (solid) and the remote’s bi-colour LED will illuminate green (solid). Alternatively use a Battery Hydrometer (Projecta Part No. BH100). A reading of 1.250 or more in each cell indicates a fully charged battery. Q. I have connected the charger properly but the LCD display reads 0.0 (zero) Volts and does not appear to be charging. A.
Q. What if I have an appliance connected to the battery whilst charging? A. Powering an appliance while charging your battery will impact on the battery chargers ability to accurately measure the battery’s response to the charge being applied. The battery charger has been designed to accommodate this situation although not recommended. For optimum charging it is recommended to charge without any appliance load on the battery.