
Manual


8
CHARGING INSTRUCTIONS
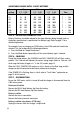
STEP 1 – CHECK THE ELECTROLYTE LEVEL
Prior to charging the battery, remove the vent caps and check the electrolyte level (not
required on sealed & maintenance free batteries). The electrolyte should be 6mm (1/4”)
above the battery’s plates. If low, top up with distilled water to the correct level and
refit the vent caps.
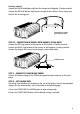
STEP 2A – CONNECTION OUT OF THE VEHICLE
Connect the RED lead (battery clip) from the charger to the Positive (+) battery post.
Connect the BLACK lead (battery clip) from the charger to the Negative (-) battery post.
STEP 2B – CONNECTION IN VEHICLE
Determine if the vehicle is Positively (+) or Negatively (-) earthed. Negatively earthed
vehicles have a cable (usually black) from the Negative battery terminal to the vehicle’s
chassis.
Negatively earthed (most vehicles)
Connect the RED lead (battery clip) from the charger to the Positive (+) battery terminal.
Connect the BLACK lead (battery clip) from the charger to the vehicle’s chassis away
from the fuel line or moving parts.
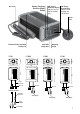
12V 7A 7-Stage
PWR SUPPLY
GEL
AGM
WET
CALCIUM
MODE
POWER ON
CHARGING
FULLY CHARGED
1A
2A
4A
7A
CHARGE
RATE
Connection out of vehicle
12V 7A 7-Stage
PWR SUPPLY
GEL
AGM
WET
CALCIUM
MODE
POWER ON
CHARGING
FULLY CHARGED
1A
2A
4A
7A
CHARGE
RATE
Connection in vehicle
(negatively earthed)