
Operating instructions

BEFORE START UP:
1. Read all instructions before using this product.
2. CHECK OIL AND FLUID LEVELS:
Check pump oil by locating the oil view window or
dipstick and fill to the red dot. Check fuel
levels. Check engine oil and coolant
levels if unit is so equipped.
(See the maintenance schedule on page 16).
3. CONNECT HOSE AND GUN ASSEMBLY: The hose
has a swivel on one end. Connect swivel end to gun after
wrapping end with tape thread sealer.
4. CONNECT THE WATER SUP-
PLY & TURN WATER ON:
Maintain an adequate supply of
water using a ¾" I.D. hose with a
pressure between 25 and 60 PSI.
Burner power switches should be
off before starting. If tank fed, be sure there is water in
the tank and the valve is switched for supply tank feed.
Do not run dry for longer than one minute. Note: CP and
most HG Series machines will not start if water is off.
5. BATTERY INFORMATION:
If you did not order a battery with
your machine you will have to buy
one and fill it with electrolyte
(available at local auto parts store).
!WEAR EYE PROTECTION!
If the opening on your battery box
measures 9" by 6" we recommend Exides' U1L/GTH
235CCA battery. If the opening measures 8" by 12" we
recommend Exides' group 46-60 550 CCA battery. Deep
cycle batteries are recommended to extend battery life.
Always connect the positive battery cable before the
negative and coat the battery terminals with corrosion
inhibitor to prevent corrosion.
6. If wheel kit, accessories, or discharge hose are not
installed, see your local dealer for installation instructions.
OPERATION:
1. STARTING:
A. Electric Powered Units: Connect power supply and
ensure that all wiring connections and voltages are of
sufficient rating to comply with the equipment's require-
ments. Turn pump power switch on. If unit is equipped
with auto-start, keep all power switches off when left
unattended. (Unit will only turn on when trigger gun is
pulled).
B. Gasoline Engine Units: To reduce the risk of starter
damage remove spray nozzle from wand and pull spray gun
trigger while cranking engine. After start, release trigger and
replace spray nozzle. Be sure nozzle is properly positioned
in quick disconnect before spraying.
2. PURGE AIR FROM SYSTEM: Squeeze the trigger on the
spray gun until a constant stream of water comes out. (Purging
works best with nozzle removed from wand and/or dual wand
in the low pressure mode.)
3. SELECT DESIRED NOZZLE:
Connect nozzle securely to spray wand. If equipped,
close pressure adjusting knob on dual wand. Hold gun
firmly, squeeze trigger for high pressure spray. O-ring
should be replaced with 1/4" or 3/8" EPDM.
CAUTION - Gun kicks back - hold with both hands.
WARNING - Risk of explosion -
DO NOT spray flammable liquids.
4. START BURNER: To create hot water on high pressure
washers equipped with heat exchangers, release the trigger
on the gun, turn the burner to the
on position, and turn the thermo-
stat to the desired temperature.
Squeeze the trigger on the
spray gun and the burner will
begin heating the water. It will
stop firing whenever the water
spray is off or if the temperature setting is exceeded.
5. STEAM: (If Equipped)Insert steam nozzle and turn ther-
mostat to 250º steam setting. The steam nozzle is sized
for approximately 25% less water volume than the hot
water mode.
6. BYPASS MODE: System will go into bypass mode when
machine is left running and trigger gun is closed. Bypass
mode is when the inlet water coming into the pump
recirculates through the unloader across the pump head.
If left in bypass too long - More Than Five Minutes -
friction created by the movement of the water will begin
to heat the water at a rapid rate. If equipped with a
THERMAL DUMP VALVE, water exceeding 145° F
will cause the valve to open allowing the hot water out of
the system into the atmosphere and allow cool water in.
The valve will reset itself when water temperature
comes down to a safe level. If equipped with a bulk water
tank, water can be bypassed back through the tank allowing
for a larger volume of water to be recirculated through the
pump head thus reducing heat on the pump seals. If equipped
with By-pass-cool system, a small portion of the bypass
water is routed back through the float tank to keep the pump
cool.
!Warning: Do not leave in bypass for longer than five
minutes to prevent pump from overheating.
6 OPERATING INSTRUCTIONS
Warning: Cool down burner before shutting off.
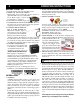
EB24F
Lock collar
after nozzle
is inserted
PUMP &
BURNER
POWER
TEMP CONTROL
CHEM.
INJ.