User’s Manual For PV-CX881P DOC NO: 54-0881P-01 02/01/21 Rev.
FCC Requirement This device has been certified to comply with the limits for a Class B computing device pursuant to Subpart J of Part 15 of the FCC Rules. See instructions if interference to radio reception is suspected. WARNING: This equipment generates and uses radio frequency energy and, if not installed or used properly, that is, in strict accordance with the manufacturer's instructions, may cause interference to radio or television reception.
Notice The information in this document is subject to change in order to improve reliability, design, or function without prior notice and does not represent a commitment on the part of this company. In no event will we be liable for direct, indirect, special, incidental, or consequential damages arising out of the use or the inability to use the product or documentation, even if advised of the possibility of such damages.
TABLE OF CONTENTS 1 Feature .........................................................................................................1 2 Hardware Configuration .............................................................................2 3 Hardware Installation..................................................................................2 4 Software Installation ...................................................................................3 4.1 Windows 98SE/ME driver Installation ................
1 Feature □ Supports NTSC/PAL/SECAM video decoding. □ Zero wait state PCI burst writes. □ Multiple YCrCb and RGB pixel formats supported on output. □ Multiple composite and S-Video inputs. □ Supports planner YUV data format. □ VBI data capture for closed caption data decoding. □ Only support Windows 98SE / WindowsME / Winsows2000/ WindowsXP □ Fully PCI Rev 2.1 compliant.
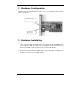
2 Hardware Configuration Standard type is featured with two ports, one is for composite video and the other is for S-Video. S-Video video input Composite video input 3 Hardware Installation 1. Turn off your computer first. Open the case and insert this PV-CX881P into your computer’s PCI slot. Make sure the adapter is well seated in the slot then fasten it with screws. Put the outer case back afterwards. 2. Connect the desired image output device to the input port of adapter.
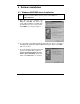
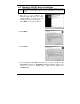
4 Software Installation 4.1 Windows 98SE/ME driver Installation After hardware installation, power on your computer, and then system Notice will detect a new hardware. Please set the new hardware to “Unknown Device”. 1. After turn on your computer, the Windows 98SE/ME will detect the newly added hardware and will show the following message on your monitor. Click ‘NEXT’ on every message box. 2.
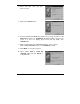
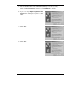
4. Please DO NOT select any item, chick-on “Next”. 5. Click-on the “Finish” button. 6. Insert the AutoRun CD-ROM driver (wait a few seconds). You will see ‘TV Card Series’ and choose ‘PV-CX881P’ window that will be shown on the screen. If it does not display, please brow CD and double click ‘AutoRun.exe’. 7. Put the AutoRun driver into CD-ROM (waiting for a few seconds). Click on ‘TV Card Series’ and choose ‘PV-CX881P’ to install. 8. Click ‘NEXT’ on every message box. 9.
4.2 Windows 2000/XP driver Installation After hardware installation, power on your computer, and then system Notice will detect a new hardware. Please set the new hardware to “Unknown Device”. 1. After turn on your computer, the Windows 2000 will detect the newly added hardware and will show the following message on your monitor. Click ‘NEXT’ on every message box. 2. Click ‘NEXT’. 3. Click ‘Finish’. 4. Insert the AutoRun CD-ROM driver (wait a few seconds).
5. Put the AutoRun driver into CD-ROM (waiting for a few seconds). Click on ‘TV Card Series’ and choose ‘PV-CX881P’ to install. 6. If you see any ‘Digital Signature Not Found’ this dialog box please click ‘Yes’. 7. Click ‘Yes’. 8. Click ‘Yes’.
4.3 DirectX Installation 1. There is no need to reinstall DirectX, if it is already in your system. If you want to install DirectX, click-on ‘DirectX’. 2. Click ‘Install’ to install DirectX. 3. After DirectX installation finished, Windows will restart. If you have other programs under executing, please save files and exit those programs. 4.4 Capture Tool 1. When you install capture driver completely, click ‘finish’ to reboot.
4.4.1 Capture Setting 1. File A. Set Capture File Click–on to set the filename of the captured video file. B. Allocate File Space Click–on to set the capture file size, in MB. C. Save Captured Video As Click–on to save a .AVI file using a different filename. 2. Options A. Preview Click –on preview to start. B. Audio Format Click –on to select the .AVI audio-sampling format that is installed in your system. C.
3. Capture A. Start Capture This function is to start capture. B. Capture Audio Selecting the item is to let you to capture with audio. C. Master Stream You can choose master stream between ‘None’, ‘Video’ and ‘Audio’. D. Set Frame Rate This function is to set frame rate. E. Set Time Limit This function is to set capture time.
4.5 Preview Pin Function Preview Pin function with AMCAP 8.
NO Item 3 4 YVU9 80 x 60 YVU9 88 x 72 YVU9 128 x 96 YVU9 160 x 120 YVU9 176 x 144 YVU9 240 x 176 YVU9 240 x 180 YVU9 320 x 240 YVU9 352 x 240 YVU9 352 x 288 YVU9 640 x 240 YVU9 640 x 288 YVU9 640 x 480 YVU9 720 x 240 YVU9 720 x 288 YVU9 720 x 480 YUY2 80 x 60 YUY2 88 x 72 YUY2 128 x 96 YUY2 160 x 120 YUY2 176 x 144 YUY2 240 x 176 YUY2 240 x 180 YUY2 320 x 240 YUY2 352 x 240 YUY2 352 x 288 YUY2 640 x 240 YUY2 640 x 288 YUY2 640 x 480 YUY2 720 x 240 YUY2 720 x 288 YUY2 720 x 480 Preview Pin function with A
NO Item 5 I420 80 x 60 I420 88 x 72 I420 128 x 96 I420 160 x 120 I420 176 x 144 I420 240 x 176 I420 240 x 180 I420 320 x 240 I420 352 x 240 I420 352 x 288 I420 640 x 240 I420 640 x 288 I420 640 x 480 I420 720 x 240 I420 720 x 288 I420 720 x 480 Preview Pin function with AMCAP 8.
4.6 Capture Pin Function and Playback Capture Pin function with AMCAP 8.
Capture Pin function with AMCAP 8.
Capture Pin function with AMCAP 8.0 NO Item 5 I420 80 x 60 I420 88 x 72 I420 128 x 96 I420 160 x 120 I420 176 x 144 I420 240 x 176 I420 240 x 180 I420 320 x 240 I420 352 x 240 I420 352 x 288 I420 640 x 240 I420 640 x 288 I420 640 x 480 I420 720 x 240 I420 720 x 288 I420 720 x 480 98SE ME Playback with Windows Media Player 7.
5 FAQ Q: What VGA card could be used to run PV-CX881P? A: The VGA card spec requested for PV-CX881P is as following: 1. Linear frame buffer 2. Hardware cursor 3. Graphics mode support 640x480/hi-color Q: Why the video picture motion is slowly when I capture or see at preview mode? A: That is normal, because the signal is via CPU and memory to display. Q: How to enable audio function. A: 1. Double-click ‘speaker’. 2. Click ‘properties ’ of ‘Options’. 3. Enable ‘Line-in’ of ‘Playback’.