
Installation Guide Instruction Manual

Quick Installation Guide Revision 1.0
PROLiNK
PROLiNK
Hurricane 5200C
Hurricane 5200C
Combo ADSL2+ Modem/Router
Combo ADSL2+ Modem/Router
Package Contents
• 1 x H5200C Modem Router
• 1 x RJ-45 straight cable
• 1 x RJ-11 DSL cable
• 1 x Power Adaptor
• 1 x DSL Splitter
• 1 x Setup CD
• 1 x USB Cable (optional)
• Quick Installation Guide
Minimum System Requirements
OS independent for Ethernet Connection
Windows XP/Vista for USB Connection
4x speed CD-ROM Drive
Ethernet Port or USB Port
H5200C ADSL2+ Ethernet Modem Router Page 1 of 2 Revision 1.0 Feb 2009
© Copyright 2009 PROLiNK All Rights Reserved. PROLiNK is manufactured under the authority of FIDA INTERNATIONAL (S) PTE LTD.
All brands or product names are either trademarks or registered trademarks of their respective owners.
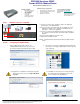
Step 1 Hardware connection
Step 1 Hardware connection
for H5200C
for H5200C
1.1 Connect one end of RJ11 (Telephone) cable to the ADSL port
(marked Line) on the ADSL Modem.
1.2 Connect the other end of RJ11 cable into the wall phone socket,
which has the ADSL service activated, or the ADSL port of a
Micro-filter whichever is applicable.
1.3 Connect one end of the RJ45 (Ethernet) cable to the LAN port of
the computer. Connect another end of RJ45 cable to the ADSL
Modem.
1.4 Connect power adapter to the power socket
1.5 Switch on the H5200C modem
Remark – for USB connection, please refer to the Driver Installation Guide on
the CD
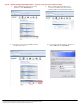
Step 2a Configuring the H5200C Modem
Step 2a Configuring the H5200C Modem
Technical Support Information
Support Hotline:
Support Email:
Address:
(65) 63570666
support@fida.com
Block 16 Kallang Place,
#06-02 Kallang Basin Industrial
Estate, Singapore 339156
9am – 6pm (Mon – Fri)
1 Start your Web Browser ( IE6 or above), the
following windows will pop up to ask you to enter
the username and password (provide by your ISP)
2 If the internet connection is established, it will automatically
proceed to our homepage www.prolink2u.com, then you can
start surfing now.
If your ADSL Line not ready or not connected properly,
the following message will appear, please check
your line and press Try Again Button.
If Pop-up Blocker is enabled, the following message will
appear, please click and select Temporarily Allow
Pop-ups.
Line USB LAN
Power switch
Wall
Socket
Telephone
(Optional)
Computer Power
Adapter
OR