MODEL NO: PIC1007WP Quick Installation Guide Wireless-N IP Camera with Pan/Tilt Version 1.30 (English / Indonesian) BEFORE GETTING STARTED This document is designed to aid you to get started with the device. If you experience problems following these guides or need further information pertaining to the device, please visit our website at www.prolink2u.com. All specifications are subject to the manufacturer’s configuration at the time of shipping and may change without prior notice, written or otherwise.
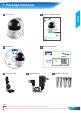
1. Package Contents English 2 Quick Installation Guide 1 IP Camera MODEL NO: PIC1007WP Quick Installation Guide Wireless-N IP Camera with Pan/Tilt Version 1.00 (English / Indonesian ) BEFORE GETTING STARTED This document is designed to aid you to get started with the device. If you experience problems following these guides or need further information pertaining to the device, please visit our website at www.prolink2u.com.
2.
1 Before you start, make sure you have a router ready with Internet connection. 2 mLiveView for Android device requires Android v2.3 or higher. 3 mLiveView for iPhone/iPad requires iOS v4.3 or higher. 4 LiveView for Windows requires Windows XP SP2 or higher. Your PC/Laptop computer should be at least 2.0 GHz (dual-core recommended) and memory 2GB. LiveView for Mac requires OS X 10.6.8 Snow Leopard or higher. Your Mac PC/Laptop should be at least 2.
5. Wired Connection Setup Step 1 PIC1007WP NAT/Router Internet Power Adapter WA N LA N 2 1 1 2 Connect power jack to camera and switch on the power Connect one end of Ethernet cable to the camera and another end to the NAT/Router Step 2 Pro mLiveView mLiveView 1 2 Download and install mLiveView app.
6. Smart WiFi Setup Step 1 2 English 1 3 Pro mLiveViewPro mLiveViewPro 1 2 3 Power on the camera.
6. Smart WiFi Setup Step 3 1 2 WPS 10-20cm 3 4 1 Press the WPS button on the camera. The LEDs will start to flash in running order Align your mobile device with the QR code facing the camera in approximately 10~20cm distance 2 3 4 Wait for the LEDs to flash simultaneously 3 times (or beep sound on models with built-in speaker) to indicate it has successfully scanned the QR code Remove your mobile device from the camera and wait for a pop-up message to prompt you to key in a name for your camera.
7. WPS Push Button Setup Step 1 (Wireless) 2 English 1 NAT/Router WPS PIC1007WP WPS WPS 1 Power on the camera. Do not connect the Ethernet cable to the camera 2 Push the WPS button on both the router and the camera. The LEDs on the camera will start to flash in running order. Wait for the LEDs to flash simultaneously for 3 times indicating the wireless connection is established Step 2 Pro mLiveView mLiveView 1 2 Download and install mLiveView app.
8. Manual Wireless Connection Setup Step 1 PIC1007WP NAT/Router Internet Power Adapter WA N LA N 2 1 1 2 Connect power jack to camera and switch on the power Connect one end of Ethernet cable to the camera and another end to the NAT/Router Step 2 1 2 3 Pro mLiveView mLiveView 1 2 3 Connect your mobile device to the WiFi router that will be used to connect the camera Download and install mLiveView app.
8. Manual Wireless Connection Setup Step 4 MAXIS English 1 2 3 1 2 3 PROLiNK_H5004N PROLiNK_PPL1501N_000002 PROLiNK_PPL1501N_000002 PROLiNK_WNR1008 PROLiNK_WNR1008 PROLiNK_PHA1061 Other... New Tulip Tap Arrow button then Camera Settings. Enter the admin username and password. (Default username is admin and leave the password blank) Tap Network then WiFi network. Enable WiFi feature of the camera. Select your WiFi network from the list and enter the WiFi password.
9. LiveView Installation & Overview Step 1 1 www.prolink2u.com Wireless Pan/Tilt IP Camera Video Management Software PIC1007WP Wireless IP Camera Quick Installation Guide User Manual CD Contents: • Management Software • Quick Installation Guide Version 1.0 (Apr’13) Please Select An Option Browse CD ©C opyr i g ht 2 013 PROLiNK All Rights Res Product Registration d. erve Exit 2 1 Insert the installation CD into your CD-ROM drive and the Main Menu will auto load.
9.
9. mLiveView App Installation mLiveView is available for Android and iOS devices. For installation use either one of the methods below : Using QR Code to install 1 Requires a QR Code scanner app installed on your mobile/tablet device. 2 Open the scanner app and point the device's camera to the below QR Code. The QR Code is also printed on the packaging box. iPad iPhone Android Manual install For Android devices: 1 Open Google Play Store in your device.
10.
11. Web Configuration Page Access Web Configure 1 2 1 Start the LiveView software. Your camera will be detected in the Auto Search column, right-click on the Camera ID to see the Web Configure option 2 You will be prompted with a security dialog, login with the below credential and click OK.
11. Web Configuration Page English 1 2 3 4 7 5 6 1 2 3 4 5 6 7 Information Displays the camera current settings, information and recording status. Network Wired Network: Setup wired network settings. Default is set to obtain IP automatically. WiFi Security: Setup WiFi connection and security. Built-in WiFi scan for easy setup. Advanced: Setup PPOE network settings. Video Display: Display live video with Pan/Tilt and Patrol feature.
12. Frequently Asked Questions 1. Why the LED indicators on the camera are flashing in sequence? Please ensure your Ethernet or WiFi connection are setup properly and check you have an Internet connection. When connected to local network, the blue LED will be constant. When connected to Internet, red LED will be constant. 2.
1. Package Contents 2 Lembar Panduan Instalasi 1 IP Camera MODEL NO: Indonesian PIC1007WP Quick Installation Guide Wireless-N IP Camera with Pan/Tilt Version 1.00 (English / Indonesian ) BEFORE GETTING STARTED This document is designed to aid you to get started with the device. If you experience problems following these guides or need further information pertaining to the device, please visit our website at www.prolink2u.com.
2.
1 Sebelum Anda mulai, pastikan Anda memiliki router siap dengan koneksi internet. 2 mLiveView untuk perangkat Android membutuhkan Android v2.3 atau lebih tinggi. 3 mLiveView untuk iPhone / iPad membutuhkan iOS v4.3 atau lebih tinggi. 4 LiveView untuk Windows memerlukan Windows XP SP2 atau lebih tinggi. PC / Laptop komputer harus setidaknya 2,0 GHz (disarankan dual-core) dan memori 2GB. 5 LiveView untuk Membutuhkan Mac OS X 10.6.8 Snow Leopard atau lebih tinggi.
5.
6. Pengaturan WiFi Cerdas Langkah 1 1 2 Indonesian 3 Pro mLiveViewPro mLiveViewPro 1 2 3 Hidupkan kamera.
6. Pengaturan WiFi Cerdas Langkah 3 1 2 WPS 10-20cm 3 1 2 3 4 4 Tekan tombol WPS pada kamera. LED akan mulai berkedip dalam menjalankan perintah Sejajarkan perangkat mobile Anda dengan kode QR menghadap kamera di jarak sekitar 10 ~ 20cm. Tunggu LED berkedip secara bersamaan 3 kali (atau suara bip pada model dengan built-in speaker)untuk menunjukkan telah berhasil memindai kode QR.
7. Pengaturan Tombol WPS Langkah 1 1 (Wireless) 2 NAT/Router WPS PIC1007WP WPS 1 Hidupkan kamera. Jangan hubungkan kabel Ethernet ke kamera 2 Tekan tombol WPS pada keduanya, router dan kamera. LED pada kamera akan mulai ke berkedip dalam menjalankan perintah.
8.
8. Pengaturan Manual Wireless MAXIS Langkah 4 1 Indonesian 2 3 1 2 3 PROLiNK_H5004N PROLiNK_PPL1501N_000002 PROLiNK_PPL1501N_000002 PROLiNK_WNR1008 PROLiNK_WNR1008 PROLiNK_PHA1061 Other... New Tulip Tekan tombol Panah kemudian Pengaturan Kamera. Masukkan admin username dan sandi (Username default adalah admin dan Sandi biarkan kosong) Tekan Jaringan setelah itu jaringan WiFi. Aktifkan fitur WiFi kamera Pilih jaringan WiFi Anda dari daftar dan masukkan password WiFi.
9. Instalasi LiveView& Penjelasan Langkah 1 1 www.prolink2u.com Wireless Pan/Tilt IP Camera Video Management Software PIC1007WP Wireless IP Camera Quick Installation Guide User Manual CD Contents: • Management Software • Quick Installation Guide Version 1.0 (Apr’13) Please Select An Option Browse CD ©C opyr i g ht 2 013 PROLiNK All Rights Res Product Registration d. erve Exit 2 1 Masukkan CD instalasi ke dalam drive CD-ROM Anda dan Maka instalasi akan berjalan otomatis.
9.
9. Instalasi mLiveView mLiveView tersedia untuk perangkat Android dan iOS. Untuk penggunaanya dapat di lakukan dengan cara salah satu dari metode berikut: Menggunakan QR Kode untuk menginstalasi 1 Membutuhkan scanner Kode QR aplikasi diinstal pada ponsel Anda / perangkat tablet. 2 Buka aplikasi scanner dan arahkan kamera QR Code. QR Code juga dicetak pada kotak kemasan. iPad iPhone Android Manual install Untuk perangkat Android: 1 Buka Google Play Store pada perangkat Anda.
10.
11. Pengaturan Web base Access Web Configure 1 2 1 Jalankan LiveView. Kamera Anda akan terdeteksi di kolom AutoSearch, klik kanan pada ID Kamera untuk melihat opsi Configurasi web 2 Anda akan diminta untuk mengisi kolom login dan isikan seperti bawah ini lalu klik OK.
11. Pengaturan Web base 1 2 4 7 5 Indonesian 3 6 Informasi Tampilan konfigurasi kamera, information dan status rekaman. 2 Network Wired Network: Pengaturan konfigurasi jaringan kabel. Settingan awal adalah obtain IP automatically. 1 WiFi Security: Pengaturan koneksi WiFi dan keamanan. Di lengkapi dengan WiFi scan untuk memudahkan pengaturan. Advanced: Pengaturan setting jaringan PPOE. 3 Video Display: Tampilan Layar langsung dengan Pan/Tilt dan fitur Patrol.
12. Pertanyaan yang sering diajukan 1. Mengapa indikator LED pada kamera berkedip secara berurutan? Pastikan Ethernet atau koneksi WiFi setup dengan benar dan periksa apakah anda memiliki sambungan Internet. Ketika terhubung ke jaringan lokal, LED biru akan konstan. Dan bila tersambung ke Internet, LED Merah akan konstan. 2.
(for Indonesia region only) * Biaya pengiriman ditanggung pembeli 3. Ruang Lingkup Garansi : a. Garansi hanya mencakup bagian-bagian / komponen perangkat keras dari konfigurasi standar yang terdapat pada spesifikasi produk sesuai dengan faktur. b. Khusus netbook garansi baterai hanya berlaku selama 6 bulan sejak tgl. pembelian. 2. Garansi Tidak Berlaku Apabila : a. Kerusakan yang disebabkan oleh, kelalaian pemakai, bencana alam, kebakaran, tegangan listrik yang terlalu tinggi / rendah, terkena cairan. b.
Email : Tel / Fax : Pelanggan PT. Prolink Intidata Nusantara Kode Pos: Tgl.
Email : Tel / Fax : Kota: Pelanggan PT. Prolink Intidata Nusantara Kode Pos: Tgl.
(for Indonesia region only) KARTU GARANSI Kepada Yth. Customer Service PT. PROLINK INTIDATA NUSANTARA Jl. Cideng Barat No.79 Jakarta Pusat 10150 - Indonesia Tempelkan perangko disini.
Worldwide Customer Care Centers SINGAPORE Office FIDA INTERNATIONAL (S) PTE LTD Walk-In : Block 16 Kallang Place #06-02, Kallang Basin Industrial Estate, Singapore 339156. Telephone : +65 6357 0668 Email Support : support@fida.com MALAYSIA Office FIDA SYSTEMS (M) SDN BHD Walk-In : 29 Jalan USJ 1/31, 47600 Subang Jaya, Selangor Darul Ehsan, Malaysia. Telephone : +60 3 8024 9151 Email Support : support_my@fida.com INDONESIA Office PT PROLiNK INTIDATA NUSANTARA Walk-In : Jl. Cideng Barat No.