
User Manual User Manual


PROLiNK® WNR1008 www.prolink2u.com
Version 1.00 2 English
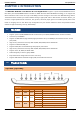
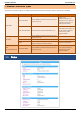
WPS
WPS
Green
ON
WPS setup successfully
OFF
WPS is disabled
Blinking
WPS is enabled to make a connection
Wireless LAN
WLAN
Green
OFF
WLAN off
ON
WLAN link / active
Blinking
WLAN traffic transmitting
LAN
Green
OFF
LAN function off
ON
LAN link / active
Blinking
LAN traffic transmitting
USB
WPS
Green
ON
USB is connected
OFF
USB is disconnected
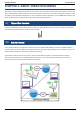
Ports and Buttons (Rear view)
Ports and buttons
Ant. 1
Ant. 2
Install the appending antennas here.
Reset
Press 2 seconds, the LED will be off.
Keep on pressing reset button 2~5 seconds, the system will reboot automatically.
Keep on pressing the reset button more than 5 seconds, the Wireless Router will set all setting back to factory
default.
LAN 1-4
Use standard LAN cables (RJ45 connectors) to connect your PCs to this port. If required, any port can be connected to
another hub. Any LAN port will automatically function as an "Uplink" port when necessary.
WAN
Connect the ADSL or Cable Modem here with RJ45 cable. If your modem came with a cable, use the supplied cable,
otherwise, use a standard LAN cable (RJ45 connectors).
DC 12V
Connect the supplied power adapter here.
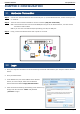
Side Panel (Side view)
(Left sideview)
(Right sideview)
Left-sideview
WPS
To enable the WPS function press the physical WPS button on the Wireless Router once, then the LED will start to flash.
Please make a connection with other WPS supported device within 2 minutes.
Right-sideview
USB
Insert the USB 3.5G card that provided by your ISP (Internet Service Provider) or USB network attached storage here.