PROLUX MIRAGE Cordless Dual-Pad Floor Buffer/Polisher MODEL: Mirage Operation Instructions Read all instructions before using this appliance For your safety please read owners manual in its entirety before use.
Congratulations on the purchase of your new Prolux Mirage Cordless Dual-Pad Brushless floor cleaner! Weighing in at only 6 lbs, with Prolux Cordless, Lithium Ion battery technology and brushless motor, it’s designed to be one of the easiest, hassle free cleaning appliances you have ever used. With its Lithium Ion battery and brushless motor technology, you will get an impressive 35 continuous minutes of safe, efficient, and powerful cleaning that others fail to deliver.
Table of contents Specifications ............................................................................................................................... 3 Safety Precautions ................................................................................................................... 4-5 Assembly Getting To Know Your cleaner ................................................................................................................. 6 Assembling your cleaner ................................
IMPORTANT SAFETY INSTRUCTIONS When using an electrical appliance, basic precaution should always be followed, including the following: READ ALL INSTRUCTIONS IN THIS OPERATING MANUAL BEFORE USING THIS APPLIANCE. Keep the operating manual for reference. Include the operating manual if you pass the appliance to third parties. Violations of the operating instructions can lead to severe injuries as well as damages to the appliance.
18.Test a small floor area with the pads/solution you intend to use before use to make sure it will not harm your floor surface. 19.If the supply cord is damaged, the manufacturer or an authorized service center must replace it, in order to avoid a hazard. 20.
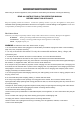
GETTING TO KNOW YOUR CLEANER -6-
OPERATION INSTRUCTIONS WARNING To reduce the risk of electric shock, the power cord must be disconnected or the battery removed before removing the cleaning pads container, or performing maintenance or troubling shooting checks Assembling your cleaner NOTE: Always remove the power plug from the wall outlet or remove battery before assembling or removing accessories -7-
HOW TO CHARGE THE BATTERY PACK When using the charger, basic precautions should always be followed, including the following: Battery and Charging Safety To reduce the risk of electric shock, fire, battery explosion, or injury: 1. Basic information and warning for the Battery and Charger are contained below. For detailed usage and warning information, read the HOW TO CHARGE THE BATTERY PACK carefully before using this unit. 2. DO NOT expose battery pack to temperatures above 122°F (50°C).
BATTERY OPERATION Charge in a well ventilated area. DO NOT block charger vents. Keep them clear to allow proper ventilation. CHARGING LITHIUM ION BATTERY PACKS Lithium Ion batteries deliver fade-free power for their entire run time. The Prolux cleaner will not gradually lose power due to decreasing battery charge. The unit will perform at its normal performance level until the battery has been depleted. Once this happens, recharging of the battery is required.
n USING THE CLEANING PADS To remove the cleaning pads/cloths from the buffer unit, simply peel the pad away from the Velcro surface of the buffer. To attach the pads/cloths, take the pad and press the Velcro side of the pad onto the Velcro surface of the buffer and apply firm pressure to ensure the Velcro surfaces are completely meshed together. n Filling the water/solution tank 1.
(Fig 1) n USING YOUR PROLUX MIRAGE FLOOR BUFFER Once you have the unit assembled, the correct pads installed, the water tank filled, and the battery charged; you are now ready to use your Prolux buffer. 1. Switch the cleaner to either the “Scrubbing” setting to deep clean your floors, or the “Mopping” setting for polishing and mopping your floors. (See page 6) 2.
Troubleshooting WARNING: Never use a defective appliance. Always switch off the appliance and disconnect it from the outlet or remove the battery before you start to troubleshoot. Fault Possible Cause(s) Solution The unit will not turn on. The battery is not charged. Make sure the battery is fully charged by plugging the battery charger into the charging port, then plug the charger into your wall outlet and keep the charger plugged into the unit until the charger light turns Green.
THREE (3) YEAR LIMITED WARRANTY Prolux warranties this product’s motor free from defects in material and workmanship for a period of three (3) years on the motor, and two (2) years on the body of the cleaner, free from manufacturer defects in material and workmanship from the original date of purchase, when utilized for normal household use. • 90 days on battery & charger.
Product Warranty Registration Please follow the link below to register your Prolux product. http://www.proluxcleaners.com/webforms/index/index/id/2/?___store=default To find more information on this product, including warranty info and to contact Prolux Customer Service. Please follow the link below: http://www.proluxcleaners.