PROLUX 2.0 COMMERCIAL BAGLESS BACKPACK VACUUM CLEANER MODEL: 2.
For your safety please read owners manual in its entirety before use. Congratulations on your purchase of your new Prolux 2.0 Pro Bagless Backpack Vacuum! We hope you love it! Our team of vacuum experts and engineers spent over 3 years designing it to make it perfect. The Prolux 2.0 Bagless is the worlds FIRST bagless backpack vacuum with the new Prolux 2.0 Bagless Technology that makes it 40% more powerful than current bagless vacuums.
Table of contents Specifications ................................................................................................................................ 3 Optional Accessories.............................................................................................................. 4 Safety Precautions ................................................................................................................... 4-6 Assembly Getting To Know Your Vacuum .......................................
• 3-Stage filtration. H13 HEPA grade HEPA filter, to keep the air clean with 99.95% efficiency. • 50ft Commercial power cord. • 1.5L dust bin capacity. • Heavy-Duty commercial grade 1-1/2” vacuum attachment set. • Industrial Grade Bumper to protect the vacuum • Able to use electric power brush (see optional accessories below) OPTIONAL ACCESSORIES • The Prolux 2.0 Power Nozzle attachment – This Power Nozzle attachment is great for anyone who is using their 2.
The Notices Given Notices for your safety are especially marked. Always observe these notices to avoid any damages to the appliance. WARNING: ATTENTION: NOTE: Warning concerning health hazards describing possible risks of injury. Warning concerning possible dangers to the appliance or other objects. Highlights tips for you. WARNING-To reduce the risk of fire, electric shock, or injury: 1. Do not leave the vacuum cleaner when plugged in. Unplug from outlet when not in use, and before Servicing. 2.
- Pointed objects such as glass shards, nails, etc. Such objects destroy the filters and hoses. - Plaster, cement, and fine drilling-dust, makeup. etc. The filters may clog causing damage to the appliance. - Bullets or bullet shells or fireworks or other explosive objects (this should be self explanatory on why you should NEVER vacuum up explosive objects but you would be surprised at the number of live bullets we have found sucked up in vacuums).
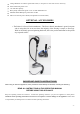
GETTING TO KNOW YOUR BACK PACK VACUUM 1. Main Motor Unit 2. Dust Container 3. Flexible Hose 4. Shoulder Straps 5. Exhaust HEPA Filter 6. Air Inlet Filter 7. Carpet/Floor Brush 8. Crevice Tool 9. Upholstery/Pet Hair tool with Slide Off Brush 10. Dusting Brush 11. Upper Attachment Wand 12. Lower Attachment Wand 13. On/Off Power Switch 14. Additional tool storage 15.
OPERATION INSTRUCTIONS WARNING To reduce the risk of electric shock, the power cord must be disconnected before removing the dust container, changing the filters or performing maintenance or troubling shooting checks Assembling your vacuum NOTE: Always remove the power plug from the wall outlet before assembling or removing accessories n ATTACHING THE FLEXIBLE HOSE & ATTACHMENT WANDS TO THE VACUUM The flexible hose should be connect before strapping the unit 1.
USING THE ATTACHMENTS DUSTING BRUSH The Dusting Brush is used for all types of furniture. (Fig 3 below) CREVICE TOOL Use for cleaning radiators, cracks & crevices along corners, and baseboards and in-between cushions. (Fig 4) UHOLSTERY BRUSH The Upholstery Brush is used for removing pet hair and other debris from upholstery. The unique design makes it an excellent tool for cleaning virtually any surface. (Fig 5) NOTE: This tool is not a grooming tool and should not be used on animals.
and tighten the ring clockwise on the attachment wand to lock the tool into place. (Fig 7) Proper Vacuuming Technique With The Prolux 2.0 Floor Tool When vacuuming with your Prolux 2.0, you may vacuum using the standard forward and backwards vacuuming motion as you would with standard vacuum cleaners. However because of the new Prolux 2.0 floor tool design, you can vacuum an area by vacuuming in half circle motions and vacuum the same area 2x as fast. • • Start with holding the wand as seen in (Fig A).
n USING YOUR VACUUM 1. Insert the power plug into the wall outlet 2. Connect hose and telescopic tube if desired. 3. Correctly place shoulder straps on each shoulder and secure the waistband strap. (Fig 8 through Fig 8b) Caution: If the waistband and both shoulder straps are not properly and securely in place, the unit could fall off your back, causing damage or injury. 4. Turn the unit on/off by pressing the switch located near the base of unit.
Fig 10 Fig 11 n HOW TO CLEAN AND REPLACE THE HEPA FILTER There are two filters in this unit, when the filters are dirty and the suction power is reduced, you must clean or replace the HEPA filter. Clean and replace the Air Inlet HEPA filter 1. Open the dust container cover by rotating the cover counterclockwise. (Fig 12) 2. Pull the top inlet HEPA filter from the container by rotating it counterclockwise to unlock it, and then pull it up and out of the unit. (Fig 12) 3.
Fig 13 Cleaning the Housing WARNING: Always switch off the appliance and disconnect it from the outlet before cleaning it. See section "Switching Off and Retracting Power Cord.” ATTENTION: Do not use Alcohol, cleaning or scouring agents to clean your machine, as these may damage the appliance. Clean the outside of the housing using only a slightly damp washcloth. Troubleshooting WARNING: Never use a defective appliance.
The Dirt/Dust container is installed Remove the Dirt/Dust container incorrectly. and reinstall; making sure the container is locked into place when reinstalling. The tool attachment being used, Attach the appropriate tool for the does not work properly on the surface you are vacuuming. See surface you are vacuuming. pages 8-9. Dirty filter(s). Change/clean the filter. See pages 12. The vacuum makes unusual noises. The power nozzle, attachment Remove any clogs.
This warranty is extended to the original purchaser of the unit only and is not transferable. *IMPORTANT: Before sending unit back for warranty work, contact your authorized PROLUX retailer you bought the unit from first. Unauthorized warranty claims may be sent back. Authorized Warranty claims: PROLUX shall be responsible for all parts and labor and the customer shall be responsible for all shipping charges to and from the PROLUX service center. Prolux is constantly striving to improve our products.