
Owner manual


Important Safety Instructions
b) Be sure the area around the charger and batteries is well ventilated while the batteries
are being charged. Gases can be forcefully blown away using a piece of cardboard or other
nonmetallic material as a fan.
c) When cleaning battery terminals wear full eye protection to prevent corrosive material from
coming in contact with eyes.
d) Add distilled water (not tap or bottled water that contain minerals) in each cell until
electrolyte reaches the levels specified by the battery manufacturer. Do not overfill. For batteries
without fill caps, carefully follow manufacturer's recharging instructions.
e) Study all battery manufacturer’s specific precautions such as removing cell caps while
charging and recommended rates of charge.
f) Determine battery type / charge profile for battery(s) by referring to the boat owner's manual /
electrical equipment(s) package and or the manufacturer’s specifications located on each battery.
Make sure Battery Type and Charge Profile are properly selected before charging your batteries.
NOTE: The ProNauticP Series models are required to be mounted in the vertical position.
NOTE: This is a dry compartment unit intended not to come in contact with water. When mounting
the charger please ensure water intrusion is not possible as it is not covered under warranty.
DO NOT install in an open cockpit or deck where water is a factor.
NOTE: ProMariner highly recommends that this unit be installed by an ABYC Certified Electrical
Technician. Guidance from ABYC E-11 AC & DC electrical systems on board boats and ABYC A-
31 battery chargers and inverters is offered throughout this manual to ensure a safe, trouble free
installation. Please re-read the PERSONAL PRECAUTIONS section of this manual prior to installation.
This unit has been designed for PERMANENT INSTALLATION ONLY Install this unit according
to these instructions. Powering this unit through a plug-and-socket configuration will void your
warranty and may create a serious electric shock hazard.
LOCATION - This unit must be located in a dry, well-ventilated area, free from unsecured
hardware. Do not mount the unit directly above or below batteries to prevent corrosive
electrolyte or gasses from damaging the unit.
LOCATION - MOUNTING - This unit must be mounted securely to an appropriate surface
(e.g. plywood bulkhead, cored fiberglass hull structure) and through-bolted if possible.
LOCATION - In addition, the following should be considered when choosing a location:
1) Placement of the optional remote panel–ensure the cable is long enough to reach the
desired location (generally in proximity to the main panel board) and is not routed near
exhaust or in an area where it can be damaged.
2) Service - Remember, there are items on this unit that should be routinely checked
(connections, LED Status Center) ensure that there is ample room to address these
issues. Also consider space to adequately swing a standard wrench. Contact between
a live component and a metallic fuel line can be extremely dangerous. A minimum of
6 inches of clearance on each side must be maintained.
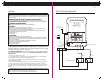
3) Cable Routing - The size of the DC cabling used is dependent upon the proximity to
the battery(s) being charged. When deciding on a location, this should be a consideration.
Consult the DC cable size table further on in this manual when planning your installation.
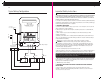
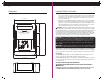
Dimensions
7
24
Optional Remote Dimensions Inches (mm)
3 1/2” (90 mm)
1/2” (13 mm)
3 1/2” (90 mm)
2 1/2” (62 mm)