Contents Introduction LLL aaa 2 UsinathisMarual 000 2 Systematizes 3 Quick User Controls GUILE iss an 4 System Operation oi 2 aWHIKUHeosiver Lina saa a £ RUSHER Handheld Microphone Transmitter. oii 1 BT-1KU Body pack Transmitter, 12 Specifications. 15 Cautions and Troubleshooting 16 Miscellaneous Tips... 12 Regulus. 18 Accessories... 18 Service information... 1a Warranty a Introduction Thank you for choosing the Lady 4W-1KU QUAD wireless system, and congratulations on your choice.
System Features AW-1KU Abrasive « Unsurpassed state-of-the-art PLL UHF performance with 12008 dynamic range and operation up to 500 feet line-of sight * Four complete and independent wireless receivers with 1000 user-electable UHF frequencies for simultaneous operation of four transmitters True Diversity circuitry with two complete front ends per receiver for maximizing range and most effective elimination of signal dropouts AUTO-SCAN for easily locating clear channels and ASC™ {Auto-Sync Channel} iR downlo
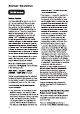
Quick User Controls Guide GW-1KU Receiver: Front View (e) EEE Psa 00 Q E23]0 mEz sl Ema) 0999 = GROUP CHANNEL wb Dw POWER BUTTON Press for one second to tum both receivers ON-OFF DIVERSITY A/B INDICATOR indicates receiver Aor B is active when transmitter is on AF PEAK LED Shows flickering GREEN LED is normal or solid GREEN LED Js for maximum audio scabies IR infrared LED transmitter window for linking the RX to the TX for frequency download (IR SYNC) BUTTON Long press told ~2 seconds) for AUTO-SCAN ta locat
SW-1KU Receiver: Back View 13 RACK EARS [oft and Right rack ears are built into the unit 130. ANTENNA EXTENSION CABLES (Options!) Attach coax cables with BNC connectors from back antenna jacks to rack ear holes for front antenna mounting configuration $4. RF CONNECTORS Antenna jack A for AF True Diversity reception 15. BALANCED 800 OUT Audio output connection for each receiver— fixed Mic level 6.
Quick User Controls Guide HT-1KU Handheld Transmitter Eid Qa — B83 M[@® 126 2 28 BCE BATTERY COVER Unscrew CW and full down 28 POWER ON/OFF SWITCH Slide power switch to insert two AA alkaline batteries up-down to tum ON-OFF 23. BUC BALL Windscreen/dust cover 28. INTERNAL ANTENNA Builtin antenna 24. LCD DISPLAY For indication of GRP (00-03) 30. FREQUENCY GROUP Indicates selected GROUP CH (00-89), AUDIO INPUT LEVEL (0dB from 00-02 or te light up the display to -3008), and BATTERY status (5 bars 31.
Quick User Controls Guide BY-1KU Body pack Transmitter (LT, LT/HM 039 93 w= GROUP CHANNEL IE wma INPUT JACK 3.5mm locking mini jack for connecting audio input cord from lapel mic {LT}, Headmic™ LT/HM), or instrument (GT) 38. POWER DESTITUTION SWITCH Slide power switch to ON or OFF to turn ON-OFF, set to MUTE to turn power on with audio muted 39.
System Operation Cpl Buttons Function The Power Bitten {1} is used to turn ON or OFF all four receivers at the same time. When this power button is pressed for two seconds, the blue back lights on the LED Displays (8) will light up indicating the receivers are on. Press the Power button again for two seconds to turn off the receivers. The back light on the LCD will display “OFF” indicating the receivers are off.
To change the Volume Levels, press the a {Up} or = {Down} Buttons {7} anytime for single stepping, or hold the Up/Down button continuously for faster level selection. Select 1 of 83 (soft to loud sound) levels from the Volume menu and advance to exit Setup Mode by pressing the Set Button one more time. Selecting 0 should mute the receiver and no output for the Line Cut only. The XLR out is unaffected.
Adjusting the Squelch in normal operation, each 4W-1KU QUAD receiver's Muse Control (16) works independently and should be adjusted clockwise (CW) to the minimum RF squelch setting at which the RF Level Mater {12} and one of the LED Diversity A/B indicators {2} will remain on while your transmitter is in normal use, up to the maximum operating range anticipated in use for your application. However, in areas of high RF activity, the MUTE control may need to be adjusted counterclockwise (COWL.
HT-1KU Handheld rE TT Buttons Function The RF Power Level Switch {27} is used to select Hi Flow power transmission. Each time the Set Button (28) is pressed, the LCD menu will cycle in the following order: fir In RENEW > VOLUME > GROUP > CHANNEL > AVIAN NEN (repeats) The a {Up} or w (Down) Buttons {25} work in the set mode only. They can be used to change any Group/Channel as selected {if not using IR Sync from receiver). They can also be used to select the desired input audio level VOL setting.
about 8-12” from the receiver to be used. On the receiver, when short pressing the ASC IR Sync Bitten {8}, while the main menu is displayed, the IR Infrared LED {8} will light up red and stay for about three seconds. This indicates IR transmission is in progress and IR data is transferring during this period.
this setting for normal use not requiring maximum operating range. A range walk test before use will determine which setting is best for your application. Slide the On/Off switch to the “ON” position and the microphone is now ready to use. The receiver's RF Signal Meter (12) and one Diversity A or B Indicator {2} should now be on, indicating a received signal from the transmitter. Adjust the volume of the receiver per Connecting Audio Output.
and should be replaced as soon as possible. To preserve battery life, turn the transmitter off when not in use. To turn the transmitter off, slide the Off/Mute/Cn switch to “MUTE” and then “OFF”. The LCD will display "OFF", no LCD or back light is fit up and the unit will be off. At Power Off the transmitter will store the last settings entered and re-display them at the next power on where it can be reprogrammed to any new Group/Channel or Volume level at the first time of use or anytime later.