
User's Manual


Using the Light
Your PROMASTER VARI-TEMP LED light uses a combination of daylight and 3200º K super bright
LEDs to adjust the color temperature of your light to the surrounding ambient light conditions.
Matching the color temperature of the existing light allows you to add light to get better exposures
while maintaining the natural feel of your scene.
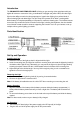
1. Press and hold the Power/Mode button (3) for approximately 3 seconds to turn on the light. The
battery indicator lights will come on to indicate the remaining battery power. To turn the light off,
press and hold the Power/Mode button for approximately 3 seconds until the light turns off.
2. Select a mode by pressing the mode switch. Continue to press the mode switch to cycle through
each mode and choose your desired setting:
Modes: Constant light (default), Fast Flash, SOS (International distress signal), Slow Flash
3. Adjust the light to the desired level of color and brightness using the adjustment buttons (2). The
UP▲ and DOWN▼ buttons increase (UP) or decrease (DOWN) the brightness of the yellow
light. The LEFT◄ and RIGHT► buttons increase (LEFT) or decrease (RIGHT) the brightness of
the white light. Use these controls together to control the color temperature and the overall
intensity of the light.
Note:
1. As the battery gets weaker, the light output will be reduced. Please be sure to use a fully charged
battery and in order to maintain the maximum output of the light, replace the battery when the
power level is low.
2. After use be sure to set the power switch to “OFF”.
3. When not in use, remove the battery and store in a cool dry location.
4. Before storing the light, be sure it is cool to the touch. Storing a hot light could cause fire.
Remote Control
The supplied MR6 remote control can control all of the functions on the light as
well as the shutter release function of CANON, NIKON, SONY, PENTAX, and
KONICA/MINOLTA cameras that support an infrared remote.
1. The light has infrared receivers on both the front and rear panel of the light
(11, 12). To operate the light, point the remote control in the direction of the
light. Press:
ON – To turn the light on
OFF – To turn the light off
M – To cycle through the operation modes of the light
▲ or ▼ - To control the intensity of the yellow light
◄ or ► - To control the intensity of the white light
2. To use the remote as a shutter release:
CANON – Press the S button next to the Canon name to release the shutter immediately. Press
the 2S button to release the shutter after a 2 second delay. In the autofocus mode on Canon
cameras the shutter will not release unless the camera has achieved proper focus. The 2S mode
allows time for certain slower focusing lenses to achieve focus.
NIKON – Press the S button next to the Nikon name to release the shutter immediately.
PENTAX – Press the S button next to the P name to release the shutter. The W/T button may be
used to control the zoom on some Pentax models.
SONY, KONICA/MINOLTA – Press the S button next to the KM name to release the shutter
immediately. Press the 2S button to release the shutter after a 2 second delay.