
Quick Start Guide


ACTIVboard Quick Start Guide
7
2. Prepare the ACTIVboard
Install software before connecting the board
Serial Connection
a. Mount the ACTIVboard as described in the User Guide and as
detailed in the supplied drawing TP 1443.
b. Attach the latching plug-in connector on one end of the serial
cable to the socket on the panel located on the rear top right-
hand corner of the ACTIVboard.
c. Connect the other end of the serial cable to the serial port on
your PC.
d. Plug the connector on the end of the power lead from the
Universal Power Supply into the socket on the back of the serial
connector that you just attached to your computer’s serial port.
e. Plug the Universal Power Supply into your power strip or wall
outlet.
f. Connect and position your projector according to the instructions
supplied with the projector unit.
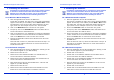
Serial Connection
Latching Serial
Connector.
Serial Cable
PC
Universal Power
Supply
Mains
Power
Source
proACTIV board
Rear View
Serial Port
Panel
ACTIVboard Quick Start Guide
7
2. Prepare the ACTIVboard
Install software before connecting the board
Serial Connection
a. Mount the ACTIVboard as described in the User Guide and as
detailed in the supplied drawing TP 1443.
b. Attach the latching plug-in connector on one end of the serial
cable to the socket on the panel located on the rear top right-
hand corner of the ACTIVboard.
c. Connect the other end of the serial cable to the serial port on
your PC.
d. Plug the connector on the end of the power lead from the
Universal Power Supply into the socket on the back of the serial
connector that you just attached to your computer’s serial port.
e. Plug the Universal Power Supply into your power strip or wall
outlet.
f. Connect and position your projector according to the instructions
supplied with the projector unit.
Serial Connection
Latching Serial
Connector.
Serial Cable
PC
Universal Power
Supply
Mains
Power
Source
proACTIV board
Rear View
Serial Port
Panel