
Operating instructions


ProMinent
®
Page 33
Repair
Checking the diaphragm rupture sensor (EX version)
왘 Unscrew the diaphragm rupture sensor from the dosing head whilst the diaphragm is being
changed
왘 Check that there is electrical continuity
왘 Press in the channel of the diaphragm rupture sensor with a blunt insulated rod (2 – 3 mm
diam. with no sharp edges)
왘 Check that the electrical continuity is lost
왘 Release the rod again
왘 Check that there is electrical continuity again
왘 If everything is in order, screw the diaphragm rupture sensor into the dosing head with a new
seal (1)
왘 If not, go to the next step.
Replacing the diaphragm rupture sensor (EX version)
WARNING
• If hazardous or unknown dosing media are being used, protect yourself from the dosing
medium!
• After a diaphragm rupture, dosing medium can be present in the diaphragm rupture
sensor and the delivery channel in the dosing head! (see Fig. 20)!
왘 Unscrew the diaphragm rupture sensor from the dosing head whilst the diaphragm is being
changed
왘 Mount the diaphragm rupture sensor on the top section (2)
왘 Lock the body (5) in position with an open-ended spanner – not the nut locked with lacquer!
왘 Unscrew the diaphragm rupture sensor
왘 Clean the contaminated parts
왘 Fit the new separating diaphragm (3) in the top section (2) with the bright side (PTFE) first
왘 Fit the disc (4) in the top section (2)
왘 Insert the spring in the body (5)
왘 Bring the body (5) up to the top section (2)
왘 Check that the spring (6) is correctly seated in the spring seat (3a)
왘 Screw the body (5) into the top section and tighten securely
왘 Check the diaphragm rupture sensor as described in “Checking the diaphragm rupture sensor
(EX version)” above.
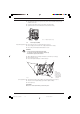
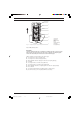
1
2
3a
6
3
5
4
1 Seal
2Top section
3 Separating diaphragm
3a Spring seat
4 Disc
5 Body
6 Spring
Fig. 23
BA_MA_TZ_006_10_06_GB.p65 05.02.2007, 13:41 Uhr33