
Operating instructions


ProMinent
®
Page 37
Repair
왘 Remove the guide sleeves (5) and the guide bands (6), the packing collars (8) and the flushing
collar (7)
왘 Clean the sealing area thoroughly
왘 Clean the piston (1), the guide sleeves (5) and the flushing collar (7)
왘 Dispose of the packing rings and the guide bands
왘 Insert the piston (1)
Reassemble the parts in reverse order:
왘 Replace packing collars
NOTICE
Never push in packing collars with pointed instrument.
This will deform packing collars or damage the piston.
왘 Push in the guide sleeve (5) evenly with a new guide band and packing collar
왘 Push in further packing collars with cut ends each offset by 180°
왘 Push flushing collar (7), one more packing ring and the guide sleeve (5) with a new guide band
one after the other into the sealing cavity
왘 Place the liquid end flange (4) onto the liquid end and screw tight (tightening torque 24 Nm)
NOTICE
• Tighten tensioning screw finger tight!
The packing collars and the piston might otherwise become damaged.
• After assembling the liquid end, proceed according to section “Installing stuffing box
packing”!
왘 Replace tensioning screw and tighten finger tight only.
Assembling liquid end 왘 Place a sling around the liquid end and attach to a crane.
WARNING
•A helper should steady the liquid end by hand.
It could slip out of the sling if allowed to swing freely.
• Ensure that the pistons cannot fall out!
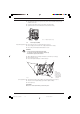
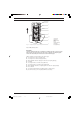
Fig. 27
1Piston
2 Hose nozzle
3Tensioning screw
4 Liquid end flange
5 Guide sleeves
6 Guide bands
7 Flushing collar
8 Packing collars
2
37654
1
8
BA_MA_TZ_006_10_06_GB.p65 05.02.2007, 13:41 Uhr37