SATA150 TX2PLUS, TX4 USER MANUAL Version 1.
SATA150 TX2plus, TX4 User Manual Copyright © 2002 Promise Technology, Inc. Copyright by Promise Technology, Inc. (Promise Technology). No part of this manual may be reproduced or transmitted in any form without the expressed, written permission of Promise Technology. Trademarks Promise, and the Promise logo are registered in U.S. Patent and Trademark Office. All other product names mentioned herein may be trademarks or registered trademarks of their respective companies.
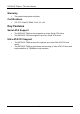
Table of Contents Chapter 1: Introduction ............................................................................................... 1 SATA150 TX Series.............................................................................................. 1 Specifications........................................................................................................ 1 Serial ATA Interface........................................................................................... 1 Ultra ATA Interface ...
SATA150 TX2plus, TX4 User Manual Chapter 4: Troubleshooting ...................................................................................... 23 Frequently Asked Questions............................................................................... 23 Getting Help..................................................................................................... 24 Contacting Technical Support.............................................................................
Chapter 1: Introduction SATA150 TX Series Thank you for purchasing one of Promise Technology’s SATA150 TX Series Controller cards. This controller allows you to install and enjoy the performance advantage of the new Serial ATA hard drives in your existing PC rather than spending the time, effort and money to upgrade to an all-new system. The SATA150 TX2plus card supports up to two Serial ATA drives and up to two Parallel ATA drives. The SATA150 TX4 supports up to four Serial ATA hard drives.
SATA150 TX2plus, TX4 User Manual Warranty • Two years limited parts and labor Certifications • CE, FCC Class B, BSMI, C-tick, UL, cUL Key Features Serial ATA Support • • The SATA150 TX2plus card supports up to two Serial ATA drives The SATA150 TX4 card supports up to four Serial ATA drives Ultra ATA/133 Support • • The SATA150 TX2plus card also supports up to two Ultra ATA/133 hard drives.
Chapter 2: Getting Started This section helps you prepare your SATA150 TX Series Controller card for installation into your personal computer or workstation. Please read this chapter carefully before attempting to install the card.
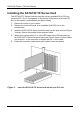
SATA150 TX2plus, TX4 User Manual Installing the SATA150 TX Series Card The SATA150 TX Series Controller card fits into any available 32-bit PCI slot (must be PCI 2.2 or 2.3 compliant). It also fits the 32-bit portion of a 64-bit PCI slot, on the system’s motherboard (see figure below). 1. Remove the cover of your system. 2. Remove the inside slot cover of an available 32-bit PCI slot on the motherboard. 3. Install the SATA150 TX Series Controller card into the open slot (see Figure 1 below).
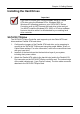
Chapter 2: Getting Started Installing the Hard Drives Important If you wish to include your current bootable Serial or Parallel ATA drive using the Windows NT4.x, Windows 2000, or Windows XP operating system on your SATA150 TX Series Controller card, do NOT connect the hard drive to the card yet. You MUST install the Windows NT4, 2000, or XP driver software first onto this drive while it is still attached to your existing hard drive controller.
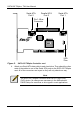
SATA150 TX2plus, TX4 User Manual Serial ATA Port 2 Parallel ATA Port 3 Serial ATA Port 1 Pin 1–Blue Connector LED Pins Figure 2. 4. SATA150 TX2plus Controller card. Attach one Serial ATA data cable to each hard drive. Then attach the other ends of the cables to one of the Serial ATA ports on the SATA150 TX2plus card. All of the connectors are keyed so they will only attach one way. Note The SATA150 TX2plus Controller card is a PCI Plug-n-Play (PnP) device.
Chapter 2: Getting Started SATA150 TX4 The SATA150 TX4 Controller card supports up to four Serial ATA hard drives. 6. Install all of the hard drives into the hard drive bays of your system, including their power cables. 7. Attach one Serial ATA data cable to each hard drive. Then attach the other ends of the cables to one of the Serial ATA ports on the SATA150 TX4 card. All of the connectors are keyed so they will only attach one way. Port 4 Figure 3.
SATA150 TX2plus, TX4 User Manual Cache Settings A Cache Config utility is included with your SATA150 TX series card. To install Cache Config, copy the Cache Config.exe file to your desktop, Start menu or other convenient place on your computer (right). 1. To open Cache Config, double-click on the icon. The Cache Config dialog box opens (below). 2. In the window, click on the SATA150 TX series controller icon. The Turn On/Off Cache option becomes available. 3.
Chapter 2: Getting Started 5. Click on Write Through to set the disk drive cache to Write Through or Write Back to set the disk drive cache to Write Back. 6. Repeat steps 4 and 5 for every disk drive attached to your SATA150 TX series controller card. 7. When you are done making cache settings, click the OK button. The utility will offer to restart your system (right). 8. Click Restart now to restart your computer immediately. Click Don’t Restart if you want to postpone the restart until later.
SATA150 TX2plus, TX4 User Manual 10
Chapter 3: Installing Software Drivers Following are driver installation procedures for the Windows operating systems that support the Promise SATA150 TX Series Controller. The SATA150 software drivers for Windows are included on the driver diskette. Drivers and installation instructions for Linux and Novell operating systems are downloadable from the Promise website at www.promise.com. Important If you wish to include your current bootable ATA drive using the Windows NT4.
SATA150 TX2plus, TX4 User Manual New Windows XP Installation The following details the installation of the SATA150 TX Series drivers while installing Windows XP. 1. Start the installation: • Floppy Install: Boot the computer with the Windows XP installation diskettes. • CD-ROM Install: Boot from the CD-ROM. Press F6 when the message “Press F6 if you need to install third party SCSI or RAID driver” appears. 2. When the Windows XP Setup window is generated, press S to specify an Additional Device(s) 3.
Chapter 3: Installing Software Drivers Existing Windows XP Installation After installing the SATA150 TX Series card and rebooting your system, Windows XP setup will show a “Found New Hardware” dialog box. Under Windows XP, “RAID Controller” will be displayed. 1. Insert the SATA150 TX Series driver diskette into the A:\ drive. 2. Choose Install the software automatically and press the Enter key. 3.
SATA150 TX2plus, TX4 User Manual New Windows 2000 Installation The following details the installation of the SATA150 TX Series drivers while installing Windows 2000. 1. Start the installation: • Floppy Install: Boot the computer with the Windows 2000 installation diskettes. • CD-ROM Install: Boot from the CD-ROM. Press F6 when the message “Press F6 if you need to install third party SCSI or RAID driver” appears. 2.
Chapter 3: Installing Software Drivers Existing Windows 2000 After installing the SATA150 TX Series card and rebooting your system, Windows 2000 setup will show a “New Hardware Found” dialog box. Under Windows 2000, “RAID Controller” will be displayed. 1. Insert the SATA150 TX Series driver diskette in drive A:\. 2. Choose Search for a suitable driver for my device (Recommended) from the list, then click Next. 3. Choose Floppy disk drives from the list, then click Next.
SATA150 TX2plus, TX4 User Manual New Windows ME Installation The following details the installation of the SATA150 TX Series drivers while installing Windows ME. 1. Install the SATA150 TX Series controller card into your system. 2. Install Windows ME fully. 3. After installation, right-click on My Computer and select Properties from the popup menu. 4. In the System window, choose the Device Manager tab. 5. In the hierarchical display under Other Devices is a listing for PCI RAID Controller.
Chapter 3: Installing Software Drivers Existing Windows ME Installation The following section details the installation of SATA150 TX Series drivers on a system that has Windows ME already installed and running. 1. After installing the SATA150 TX Series controller card and configuring the hard drives, power up the system and boot. 2. The Add New Hardware Wizard will appear, informing you that it has found a PCI Mass Storage Controller. 3.
SATA150 TX2plus, TX4 User Manual New Windows NT4.x Installation The following details the installation of the SATA150 TX Series drivers while installing Windows NT4.x. 1. Start the system installation by booting from the Windows NT disk: • Floppy install: boot the system with the Windows NT installation diskettes. • CD-ROM disk install: boot from the CD-ROM disk and press F6 when the message “Setup is inspecting your computer’s hardware configuration…” appears. 2.
Chapter 3: Installing Software Drivers Existing Windows NT4.x Installation The following section details the installation of SATA150 TX Series drivers on a system that has Windows NT4.x already installed and running. NOTE: Do not attach the boot drive or any other hard drive to the SATA150 TX Series controller card before completing this step. 1. From the Start menu, choose Settings. 2. From the Settings menu, choose Control Panel. 3. Double-click the SCSI Adapters icon.
SATA150 TX2plus, TX4 User Manual New Windows 98 Installation The following section details the installation of the SATA150 TX Series drivers while installing Windows 98. 1. Install the SATA150 TX Series controller card and configure the hard drive(s), partition and format your hard drive(s), if necessary. 2. 3. 4. 5. 6. 7. Install Windows 98 normally. After installation, go the Start menu and choose Settings. From the Settings menu, choose Control Panel.
Chapter 3: Installing Software Drivers Existing Windows 98 Installation The following section details the installation of SATA150 TX Series drivers on a system that has Windows 98 already installed and running. 1. After installing the SATA150 TX Series controller card and configuring the hard drives, power up the system and boot Windows. 2. The “Add New Hardware Wizard” will appear, informing you that it has found a “PCI Mass Storage Controller.” 3. Click Next.
SATA150 TX2plus, TX4 User Manual 22
Chapter 4: Troubleshooting Frequently Asked Questions This section lists frequently asked questions involving pre-installation, drive issues, installation, and post-installation. Q. What is meant by the following warning that appears in the SATA150 TX2 BIOS? “[warning] because of 40-conductor cable(s) used, dx would be down to ultra33 mode. please use 80-conductor cable(s) if ultra66 or above mode wanted” A.
SATA150 TX2plus, TX4 User Manual Q. Why does FDISK report a much lower drive capacity if a single drive exceeds 64GB? A. The version of FDISK.EXE that is included with Windows 98 and ME does not correctly report the capacity of drives that exceed 64GB. This is a cosmetic, not actual, limitation. Microsoft has an updated version of FDISK.EXE that corrects this problem. Go to http://support.microsoft.com for an updated version of FDISK.EXE and more information. Q. While booting Windows NT4.
Chapter 4: Troubleshooting Contacting Technical Support Promise Technical Support provides several support options for Promise users to access information and updates. We encourage you to use one of our electronic services, which provide product information updates for the most efficient service and support.
SATA150 TX2plus, TX4 User Manual European Tech Support E-mail Support support@promise.nl Fax Technical Support +31 (0) 40 256 94 63 Attention: Technical Support Phone Technical Support +31 (0) 40 256 94 61 8:30-5:00pm The Netherlands Time If you wish to write us for support: Promise Technology Europe B.V. Attn: Technical Support 1European Business Centre, Unit 1.25 Luchthavenweg 81 5657 EA Eindhoven, The Netherlands Pacific Rim Sales Office E-mail Support support@promise.com.
Chapter 4: Troubleshooting Limited Warranty Promise Technology, Inc. (“Promise”) warrants that for two (2) years from the time of the delivery of the product to the original end user: a) the product will conform to Promise’s specifications; b) the product will be free from defects in material and workmanship under normal use and service.
SATA150 TX2plus, TX4 User Manual Promise’s sole responsibility with respect to any product is to do one of the following: a) replace the product with a conforming unit of the same or superior product; b) repair the product; c) recover the product and refund the purchase price for the product.
Chapter 4: Troubleshooting Returning Product For Repair If you suspect a product is not working properly, or if you have any questions about your product, contact our Technical Support Staff through one of our Technical Services, making sure to provide the following information: • • • • • Product model and serial number (required) Return shipping address Daytime phone number Description of the problem Copy of the original purchase invoice The technician will assist you in determining whether the product
SATA150 TX2plus, TX4 User Manual When repairing returned product(s), Promise may replace defective parts with new or reconditioned parts, or replace the entire unit with a new or reconditioned unit. In the event of a replacement, the replacement unit will be under warranty for the remainder of the original warranty term from purchase date, or 30 days, whichever is longer. Promise will pay for standard return shipping charges only.