
Computer Hardware User Manual

SuperTrak EX Series User Manual
66
• Read Cache Policy – Choose from Read Cache, Read Ahead, or No
Cache.
• Axle – RAID 50 and 60 logical drives only. Choose the number of axles
or choose 0 to let the controller decide for you.
5. Highlight Save Configuration and press Enter.
At this point you can create additional logical drives, if there is space
remaining on your disk arrays. To create another logical drive, repeat steps 2
though 5 above.
6. Press the F10 key to exit the SuperBuild utility and press Y to confirm and
restart the computer.
Do not press the Ctrl-Alt-Del keys. Do not press the Esc key.
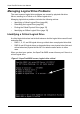
Initializing a Logical Drive
Promise recommends that you Initialize your logical drives immediately after you
create them. Initialization sets all data bits in the logical drive to zero, removing
any residual data left behind from earlier configurations. You can also perform an
Initialization on an existing logical drive.
1. In the Main Menu, highlight Logical Drive Management and press Enter.
The Logical Drive Management screen displays.
2. Highlight the logical drive you want to initialize and press Enter.
3. Highlight Initialization Start and press Enter.
A message appears at the bottom of the screen.
4. Choose one of the following actions:
• For a Full Initialization, press F.
• For a Quick Initialization, press Q.
• To cancel Initialization, press C.
Important
• Promise recommends that you Initialize your logical drives
immediately after you create them.
• You must be partition and format your new logical drives
before your operating system will recognize them.
Warning
When you initialize a logical drive, you delete all data on the
logical drive. Be sure to backup any important data before you
initialize a logical drive!